
Advertisement

Morris Minor Traveller buyer’s guide
The Morris Minor Traveller combines the accessibility of its saloon sibling with practicality and undeniable charm. Here’s how to buy one
Words: Paul Wager
This isn’t the first guide we’ve published to the wood-framed Moggy and it’s unlikely to be the last, such is the constantly evolving nature of the classic car scene.
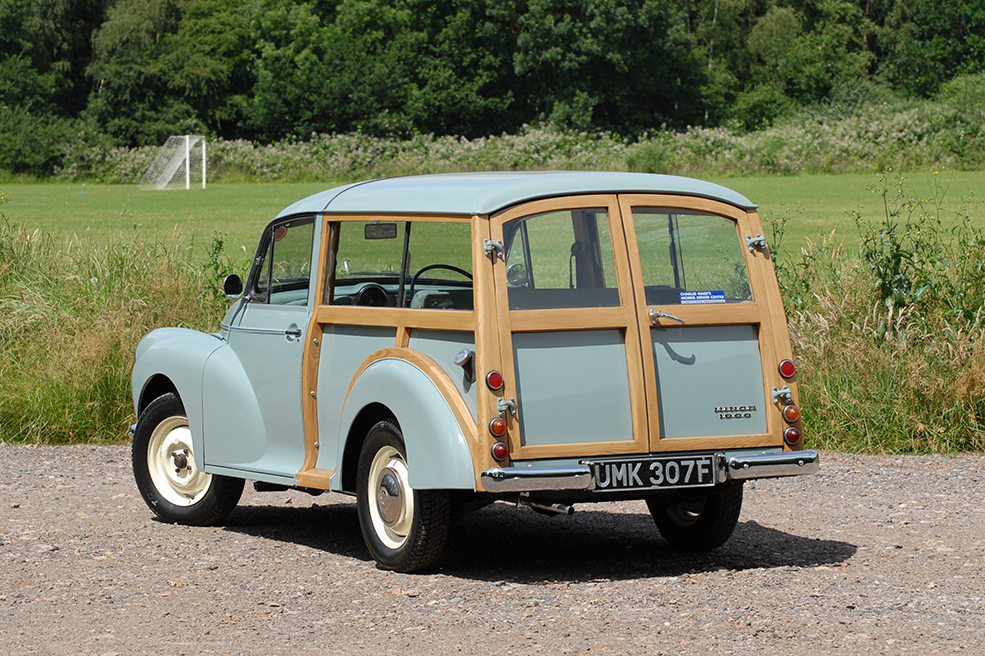
Today the ultra-practical Traveller is one of the more-sought-after Minor variants, alongside the commercial derivatives with which it has so much in common but its wooden rear bodywork framing means it needs more care than all of them.
Not so long ago, the Traveller was still being overlooked in favour of the regular Minor saloon but that wooden jigsaw is in fact structural and neglected examples deteriorated quickly.
Luckily, renewed interest in the Traveller together with its easy ownership experience, great parts support and those double doors allowing easy access for dogs and luggage alike means the gap between neglected and presentable cars has widened and the tatty ones now stand out.
The Morris Minor arrived in breathless sidevalve form in 1948, with the Traveller added to the range in 1953 just as the new A-Series engine replaced the old Morris engine.
In 1956 the Minor 1000 arrived, with a one-piece screen and the stronger 903cc, 37bhp version of the A-Series engine paired with an improved gearbox and higher final drive. These changes shaved an incredible 20 seconds off the 0-60 time.
Flashing indicators were added in 1961, while in 1962 the engine was enlarged again to 1098cc and 48bhp, paired with stronger synchromesh, a 7.5-inch clutch and larger eight-inch front brake drums. In 1963 revised light clusters gained separate orange segments for the indicators, while the clap-hands wipers were swapped for the modern tandem type.
A key starter was fitted from October 1964 and the passenger glovebox received a lid, the seats became a single colour and a plainer safety steering wheel was fitted. And that was pretty much it as BMC concentrated on the Mini and the 1100 before Minor production was wound down, the convertible ending in 1969, the saloons in November 1970 and the Traveller clinging on until April 1971.
The Minor was an early example of unitary construction and to ensure the strength of the bodyshell it’s a more complex affair than you might expect given the utilitarian nature of the car, with plenty of double-skinned areas.
Like the commercial versions, the Traveller uses a hybrid construction with the unitary front end of the saloon and a chassis for the rear section. Throw in the complexity of the wooden rear bodywork framing and the Traveller offers up the prospect of both rusty metalwork and rotten woodwork to deal with.
Starting at the front end, the Minor’s reputation as a DIY-friendly classic means many have received the attentions of the home welder but there are plenty of box sections and double-skinned areas which makes repairing serious rust a tricky business.
Spend time in the workshops of any Minor specialist and you’ll see that good metal often has to be cut away in order to effect repairs inside box sections and if not done carefully, this can mean that crucial parts of the shell end up out of alignment. Workshops performing extensive body repair on the Minor shell will often fit cross-bracing before embarking on major metal surgery to prevent this.
Sills and floors covered in small patch repairs are a sure sign of the DIY welding torch, while the fit of the doors is a good clue as to the alignment of the A-pillar and sills… although do remember that this is a 1940s Morris so don’t expect Lexus-level panel gaps.
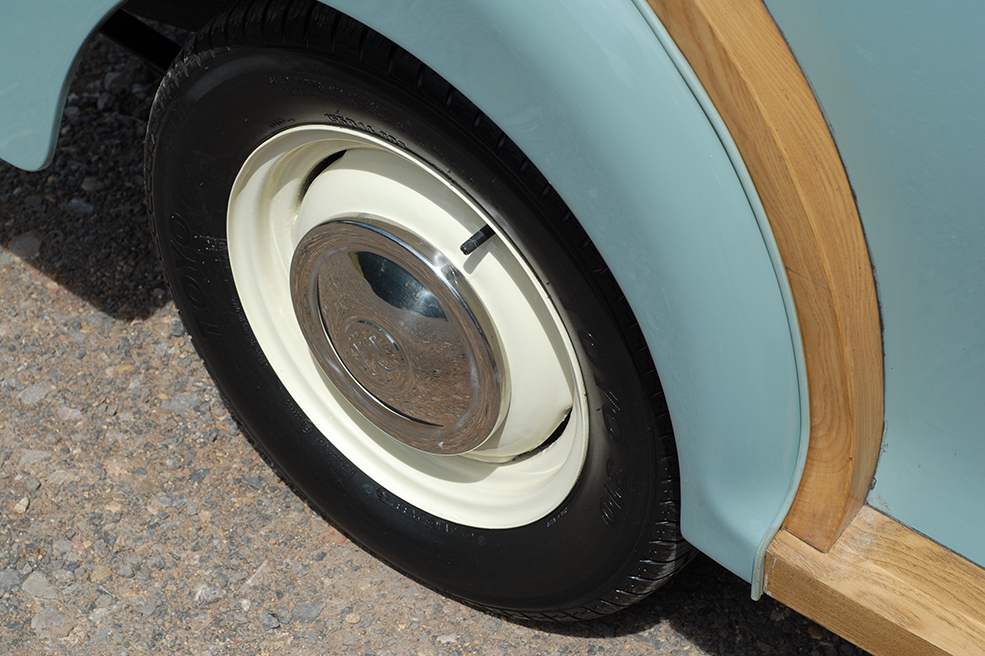
The gap between the front wings and bonnet is another clue as to the quality of previous work. The wings bolt on and if the mounting flange or the general inner arch and bulkhead have been disturbed then they won’t fit properly. A stack of washers under the mounting bolts indicates a quick fix.
Meanwhile, check the traditional Minor rust spots: the crossmembers under the front seats and the inner part of the sills under the carpets. The front crossmember which supports the front suspension torsion bars is also critical, while the floors are also worth a check.
Other rust should be obvious, like crusty door bottoms and frilly headlight apertures, but all the panels you’ll need are available.
Moving rearwards, the chassis metalwork obviously needs to be sound, especially the spring hanger areas for the rear suspension, but it is at least easy to see any problems.
The elephant in the room is that wooden rear bodywork framing which is in fact structural and can be weakened alarmingly if rot has set in. The standard test for wooden-framed bodywork like this is to squeeze the wooden sections firmly by hand and if they give at all then you need to suspect the worst.
Visible mould in the joints is also a bad sign, as are obviously home-made repairs, since this is a complex structure with precise joints and school woodwork lessons won’t have covered the necessary skills.
Yes, you can buy complete replacement wood sets but fitting them isn’t a simple task, since the cars all vary slightly which means inevitably some alteration will be needed. It’s not impossible for the DIY restorer but time-consuming to do properly.
The bodywork also needs to go together in the right order, since the wooden frame must be assembled and aligned first, then the roof skin is nailed (yes, nailed) in place and then a finishing gutter strip added to conceal the nails. The rear doors must also be adjusted to open and close perfectly and the entire process takes even Minor specialists quite some time, often requiring the chassis to be jacked up at the rear corners to square things up during assembly.
Engine and transmission
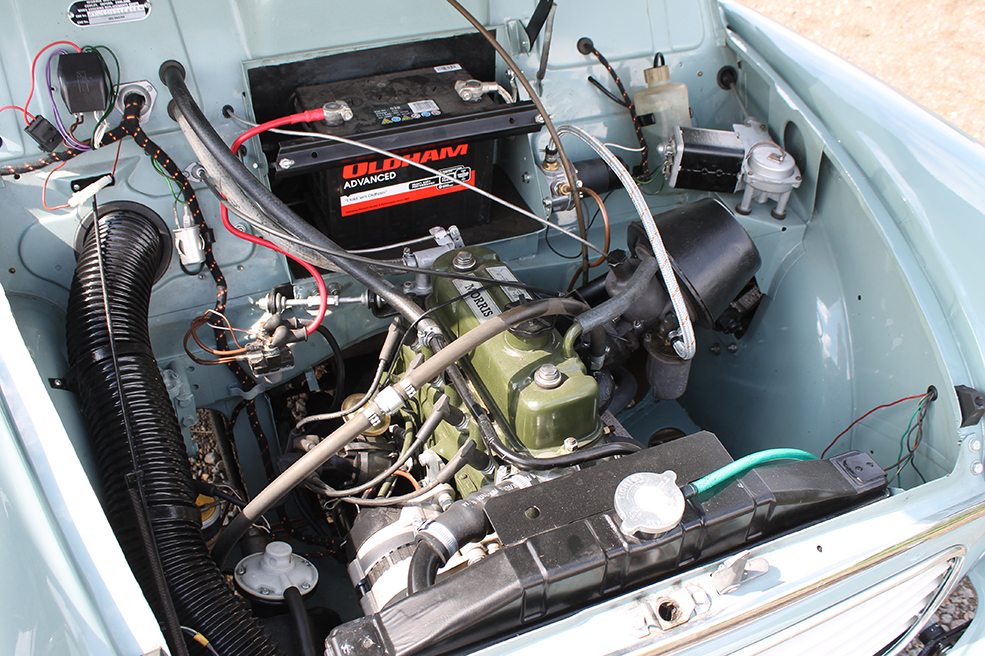
The early 803cc A-Series is a rare unit in the Traveller and something of a specialist proposition, so for most purposes it will be the 948 or 1098cc A-Series you’ll be looking at. The engine is very much a known quantity and problems should be both obvious and easy to diagnose. Smoking suggests tired valve seals or guides and as for oil leaks, it’s often said that a Minor not leaking a bit of oil is probably empty. If an oil leak is really bad, then suspect the rear crankshaft oil seal, or the front seal. The sump gasket and the rocker cover gasket are also prone to leak.
The strongest gearboxes came with the 1098cc cars, but worn synchromesh can arise on all examples, giving crunchy changes – after all, even the youngest is still over 50 years old. Either learn to live with it or hunt down a good used replacement if you don’t fancy the cost of a rebuild. If the box jumps out of gear as you lift off the throttle sharply, it’s harder to live with and will need more immediate attention.
No Minor ever featured synchromesh on first gear, so if you plan to do a lot of town driving then learn the double-declutching technique to achieve a crunch-free change down to first on the move. It’s a satisfying skill and much better than slipping the clutch in stop-and-go traffic.
Suspension, steering and brakes
The Minor uses a kingpin design for the front suspension which means regular greasing is required. Check for evidence that the grease nipples have been used within living memory and also check the trunnions for wear: with the front wheel off the ground, grasp the tyre and top and bottom and attempt to waggle it, with any significant movement evidence that work is needed.
If the rear end seems to be sitting low, the rear leaf springs may simply have sagged and if the ride is excessively bouncy, suspect the lever arm dampers are past their best. Reconditioned units are around £70 a pair and simple to fit.
Standard braking kit is unassisted drums all round and when set up properly and in good order, they do stop the 800kg Minor perfectly well. By today’s standards the pedal pressure required is high though, which can put off drivers used to modern cars, especially in urban traffic and a useful upgrade is a remote brake servo. This works well with the standard drum system and although a front disc conversion is a popular upgrade, it depends on how you intend to drive the car.
Interior, trim and electrics
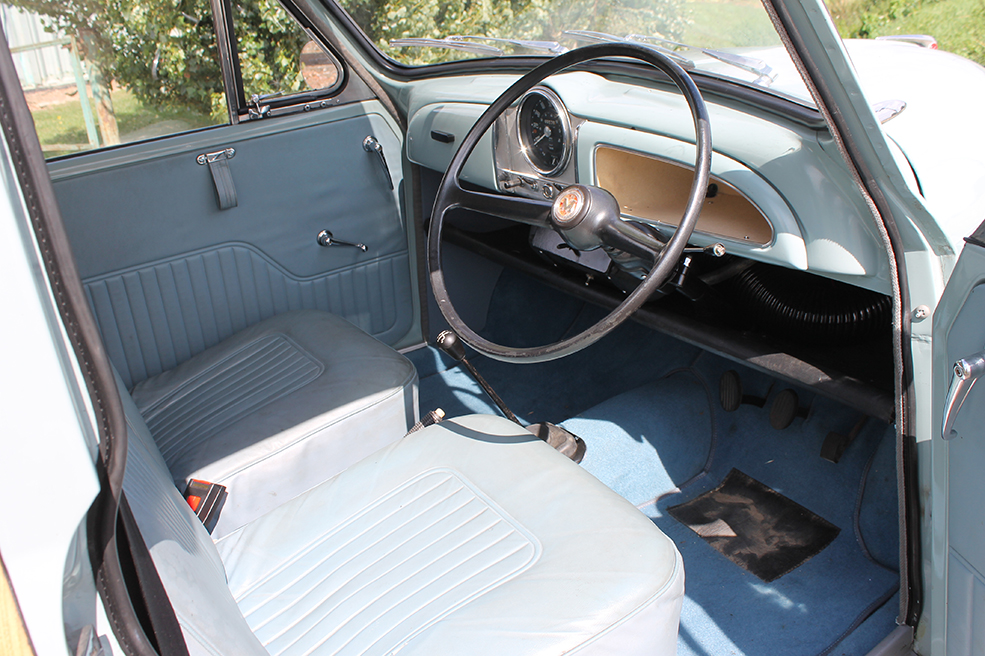
The Minor’s cabin is both small and relatively spartan, meaning that a tired interior needn’t put you off at the right price. Indeed, smartening up a shabby cabin can be a rewarding DIY project, with all the parts available from the likes of Newton Commercial. Carpet sets involve some glueing and cutting but it’s all basic DIY, while the seat covers and padding can be stripped off the existing frames with basic hand tools and replaced with new ones.
Many Travellers are trimmed in the rear with offcuts of old domestic carpet but the original Hardura material is still available.
In standard form, the Minor’s electrical kit amounts to little more than lights, heater fan and wipers which means the original dynamo is up to the task. The demands of modern life such as brighter headlights, modern audio and phone charging socket will mean that the dynamo can struggle to charge at idle speeds, so an alternator upgrade is a good move.
Morris Minor Traveller: our verdict
The Morris Minor Traveller must be one of the most practical classics going: in 1098cc form it has the pace to keep up with modern traffic, there’s not a single part you can’t buy off the shelf and those opening rear doors and square load compartment give it the practicality of a small van. What’s more, running costs are no greater than a modern hyper-economical hybrid supermini.
Where it will bite you though is in restoration costs if you buy a bodged or rotten example, so be diligent and view several examples to get an idea of how a good one should feel. Remember, the bodywork is always going to be more expensive than the oily bits.
Morris Minor Traveller timeline
Morris Minor introduced as saloon only
Morris Minor Traveller introduced
A-Series engine introduced
Engine enlarged to 948cc
Flashing indicators replace trafficators
Engine enlarged to 1098cc, with improved synchromesh, larger clutch and bigger brake drums
1963 Lamp clusters gain orange indicator lenses
Key starter and passenger glovebox lid added
Morris Minor Traveller production ends

You may also like...

30th April 2024
Best Ford Colgone V6 classics
Originally confined to obscure German-market saloons, the Ford Cologne V6 has powered loads of cars on both sides of the Atlantic. Here are our favourites
by James Howe
Best Ford family saloons
In the wake of the Ford Mondeo's demise, we explore Ford's classic family saloons through the years
Best forgotten Ford classics
In this Market Trends we look at three largely forgotten Fords; the Mk2 Consul, Cougar and Probe.
by Matt Bell

No thanks, I’m not interested!
- Morris Manuals
- Minor MM Series
- Workshop manual
Morris Minor MM Series Workshop Manual
- page of 444 Go / 444
Table of Contents
- General Data
- Engine (USHM2)
- The Engine Components
- Key to the Engine Components
- General Description
- Lubrication System
- Draining the Engine Sump
- Removal and Replacement of Sump
- Removal of Oil Pump
- Dismantling, Reassembling, and Replacing Oil Pump
- Removal and Replacement of Piston and Connecting Rod
- Dismantling and Reassembling Piston and Connecting Rod
- Removal and Replacement of Piston Rings
- Fitting Gudgeon Pins
- Piston Sizes and Cylinder Bores
- Removal and Replacement of Main and Big-End Bearings
- Removal and Replacement of Engine
- Removal and Replacement of Power Unit
- Removal of Timing Cover
- Replacement of Timing Cover
- Removal and Replacement of Timing Chain
- Removal and Replacement of Carburetor
- Removal and Replacement of Inlet and Exhaust Manifold
- Removal and Replacement of Cylinder Head
- Removal and Replacement of Camshaft
- To Refit the Distributor Drive Gear
- Removal and Replacement of Tappets
- Tappet Adjustment
- Checking Valve Timing
- Removal and Replacement of Flywheel
- Removal and Replacement of Crankshaft
- Regrinding of Crankshaft
- Removal and Replacement of Valves
- Decarbonizing
- Grinding and Testing Valves and Seatings
- Removal and Replacement of Valve Guides
- Oil Pressure
- Locating Troubles
- If Engine Starts but Runs Erratically
- If Engine Starts and Stops
- If Engine will Not Idle or Run Slowly
- Fitting Valve Springs
- Engine Fails to Give Full Power
- Engine Knocks
- Engine Backfires
- The Morris Minor (Seris II) Engine Lubrication
- Engine General Description
- Engine Lubrication System
- Removal and Replacement of Sump and Oil Pump Pick-Up
- Oil Pressure Relief Valve
- The Component Parts of the Morris Minor (Series II) Cylinder Blocl, Cylinder Head, Etc.
- Removal and Replacement of Water Pump
- Main Bearings
- Removal and Replacement of Inlet and Exhaust Manifolds
- Removal and Replacement of Rocker Assembly
- The Morris Engine (Series II) Moving Parts
- Removal and Replacement of Cylinder Head Assembly
- Refitting the Cylinder Head
- Grinding and Testing Valves and Valve Seatings
- Rocker Adjustment
- The Fuel System of the Morris Minor (Series II)
- Maintenance of the Fuel System
- Air Cleaner
- Induction Heaters
- Dust-Proofed Carburetors
- The Fuel System of the Morris Minor 1000
- Oil Bath Air Cleaner
- Dry-Time Air Cleaner
- The Morris Minor 1000 Oil Bath and Air Cleaner Components
- Preventing Carburetor from Freezing
- Dry-Type Air Cleaner
- HS2 Carburetor
- Induction and Carburetor Suction Chamber Heaters
- The Ignition System of the Morris Minor (Series MM)
- The Ignition System General Description
- Locating the Cause of Uneven Firing
- Testing the Low-Tension Circuit
- High-Tension Cables
- To Locate Fault
- Attention to Sparkling Plugs
- Plug Inspection
- Contact Breaker Mechanism
- Distributor Lubrication
- Removal and Replacement of the Distributor
- Ignition Timing
- Dismantling the Distributor
- Fitting New Distributor Bushes
- Reassembling the Distributor
- Later Distributor Mounting
- High-Lift Cam
- The Ignition System of the Morris Minor (Series II) and Morris Minor 1000
- The Cooling System of the Morris Minor (Series MM)
- The Cooling System of the Morris Minor (Series II)
- The Cooling System of the Morris Minor 1000
- The Clutch of the Morris Minor (Series MM)
- The Flywheel and Clutch Components
- Key to the Flywheel and Clutch Components
- Clutch General Description
- Driven Plate Assembly
- Withdrawal Bearing Assembly
- Cover Assembly
- Removal of the Clutch
- Dismantling the Clutch
- Assembling the Clutch
- Adjusting the Release Levers
- Replacement of the Clutch
- Servicing the Clutch
- Starter Ring
- Clutch Judder
- Universal Clutch Gauging Fixture
- The Clutch of the Morris Minor (Series II) and Morris Minor 1000
- The Gearbox of the Morris Minor (Series MM)
- The Gearbox Components
- Key to the Gearbox Components
- The Gearbox of the Morris Minor (Series II)
- The Morris Minor (Series II) Gearbox
- The Morris Minor (Series II) Gearbox Components
- Key to the Morris Minor (Series II) Gearbox Components
- Dismantling and Reassembling the Mainshaft
- Dismantling and Reassembling the First Motion Shaft Assembly
- Speedometer Drive Pinion
- Second Speed Synchronizer
- Bearing Packing Washers
- The Gearbox of the Morris Minor 1000
- The Morris Minor 1000 Gearbox Remote Components
- Key to the Morris Minor 1000 Gearbox Remote Components
- The Propeller Shaft of the Morris Minor (Series MM)
- Attention to Universal Joints
- Testing for Wear
- Removal of the Propeller Shaft
- Dismantling the Propeller Shaft
- To Examine and Check for Wear
- Reassembling the Propeller Shaft
- Replacement of the Propeller Shaft
- The Propeller Shaft of the Morris Minor (Series II) and Morris Minor 1000
- The Rear Axle
- The Rear Axle and Propeller Shaft Components
- Key to the Rear Axle and Propeller Shaft Components
- The Rear Axle General Description
- The Rear Axle Lubrication
- Removing and Replacing a Brake-Drum and Hub
- Removing and Replacing a Brake-Plate Assembly
- Removing and Replacing a Rear Axle Half-Shaft
- Removing the Rear Axle from the Car
- Important Points Concerning Attention
- Dismantling the Axle and Removing the Differential Assembly
- Dismantling the Differential Assembly and Crown Wheel
- Examining Parts for Wear
- Replacing the Differential Cage
- Assembling the Differential and Crown Wheel
- Replacing a Pinion
- Fitting a New Axle Casing
- Fitting a New Axle Housing Cover
- Replacing a Crown Wheel and Pinion Having Markings Different to the Original
- Reassembling the Axle
- Refitting the Axle to the Car
- Using Service Tool 18G 264
- Lubrication
- Removing and Replacing a Brake-Drum and Axle Shaft
- Removing and Replacing a Hub
- Renewing the Pinion Oil Seal
- Removing the Differential Pinions
- Replacing the Differential Pinions
- Dismantling the Crown Wheel and Pinion
- Assembling and Setting the Crown Wheel and Pinion Assembly
- Setting the Pinion Position
- Adjusting Pinion Bearing Preload
- Setting the Crown Wheel Position
- Adjusting the Backlash
- Removing and Replacing the Axle
- Modified Rear Axle Hub Bearing Nuts
- Rear Hub Oil Seal
- The Rear Road Springs
- The Shock Absorber, Radiator, Exhaust System, Petrol System, and Rear Spring Components
- Key to the Shock Absorber, Radiator, Exhaust System, Petrol System, and Rear Spring Components
- The Rear Road Springs General Description
- Removal and Replacement of the Rear Springs
- Dismantling and Reassembling the Springs
- The Steering Gear
- The Morris Minor (Series MM and Series II) Steering Gear Components
- Key to the Morris Minor (Series MM and Series II) Steering Gear Components
- The Steering Gear Maintenance
- Removal and Replacement of the Steering-Wheel
- Removal and Replacement of the Steering-Column Assembly
- Removal and Replacement of the Steering-Rack Assembly
- Dismantling the Steering Gear
- Reassembling the Steering Gear
- Checking and Setting Wheel Alignment
- Rubber Seal Steering Joints
- Eliminating Steering-Rack Rattle
- Modified Steering Ball Sockets
- The Steering Gear of the Morris Minor 1000
- Modified Steering-Column Assembly
- Direction Indicator Switch
- Steering Lock Ignition Switch
- The Front Suspension
- Trimming the Torsion Bars
- Removing a Torsion Bar
- Resetting and Replacing the Torsion Bars
- Removal and Replacement of the Swivel Pin Assembly
- Dismantling and Examining the Swivel Pin Assembly
- Removal and Replacement of the Lower Suspension Arm
- Removal and Replacement of the Brake-Drum and Hub
- Removal and Replacement of the Brake Backplate Assembly
- Modified Wheel Mounting
- Front Suspension Rattle
- Elimination of Rattle at Top Link
- Fitting Rubber-Bushed Top Links
- Modified Front Hub Grease Cap
- Modified Swivel Pin Assembly
- Swivel Pin Rethreading Procedure
- Later-Type Brake-Drums and Hubs
- Strengthened Swivel Pin Assemblies
- The Hydraulic Dampers
- The Hydraulic Dampers General Description
- The Hydraulic Dampers Maintenance
- Removal and Replacement of the Dampers
- Testing Hydraulic Dampers
- Topping up with Fluid
- Modified Dampers
- The Braking System
- Arrangement of Hydraulic Brake System
- Key to Arrangement of Hydraulic Brake System
- The Braking System General Description
- Master Cylinder
- The Braking System Maintenance
- Adjustment of the Brake Pedal
- Brake-Shoe Adjustments
- To Bleed the System
- Removing the Master Cylinder
- Dismantling the Master Cylinder
- Assembling the Master Cylinder
- Replacing the Master Cylinder
- Brake Assembly
- Removing the Wheel Cylinder
- Dismantling the Wheel Cylinder
- Assembling the Wheel Cylinder
- Replacing the Wheel Cylinder
- Removing the Flexible Hose
- Removing and Replacing the Brake-Shoes
- Relining the Brake-Shoes
- Braking Irregularities and Their Causes
- Brake Squeak
- Hand Brake Adjustment
- Brake Fluid
- Access to Brake Adjustment
- Master Cylinder (Laser Type)
- Rear Brake Backplate Abutment Pad
- Brake-Drum Seals
- Removing and Replacing Brake-Shoes (Laser Models)
- Brake-Drum Dust Seals
- Preventive Maintenance
- The Electrical Equipment
- The Electrical Equipment General Description
- Battery Routine Maintenance
- Initial Filling and Charging
- Removing and Replacing the Dynamo
- Dismantling the Dynamo
- Servicing the Dynamo
- Removing and Replacing the Starter
- Servicing the Starter
- Control Box
- Windscreen Wiper
- Fitting Second Wiper Arm
- Trafficators
- Replacement of Trafficator Arm
- Electric Horn
- Replacement Bulbs
- Light Units
- Removing and Replacing the Light Units
- Renewing Headlamp Bulbs
- Setting the Headlamps
- Cleaning Lamps
- Tail and Stop Lamp
- Number-Plate Illumination
- Panel Lamps
- Ignition Warning Lamp
- Lamp Warning Light
- Location and Remedy of Faults
- Charging Circuit
- Starter Motor
- Lighting Circuits
- Pilot Lamps
- Key to Cable Colours
- Wiring Diagram
- Installation of Traffic Indicators
- Panel Lamps and Warning Lamps
- Windowless Yoke Dynamo
- Modified Control Box
- Windtone Horn
- Interior Lamps
Advertisement
Quick Links
- Download this manual
Related Products for Morris Minor MM Series
- Morris MIP-65400
- Morris MINI-MINOR
- Morris MINI-VAN
- Morris MINI PICK-UP
- Morris MINI-TRAVELLER
- Morris MID-65356
- Morris Maxim II
- Morris MOF-64530
- Morris MVF-65374
- Morris MPH-20041S
- Morris MKV-64335
- Morris MWRS-20702LG
- Morris MOF-64520
- Morris MKV-64330
- Morris MOF-64555
- Morris MCD-8161
This manual is also suitable for:
Rename the bookmark, delete bookmark, delete from my manuals, upload manual.
- Morris Minor Owners Club
Promoting the Preservation and Use of the Postwar Morris Minor
Skip to content
- MMOC Home Board Home Technical Bodywork
Danish oil on traveller woodwork
Post by woodiesenfrance » Sat Jan 31 2009 9:32 am
Post by Declan_Burns » Sat Jan 31 2009 10:38 am
Post by aupickup » Sat Jan 31 2009 10:43 am
Post by woodiesenfrance » Sat Jan 31 2009 10:47 am
Post by aupickup » Sat Jan 31 2009 10:49 am
Post by emmerson » Sat Jan 31 2009 11:26 am
Post by Longdog » Sat Jan 31 2009 12:03 pm
Post by dalebrignall » Sat Jan 31 2009 1:46 pm
Post by woodiesenfrance » Sun Feb 01 2009 8:07 pm
Post by bmcecosse » Sun Feb 01 2009 9:52 pm
Return to “Bodywork”
- ↳ Announcements
- ↳ Events
- General Discussion
- ↳ General Discussion
- ↳ Minors On Tour
- ↳ Stolen!
- ↳ Useful Tips
- ↳ Do you know....?
- ↳ Off-Topic
- ↳ Restoration Projects
- ↳ Mechanical
- ↳ Bodywork
- ↳ Other
- ↳ Electrical
- For Sale/Wanted
- ↳ Cars for sale
- ↳ Parts for sale
- ↳ Free!
- ↳ Wanted
- ↳ Scrapyards
- Registers and Branches
- ↳ MMOC Registers and Branches Forum
- ↳ MMOC Area Forum
- ↳ MMOC Branch Forum
- ↳ Ex-Government Minors
- ↳ Series MM Register
- ↳ Custom & Modified Register
- ↳ Ex Police Register
- ↳ Concours Forum
- Problems with the Messageboard
- MMOC Home Board Home
- All times are UTC
Powered by phpBB ® Forum Software © phpBB Limited
Privacy | Terms
- Bahasa Indonesia
- Slovenščina
- Science & Tech
- Russian Kitchen
RBTH releases a special brochure – Moscow Traveller

Moscow Traveller
The Russian capital has gone through countless changes since its founding in 1147. Today this bustling city is one of the world's great metropolises — full of exhibitions and performances, new art spaces, modern parks and expanded sports venues. In recent years, Moscow has attracted the best Russian and foreign architects and urban planners, who have made significant changes not only in the city's visible fabric but also in the patterns of urban life.
This largest city in Europe is managing its growth through the expansion of subway lines, launching new forms of public transportation and an expansion of bicycle lanes. New stadiums are being built for large-scale international sporting competitions and former factories are being turned into spaces for creative expression. People of any age and profession can find a way to fit into life here. Young artists can express themselves through street art; ambitious entrepreneurs can find support for social and ecological projects. New green spaces and farmers markets are helping people embrace a healthy lifestyle.
Moscow today is a city in transition, developing a new identity for the 21st century.
RBTH is taking a deep look onto all these angles of new Moscow in our special print edition – Moscow Traveller.
Click here to get a PDF version of our brochure.
Read more about Moscow at RBTH Travel section
Subscribe to get the hand picked best stories every week.
All rights reserved by Rossiyskaya Gazeta.
to our newsletter!
Get the week's best stories straight to your inbox
This website uses cookies. Click here to find out more.
NS Energy is using cookies
We use them to give you the best experience. If you continue using our website, we'll assume that you are happy to receive all cookies on this website.
We have recently upgraded our technology platform. Due to this change if you are seeing this message for the first time please make sure you reset your password using the Forgot your password Link .
Russia’s TVEL to introduce new fuel design at Dukovany nuclear plant in Czech Republic
Nuclear Power Reactor
By NS Energy Staff Writer 30 Jul 2019
TVEL will conduct a number of pre-irradiation test for the new fuel design aimed at qualification for a licence
Project Gallery

Image: The Dukovany nuclear power plant in Czech Republic. Photo: courtesy of The State Atomic Energy Corporation ROSATOM.
TVEL, a Russian nuclear fuel cycle company and a subsidiary of Rosatom, has signed a contract with Czech national power company ČEZ to introduce the new RK 3+ modification of its VVER-440 fuel at the 2,040MW Dukovany nuclear power plant (NPP).
Prior to the introduction, TVEL will carry out a number of pre-irradiation tests for the new fuel design aimed at qualification for a licence from the Czech Republic’s State Office for Nuclear Safety.
TVEL said in a statement: “The project will also consider the operations experience of the prototype of such fuel at power unit 4 of Kola NPP in Murmansk region (Russia’s North-West, Kola Peninsula), where it has been successfully used since 2010.”
Compared to the previous generations of VVER-440 fuel, the RK 3+ design has enhanced physical and thermo-hydraulic properties.
Additionally, the new fuel design features longer fuel rod pitch, which will streamline the water-uranium ratio in the reactor core and increase the efficiency of the fuel.
The design provides an option to the engineers with the elongation of the fuel cycle at the power plant.
TVEL JSC research and development vice-president Alexander Ugryumov said: “The new project of switching Dukovany NPP to RK 3+ fuel will facilitate the optimization of the plant fuel cycle strategy, also increasing safety and economic efficiency of the power units operation.”
Dukovany nuclear power plant was commissioned in 1985
Commissioned in 1985, the Dukovany NPP has four power units powered by VVER-440 reactors. Each of the reactors has a heat capacity of 1,375MW and an electric capacity of 510MW.
The power plant generates about 13 billion kWh of electricity per annum, meeting approximately 20% of power needs in the Czech Republic.
The country also operates Temelin NPP, featuring two units with VVER-1000. The two power plants account for about 35% of the country’s total power generation capacity.
The two nuclear power plants in the Czech Republic have been operated with Russian nuclear fuel manufactured by TVEL’s Machine-Building Plant (Elektrostal, Moscow region).
Recently, TVEL secured a contract to supply nuclear fuel to the future power units 7 and 8 of the Tianwan nuclear power plant (NPP) in China.

- Latest Topics Table
- Morris Minor
- Woodies Chat
- Modified Minors
- Morris Mini
- Morris Major
- Morris Isis
- Buy, Sell & Trade
- Vendor Market
- List Archives
- Random Topic
- Who's Online?
- Add Your Car
- Top Rated Cars
- Browse Registry
- Recently Added
- Search Registry
- Random Vehicle
- Cars For Sale
- Sell Your Car
- Parts For Sale
- Buyer Safety
- Buy & Sell Forum
- MinorForum Regalia Shop
- Parts & Accessories
- Tires & Wheels
- My Order Status
- Events Calendar
- Add an Event
- Featured Build Journals
- Latest Journal Posts
- Create a Journal
- Tech Library
- Featured Articles
- Submit an Article
- Buying a Used Vehicle
- Frequently Asked Questions
- General Maintenance
- Service & Repair
- Body Repair & Paint
- Restoration
- Video Library
- Scanned Publications
- Miscellaneous
- Link Directory
- Link to This Website
- Member Services
- Parts Suppliers
- Reference & Tech
- Clubs & Registers
- Personal Sites
- Specialist Services
- General Suppliers
- Other Links
Checking and Filling Gearbox Oil
From the Morris Minor Owner's Manual, Section PP.2A
The gearbox oil level should be checked by the dipstick every 1,000 miles (1,600 km) and replenished if necessary.

Figure PP.3 - The gearbox oil filler is accessible through the aperture in the toe board
The filler plug, which also serves to indicate the oil level, is located beneath a rubber cover situated near the gear lever, and is accessible when the front carpet and rubber cover have been raised.
The gearbox must only be filled with engine oil to Ref. A (SAE 30 grade) to the level of the filler plug.
After the first 500 miles, the gearbox should be drained and filled with fresh oil. This procedure should be repeated afterwards every 6,000 miles (10,000 km).
More Articles Like This:
- Minor Adjustments & Modification Guide
- Car Bodywork 101: Lesson #5 Painting
- Morris Minor Traveller History
- LBC Fact and Fiction
- BMC A-Series Engine Codes
- Car Bodywork 101: Lesson #4 Final Paint Prep
Comments on "Checking and Filling Gearbox Oil"
Did you find this article useful? Do you have a question or comment about this article? Leave a rating or a comment below, and get instant reply notification via email If you have a long question, or a question not directly related to this article, please start a new topic in the Discussion Forums
Want to leave a comment or ask the owner a question? Sign in or register a new account — it's free
Bookmark and Sharing
Click any icon to bookmark this page with your choice of services. Hover the mouse to see where a link goes. Don't see your favourite service? Contact the webmaster with details.

article/308
IMAGES
VIDEO
COMMENTS
In reply to # 4737 by neil4030 Woodies of West Sussex have been in the business of maintaining and restoring traveller wood since the eighties. They are the recognized UK expert in the field. They recommend a mix of 90% Blackfriar's Exterior Gloss varnish with 10% Owatrol oil. Sand first then apply three or four coats with 24 hours between coats.
Joined: Fri Oct 28, 2005 7:58 pm. Location: Near Pontypool, S.Wales. MMOC Member: No. by emmerson » Sat Apr 11, 2009 7:29 am. Danish oil, on new wood, with three coats of Cuprinol first. The more coats of Danish Oil I put on, the better it looks. Takes a long time to dry, though. dalebrignall. Minor Legend.
After Sir Alec Issigonis designed the Morris Minor, it went on to become a popular classic car. Of all the models to be produced, the Morris Traveller is perhaps the most striking in terms of appearance. With an ash wood frame and two side-hinged rear doors, the Traveller was billed as an estate model.
There is no right answer. If you put 10 Traveller owners in a room, you'll get at least 12 different views. For original good looks and lovely light wood, then varnish is the best, BUT if you want to use the car and let it out in anything other than mild sunshine, then other treatments rule. I like Burgess wood sealer.
The definitive Morris Traveller arrived in 1956, fitted with the larger 948cc A-Series engine as well as a larger curved windscreen and tweaks to the interior. Taller gearing made the magic 70mph attainable at last, while a remote change gearshift also made life easier. Meanwhile, wider opening doors made access better from 1959 but more ...
Traveller - new wood treatment. by Duke » Sat Nov 18, 2006 8:55 pm. Has anybody out there tried using a marine preparation called DEKS OLJE for treating traveller new woodwork? It is a two stage preparation, the first, lots of coats which soak into the wood and, the second is a breathable top coat giving a gloss finish.
We've joined forces with Cambrian Classics Ltd to show how the woodwork is replaced on a 1967 Morris Minor Traveller - the factory woodie built from 1953 unt...
The Morris Minor arrived in breathless sidevalve form in 1948, with the Traveller added to the range in 1953 just as the new A-Series engine replaced the old Morris engine. In 1956 the Minor 1000 arrived, with a one-piece screen and the stronger 903cc, 37bhp version of the A-Series engine paired with an improved gearbox and higher final drive.
Normally, the bar would not clear a Minor oil pan, but with the Toyota engine, there was just enough space. ... 1955 Morris Minor Traveller (Modified) Engine Toyota 4A-GE DOHC 16-valve inline-four, cast-iron block and aluminum alloy cylinder head Displacement 1,587 cc Horsepower 112 @ 7,200 RPM (at the rear wheels; approx. 140 at the crank ...
This Trafalgar Blue 1968 Minor 1000 Traveller is the treasured pet of David Toy of Cape St. Claire, Maryland. Despite having a collection that includes a Cobra replica, a Porsche 911 and a brace ...
View and Download Morris Minor MM Series workshop manual online. Minor MM Series engine pdf manual download. Also for: Minor ii series, Minor 1000. ... The Morris Minor 1000 Oil Bath and Air Cleaner Components. Preventing Carburetor from Freezing. ... Morris MINI-TRAVELLER; Morris MID-65356; Morris Maxim II; Morris MOF-64530; Morris MVF-65374 ...
Morris Minor Owners Club. ... A member of the French Minor Club has acquired a traveller in vgc, the wood has been treated with danish oil. ... (& to re-oil it regularly) The traveller lives in a chilly part of France, not the hot south, and has to be outside a lot of the time Thaks in advance for your help. Top.
This 1961 Morris Minor Traveller is finished in beige over red vinyl upholstery and is powered by a 1,098cc inline-four paired with a four-speed manual transmission. The car was acquired by the current owner in 2012, and subsequent work involved overhauling the brakes, refinishing the 14" wheels, and adding a windshield visor and Motorola AM ...
New Moscow downtown specialty shop Ampersand Oil and Vinegar Tap House features 32 infused oils and vinegars on tap, flavored natural salts, artistic culinary tools, gift…
RBTH is taking a deep look onto all these angles of new Moscow in our special print edition - Moscow Traveller. Click here to get a PDF version of our brochure. Read more about Moscow at RBTH ...
TVEL, a Russian nuclear fuel cycle company and a subsidiary of Rosatom, has signed a contract with Czech national power company ČEZ to introduce the new RK 3+ modification of its VVER-440 fuel at the 2,040MW Dukovany nuclear power plant (NPP). Prior to the introduction, TVEL will carry out a number of pre-irradiation tests for the new fuel ...
The chief executive of French oil company Total, Christophe de Margerie has died in an air crash in Moscow.Airport officials say the business jet he was trav...
1960 Morris Minor Tourer Ex vintage Mini racer Edited 1 time(s). Last edit at 2020-06-29 04:16 PM by minimarc. Reply. ... The oil offered by Moss looks good too, and has a bit higher ZDDP (1400-1500 ppm versus 1250 for the Castrol 5W-50 Edge), although it seems more expensive. The gearbox oil used in the past was Castrol Hypoy C 80/90w or more ...
From the Morris Minor Owner's Manual, Section PP.2A. The gearbox oil level should be checked by the dipstick every 1,000 miles (1,600 km) and replenished if necessary. The filler plug, which also serves to indicate the oil level, is located beneath a rubber cover situated near the gear lever, and is accessible when the front carpet and rubber ...