How to Inspect Element on Safari for Mac
This is how you Inspect Element on Safari for macOS

When you know how to Inspect Element on Safari for Mac, you can delve into the HTML and CSS code of a web page, to see how it's really functioning behind the scenes or to make changes to how the site looks or functions (these are only temporary and the changes will be discarded after you close your browser).
If you're on a website you've built, you can use Inspect Element to debug issues with a page's front end.
Chrome and Firefox users will be used to simply right clicking on a page element and then selecting Inspect Element. However, with Safari the Inspect Element feature is not enabled by default, so you may be scratching your head about where to find it, especially if you're unfamiliar with Apple's browser. To enable Inspect Element, you first have to switch on Safari's Developer Menu.
If you aren't sure how, fear not, as this guide will show you exactly how to Inspect Element on Safari. All you need to do is read on.
- In Safari, click Safari in the tool bar
- Click Settings and head to Advanced
- Check Show Develop menu in menu bar
- On a webpage, right click an element
- Click Inspect Element
Read on to see illustrated instructions for each step.

1. Open Safari's settings

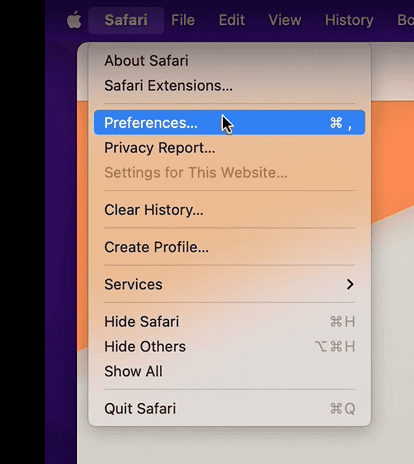
With the browser open, click Safari in the top left, then click Settings .
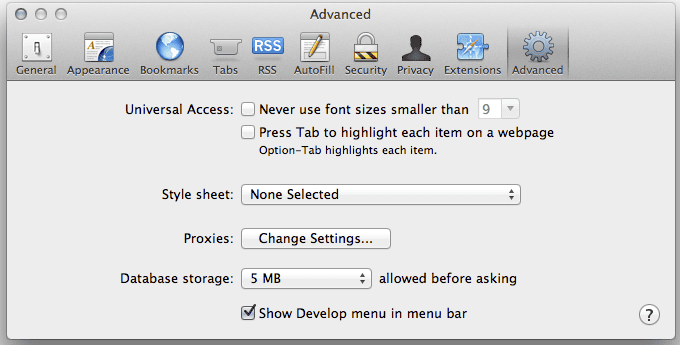
2. Under Advanced, enable the Develop menu

Click the Advanced tab , then check Show Develop menu in the menu bar . You can now close the Settings window .
3. Right click and select Inspect Element

Right click a page element and select Inspect Element from the menu.
4. Inspect the page code

You can now inspect the page code in HTML and CSS. Have fun!
If you'd like to learn more ways to get the most out of your Mac, we have lots of helpful tutorials just like this one. Find out how to enable macOS beta updates , so you can see and test the new features coming to your Mac in upcoming OS releases. I
f your Mac is behaving a little sluggishly, learn how to clear the cache on Mac , as this may help speed things back up. If you're sick of screenshots sitting on your desktop and spoiling your clean background, discover how to change the screenshot save location on Mac . Messy desktop? Learn how to use desktop stacks on Mac .
Sign up to get the BEST of Tom's Guide direct to your inbox.
Here at Tom’s Guide our expert editors are committed to bringing you the best news, reviews and guides to help you stay informed and ahead of the curve!
Peter is Reviews Editor at Tom's Guide. As a writer, he covers topics including tech, photography, gaming, hardware, motoring and food & drink. Outside of work, he's an avid photographer, specialising in architectural and portrait photography. When he's not snapping away on his beloved Fujifilm camera, he can usually be found telling everyone about his greyhounds, riding his motorcycle, squeezing as many FPS as possible out of PC games, and perfecting his espresso shots.
Google Chrome just got 3 AI features that look like a game changer — here’s what’s new
Chrome could get some important energy saving upgrades — what we know
I review gaming laptops for a living — and I’d recommend these 7 over a PS5 Pro
Most Popular
- 2 NYT Strands today — hints, spangram and answers for game #204 (Monday, September 23 2024)
- 3 Samsung Galaxy S25 Ultra leaks just tipped biggest design changes
- 4 Apple TV Plus top 10 shows — here's the 3 worth watching now
- 5 JLAB JBuds Sport ANC 4 review: Bargain sports buds with strong bass
Inspecting Web Pages in Safari on macOS: Developer Tools
Noah Walker
July 27, 2024

Safari’s Web Inspector lets you examine web pages on macOS. It’s a handy tool for web developers and curious users alike. To use Web Inspector, you need to turn it on in Safari’s settings.
Once enabled, Web Inspector opens up a world of web page details. You can see the HTML, CSS, and JavaScript that make up a page. This tool helps you find bugs, test designs, and learn how websites work.
Web Inspector is easy to use. Right-click on any part of a web page and select “Inspect Element.” A new window pops up with all the page’s code. You can change things and see the results right away on the page.
Safari’s Arsenal of Inspection Tools
Opening the develop menu.
To harness Safari’s developer tools, you first need to activate the “Develop” menu. Navigate to Safari > Preferences > Advanced and check the box next to “Show Develop menu in menu bar.” This unlocks a suite of tools designed to enhance your web development workflow.
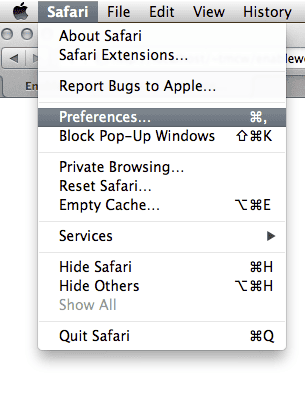
1. Click Preferences In The Safari Menu
2. Click the Advanced Tab
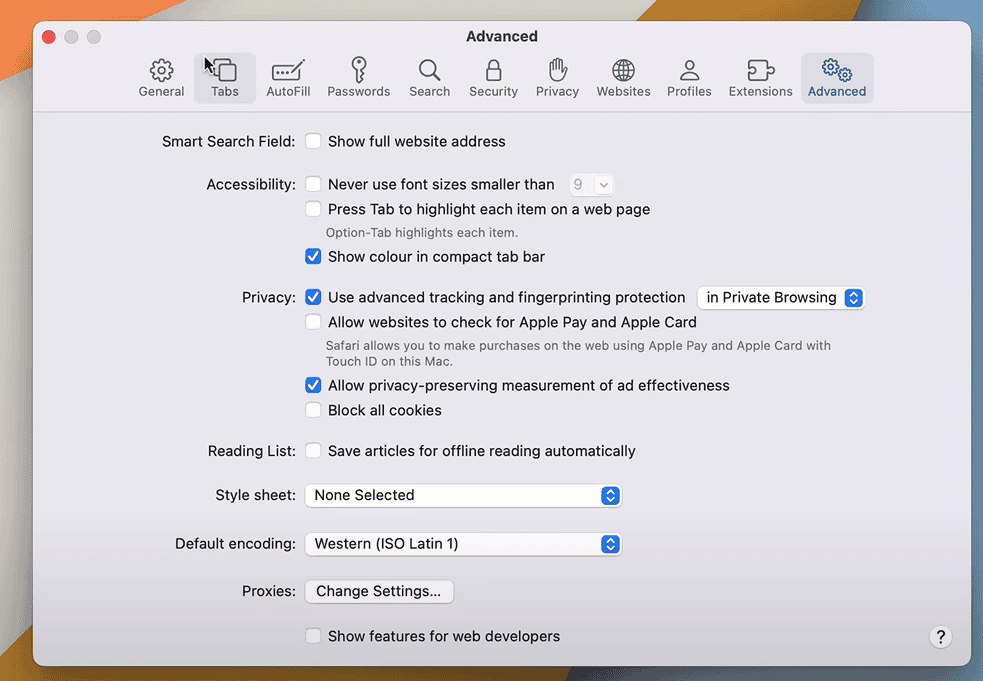
3. Check Show Features For Web Developers

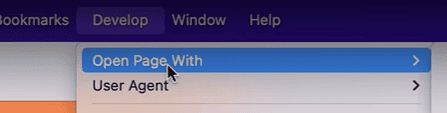
4. The Develop Menu Will Show
Inspecting Elements with Precision
The “Inspect Element” tool is your gateway to understanding a webpage’s structure. Right-click on any element and choose “Inspect Element.” A panel will appear, displaying the HTML, CSS, and JavaScript code responsible for that element’s appearance and behavior.
Debugging JavaScript Code
Safari’s JavaScript console is essential for identifying and fixing errors in your code. Use the console to log messages, inspect variables, and step through your code’s execution. You can access the console from the Develop menu or by pressing Option + Command + C .
Monitoring Network Activity
The Network tab in Safari’s developer tools provides a detailed view of all network requests made by a webpage. This can help you diagnose performance bottlenecks, identify slow-loading resources, and optimize your website’s loading speed.
Responsive Design Testing
Safari’s responsive design mode allows you to simulate different screen sizes and devices to ensure your website looks and functions correctly across a wide range of platforms. This feature is invaluable for creating responsive websites that adapt to various screen resolutions.
Additional Developer Tools

Key Takeaways
- Safari’s Web Inspector must be turned on in settings
- Web Inspector shows the code behind web pages
- You can use Web Inspector to test and learn about websites
Enabling Web Inspector in Safari
Web Inspector is a powerful tool for examining web pages in Safari. It lets you view code and debug issues.
The keybinding is: ⌘⌥i
Show Develop Menu in Menu Bar
To use Web Inspector, you need to turn on the Develop menu first. Open Safari and click Safari > Preferences in the top menu bar. Click the Advanced tab. Check the box next to “Show Develop menu in menu bar.”
The Develop menu will now appear in Safari’s menu bar. This menu has many useful options for web developers.
Accessing Web Inspector Features
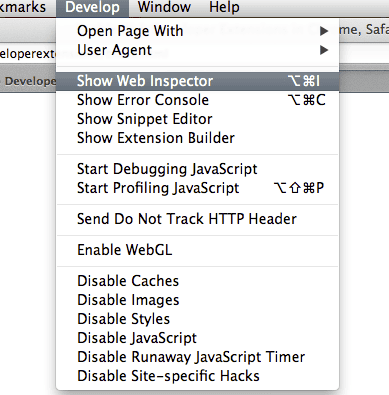
Once the Develop menu is visible, you can open Web Inspector. Go to the web page you want to check. Click Develop > Show Web Inspector in the menu bar. You can also use the keyboard shortcut Option + Command + I.
Another way to open Web Inspector is to right-click on any part of a web page and select “Inspect Element.” This opens the inspector and focuses on that specific element.
Web Inspector has several tabs with different tools. The Elements tab shows the page’s HTML structure. The Console tab displays JavaScript output and errors. Other tabs help you check network activity, storage, and more.
Utilizing Web Inspector for Development
Web Inspector is a powerful tool for developers working with Safari on macOS. It lets you look at and change webpage code right in the browser.
Inspecting and Modifying HTML and CSS
Web Inspector shows a page’s HTML and CSS. You can see how elements are nested and styled. Click any element to view its details. You can edit CSS properties live to test changes. This helps fix layout issues fast.
The Elements tab displays the page structure. It shows HTML tags and attributes. You can expand and collapse sections to focus on specific parts. Double-click text to edit content directly.
The Styles pane shows CSS rules for the selected element. You can turn rules on and off or change values. New styles can be added to test ideas quickly. These changes are temporary and reset when you reload the page.
Debugging and Troubleshooting
Web Inspector helps find and fix code problems. The Console tab shows errors warnings and logs. You can run JavaScript commands here to test ideas.
The Sources tab lets you set breakpoints in your code. This pauses execution so you can step through line by line. You can watch variables and see how values change as the code runs.
The Network tab shows all resources loaded by the page. This includes images scripts and data files. You can see load times and file sizes. This helps spot performance issues.
Advanced Web Inspector Tools
Web Inspector has tools for deeper analysis. The Storage tab shows data saved by the site like cookies and local storage. You can view and edit this data.
The Timelines tab records page activity over time. It shows when scripts run and layouts update. This helps find slow parts of your code.
The Layers tab visualizes the page’s composited layers. This is useful for spotting rendering issues. You can see how elements are stacked and repainted.
These tools give developers a complete view of their web pages. They make it easier to build fast and bug-free sites.
Safari includes built-in developer tools – you don’t need to install anything to debug issues in the browser.
most recent

How to Minimize The Screen on iPhone: Step-by-Step

How To Keep Your iPhone’s Standby Mode Clock Visible

Camera App Denied By Apple For Not Explaining Why It Needs Camera Access
How To Turn On Siri On iPhone

Apple Watch
Apple watch band size chart.

Apple ID Account Recovery Process
SimplyMac.com is your go-to resource for everything tech - including Apple products, PC, Android, Xbox, Playstation, and more. We provide easy-to-follow tutorials, troubleshooting guides, and expert tips to help you make the most of your iPhone, iPad, Mac, and other devices. Our goal is to simplify tech for everyone, offering insightful content and practical advice to enhance your digital life.
All trademarks are the property of their respective owners. SimplyMac.com is not affiliated with Apple® Inc. iPhone®, iPod®, Mac®, Macbook®, Apple Watch®, and iPad® are trademarks of Apple Inc. We are also not affiliated with Samsung®, Google®, or any of the respective owners of the other trademarks appearing herein.
PHone 775-237-2170
18500 Las Vegas Blvd S Jean, NV 89019
© 2024 SimplyMac.com | Sitemap
Accessibility | Privacy | Terms & Conditions | Pages | Contact Us
Due to recent expansions in US sanctions against Russia and Belarus as well as existing country-level sanctions in Iran, North Korea, Syria, Cuba, and the Crimea region (each a “sanctioned country”), Zapier will no longer be able to provide services in any sanctioned country starting September 12, 2024. These sanctions prohibit US companies from offering certain IT and enterprise software services in a sanctioned region.
Starting September 12, 2024, Zapier customers will no longer be able to access Zapier services from a sanctioned country. We understand this may be inconvenient and appreciate your understanding as we navigate these regulatory requirements.
How To Enable Inspect In Safari

- Software & Applications
- Browsers & Extensions

Introduction
Safari, the sleek and innovative web browser developed by Apple, offers a range of powerful features that cater to the needs of both casual users and web developers. One such feature is the ability to inspect and manipulate the elements of a webpage using the built-in developer tools. This functionality, commonly referred to as "Inspect Element," provides a comprehensive set of tools for analyzing and modifying the structure and style of web pages.
Enabling the Inspect Element feature in Safari allows users to delve into the underlying code and design of a webpage, providing valuable insights for developers, designers, and curious individuals alike. Whether you're a seasoned web developer seeking to fine-tune the layout of a website or an inquisitive user eager to explore the building blocks of your favorite web pages, enabling Inspect Element in Safari opens up a world of possibilities.
In this guide, we will walk you through the simple yet powerful process of enabling and utilizing the Inspect Element feature in Safari. By following the steps outlined in this tutorial, you will gain the ability to inspect, analyze, and modify the elements of any webpage, empowering you to deepen your understanding of web development and design.
Let's embark on this enlightening journey to unlock the potential of Safari's developer tools and harness the capabilities of Inspect Element. Whether you're a novice or an experienced user, this guide will equip you with the knowledge and skills to leverage this feature effectively. So, without further ado, let's dive into the world of web exploration and discovery with Safari's Inspect Element feature.
Step 1: Open Safari Developer Tools
To begin our journey into the realm of web exploration and development, the first step is to access the powerful Safari Developer Tools. These tools provide a gateway to a plethora of functionalities designed to aid in web development, debugging, and optimization. Whether you're a seasoned developer or an enthusiastic beginner, Safari Developer Tools offer a rich set of features to enhance your browsing and development experience.
To open Safari Developer Tools, follow these simple steps:
Launch Safari : Start by opening the Safari web browser on your Mac or iOS device. Safari's intuitive interface and seamless user experience make it a popular choice for users across the globe.
Navigate to the Menu Bar : Once Safari is open, navigate to the menu bar located at the top of the screen. Here, you will find a range of options and settings to customize your browsing experience.
Access the Develop Menu : In the menu bar, locate the "Develop" option. If you do not see the Develop menu in the menu bar, you may need to enable it in Safari's preferences. To do this, go to Safari > Preferences > Advanced, and check the box next to "Show Develop menu in menu bar."
Select "Show Web Inspector" : After accessing the Develop menu, hover over the "Show Web Inspector" option. Clicking on this option will open the Safari Developer Tools, revealing a wealth of features and functionalities to explore.
By following these straightforward steps, you can easily access the Safari Developer Tools, setting the stage for an immersive and enlightening web development journey. With the Developer Tools at your fingertips, you are now ready to delve deeper into the world of web exploration and leverage the full potential of Safari's capabilities.
Opening Safari Developer Tools marks the first step in our quest to enable and utilize the Inspect Element feature, laying the foundation for a seamless and enriching experience. As we proceed to the next step, we will unlock the potential of Inspect Element, empowering you to analyze and manipulate the elements of web pages with ease and precision.
Step 2: Enable Inspect Element
Enabling the Inspect Element feature in Safari is a pivotal step that grants you access to a powerful set of tools for analyzing and modifying the elements of a webpage. This feature empowers users to delve into the underlying structure and style of web pages, providing valuable insights for developers, designers, and curious individuals alike. By enabling Inspect Element, you gain the ability to inspect, analyze, and modify various elements of a webpage, fostering a deeper understanding of web development and design.
To enable Inspect Element in Safari, follow these simple steps:
Access Safari Developer Tools : As outlined in Step 1, open Safari Developer Tools by navigating to the Develop menu and selecting "Show Web Inspector." This action reveals the comprehensive set of developer tools, including the coveted Inspect Element feature.
Right-Click and Select "Inspect Element" : Once Safari Developer Tools are open, navigate to the webpage you wish to inspect. Right-click on any element within the webpage, such as text, images, or buttons. From the context menu that appears, select "Inspect Element." This action triggers the activation of the Inspect Element feature, opening a panel within Safari Developer Tools that displays the underlying code and structure of the selected webpage element.
Keyboard Shortcut : Alternatively, you can use a keyboard shortcut to enable Inspect Element. With the webpage open, press "Option + Command + I" on your Mac or "Control + Shift + I" on your Windows keyboard. This shortcut swiftly activates the Inspect Element feature, allowing you to seamlessly analyze and modify the elements of the webpage.
Enabling Inspect Element in Safari unlocks a world of possibilities, empowering you to explore and manipulate the building blocks of web pages with precision and insight. Whether you seek to fine-tune the layout of a website, troubleshoot design issues, or simply satisfy your curiosity about the inner workings of web pages, the Inspect Element feature in Safari equips you with the tools to accomplish these tasks effectively.
With Inspect Element enabled, you are poised to embark on a journey of discovery and innovation, leveraging the capabilities of Safari's developer tools to gain a deeper understanding of web development and design. As we proceed to the next step, you will harness the power of Inspect Element to start inspecting and analyzing the elements of a webpage, unlocking a wealth of knowledge and insights along the way.
Step 3: Start Inspecting Elements on a Webpage
Now that you have successfully enabled the Inspect Element feature in Safari, you are ready to embark on an enlightening journey of exploring and analyzing the elements of a webpage. The Inspect Element feature empowers you to delve into the underlying code and structure of web pages, providing valuable insights and opportunities for modification. By following the steps outlined in this guide, you have gained the ability to inspect, analyze, and modify various elements of a webpage with precision and ease.
To start inspecting elements on a webpage using Safari's Inspect Element feature, follow these simple yet powerful steps:
Navigate to the Webpage : Begin by navigating to the webpage you wish to inspect. Whether it's a personal blog, a professional website, or a popular online platform, Safari's Inspect Element feature allows you to analyze and manipulate the elements of any webpage.
Activate Inspect Element : With the webpage open, right-click on any element within the page, such as text, images, or buttons. From the context menu that appears, select "Inspect Element." Alternatively, you can use the keyboard shortcut "Option + Command + I" on your Mac or "Control + Shift + I" on your Windows keyboard to swiftly activate the Inspect Element feature. Upon activation, Safari Developer Tools will reveal a panel displaying the underlying code and structure of the selected webpage element.
Explore the Elements : Once the Inspect Element panel is open, you can explore the elements of the webpage with ease. The panel provides a comprehensive view of the HTML and CSS code associated with the selected element, allowing you to gain insights into its structure, styling, and positioning within the webpage.
Modify and Experiment : With the ability to inspect and analyze webpage elements, you can experiment with modifications to observe real-time changes on the webpage. Whether it's adjusting the text content, modifying the styling, or repositioning elements, Safari's Inspect Element feature enables you to experiment and visualize the impact of your changes instantly.
Gain Insights and Learn : As you delve into the elements of the webpage, take the opportunity to gain valuable insights into web development and design. By analyzing the code and structure of various elements, you can enhance your understanding of HTML, CSS, and the intricate components that contribute to the visual and functional aspects of web pages.
By following these steps, you can harness the power of Safari's Inspect Element feature to gain a deeper understanding of web development and design. Whether you are a developer seeking to troubleshoot design issues or a curious individual eager to explore the building blocks of web pages, the Inspect Element feature in Safari equips you with the tools to accomplish these tasks effectively. Embrace the opportunity to immerse yourself in the world of web exploration and innovation, leveraging the capabilities of Safari's developer tools to unlock a wealth of knowledge and insights along the way.
In conclusion, the ability to enable and utilize the Inspect Element feature in Safari opens up a world of possibilities for web developers, designers, and curious individuals alike. By following the simple yet powerful steps outlined in this guide, you have gained the capability to delve into the underlying code and structure of web pages, empowering you to analyze, modify, and gain valuable insights into the elements that constitute the digital landscape.
Enabling Inspect Element in Safari marks the beginning of an enlightening journey, offering a gateway to a deeper understanding of web development and design. With the Inspect Element feature at your fingertips, you have the power to troubleshoot design issues, experiment with modifications, and enhance your knowledge of HTML, CSS, and the intricate components that shape the visual and functional aspects of web pages.
As you navigate through the elements of webpages using Safari's Inspect Element feature, you gain the opportunity to refine your skills, gain practical insights, and foster a deeper appreciation for the art and science of web development. Whether you are a seasoned developer seeking to fine-tune the layout of a website or an inquisitive user eager to explore the building blocks of your favorite web pages, the Inspect Element feature equips you with the tools to accomplish these tasks effectively.
Furthermore, the seamless integration of Inspect Element within Safari's developer tools enhances the browsing and development experience, fostering a dynamic environment for exploration and innovation. The ability to analyze and modify webpage elements with precision and ease empowers you to elevate your understanding of web technologies and contribute to the creation of compelling digital experiences.
In essence, the journey to enable and utilize Inspect Element in Safari transcends mere technical proficiency; it embodies a spirit of curiosity, creativity, and continuous learning. By embracing the capabilities of Safari's developer tools, you embark on a path of discovery, where each interaction with webpage elements unveils new insights and sparks inspiration.
As you reflect on the knowledge and skills acquired through this guide, may you approach web development and design with renewed enthusiasm and confidence. The journey does not end here; it extends into the boundless realms of web exploration and innovation, where the Inspect Element feature in Safari serves as a steadfast companion in your quest for mastery and creativity in the digital domain.
Leave a Reply Cancel reply
Your email address will not be published. Required fields are marked *
Save my name, email, and website in this browser for the next time I comment.
- Crowdfunding
- Cryptocurrency
- Digital Banking
- Digital Payments
- Investments
- Console Gaming
- Mobile Gaming
- VR/AR Gaming
- Gadget Usage
- Gaming Tips
- Online Safety
- Software Tutorials
- Tech Setup & Troubleshooting
- Buyer’s Guides
- Comparative Analysis
- Gadget Reviews
- Service Reviews
- Software Reviews
- Mobile Devices
- PCs & Laptops
- Smart Home Gadgets
- Content Creation Tools
- Digital Photography
- Video & Music Streaming
- Online Security
- Online Services
- Web Hosting
- WiFi & Ethernet
- Browsers & Extensions
- Communication Platforms
- Operating Systems
- Productivity Tools
- AI & Machine Learning
- Cybersecurity
- Emerging Tech
- IoT & Smart Devices
- Virtual & Augmented Reality
- Latest News
- AI Developments
- Fintech Updates
- Gaming News
- New Product Launches
- Hyperbaric Oxygen Therapy Revolutionizing Treatment for Various Conditions
- 12 Best Free AI Image Sharpeners in 2024 WebPCMobile
Related Post
Hyperbaric oxygen therapy: revolutionizing treatment for various conditions, apple wallet availability in the pocketguard app: sync your apple card, apple cash, and savings from apple card accounts, unleashing young geniuses: how lingokids makes learning a blast, designing for flexibility: materials and manufacturing techniques in flexible hybrid electronics, robots acquires spyontech, clear hearings: navigating ear health with the scopearound otoscope, related posts.

How To Inspect On IPhone Safari

How To Get Developer Tools In Safari

How To Inspect In Safari On IPad

How To Inspect Page On Safari

How To Open Developer Tools In Safari

What Is Web Inspector In Safari

How To Debug In Safari

How To Open Developer Tools On Safari
Recent stories.

12 Best Free AI Image Sharpeners in 2024 (Web/PC/Mobile)

Sanjuksha Nirgude Soaring High with Robotics

OpenStack Backup and Recovery Software

5 Ways to Improve IT Automation

What is Building Information Modelling?

How to Use Email Blasts Marketing To Take Control of Your Market
- Privacy Overview
- Strictly Necessary Cookies
This website uses cookies so that we can provide you with the best user experience possible. Cookie information is stored in your browser and performs functions such as recognising you when you return to our website and helping our team to understand which sections of the website you find most interesting and useful.
Strictly Necessary Cookie should be enabled at all times so that we can save your preferences for cookie settings.
If you disable this cookie, we will not be able to save your preferences. This means that every time you visit this website you will need to enable or disable cookies again.
How to use Inspect Element on iPhone , iPad
Inspect Element is a handy tool in the web developer’s arsenal to test and debug application behavior in various web browsers. Nearly all desktop-based web browsers, like Chrome, Safari, Edge, Firefox, and others, have a web/element inspector utility built into them, known usually as Developer Tools, or Dev Tools in short. Some users also prefer to call it the Web Inspector.
But when it comes to the iPhone or iPad, the Dev Tools utility is not available natively within mobile browsers like Safari or Chrome. And though the desktop utility has the option to mimic different screen sizes and user agents, including mobile devices, sometimes developers might prefer to inspect an element that is actually rendered on the device.

Well, there are a few workarounds that allow you to use the Dev Tools utility to inspect an element directly from the iPhone and iPad. In this article, we’ll explore a few of them.
Copy How to use Web Inspector on iPhone, iPad with a computer (Mac)
You can use Safari Dev Tools available on Mac to inspect an element on iPhone or iPad, by plugging in your iPhone or iPad to your Mac. Once the iPhone or iPad is plugged in and authorized to connect to your Mac, the Safari Developer Tools on Mac will be able to inspect the web elements rendered in Safari on your iPhone or iPad.
Note: This method only works for iOS, iPadOS devices connected to Safari on a Mac. If you have a Windows or Linux PC, no Developer Tools (from any browser) would be able to inspect elements from the iPhone or iPad.
The below steps will guide you to use the Safari Web Inspector on your Mac to inspect an element in Safari on the iPhone or iPad.
Step #1: Enable Web Inspector in Safari on iPhone, iPad
- Connect your iPhone or iPad to a Mac via USB.
- Tap on “Trust this computer” when prompted on the iPhone or iPad.
- If you’re using the latest version of iOS (or iPadOS), you may need to enable the Web Inspector in Safari. To do so, open the Settings app on your iPhone or iPad, and go to Safari .
- Scroll down to the bottom and tap on Advanced .
- Turn on the toggle for Web Inspector .
Step #2: Enable the Develop menu in Safari on Mac
- On your Mac, open the Safari web browser.
- Go to the Safari menu from the top-left corner, and click on Preferences…
- Click on the Advanced tab.
- Select the checkbox labeled Show Develop menu in the menu bar .
The Develop menu should now be enabled in the Safari menu bar.
Step #3: Use Web Inspector with iPhone, iPad
- With the iPhone or iPad still connected to your Mac, open a webpage that you want to inspect in Safari on your iPhone or iPad. Ensure the device stays unlocked.
- On your Mac, go to the Safari Develop menu, and hover over iPhone or iPad’s device name.
- You should be able to see a list of inspectable applications, including the individual web pages open in Safari. Select the web page that you want to inspect.
The Safari Web Inspector on Mac will now show the details of the webpage from your iPhone or iPad. You can use it just as you would use it for any website opened in Safari on Mac.
Copy How to use Web Inspector on iOS, iPadOS without a computer (Mac)
If you wish to inspect an element on an iPhone or iPad without a computer, you can do so now on iOS 15, with the help of third-party Safari Extensions.
Here, we’ll be using an extension called Web Inspector. But you may also try other similar extensions available from the App Store. The below steps will guide you to enable and use the Web Inspector extension on the iPhone or iPad.
- Download and install Web Inspector from the App Store, on your iPhone or iPad.
- Open the Settings app, and go to Safari >> Extensions .
- Tap on Web Inspector .
- Turn on the Web Inspector toggle to enable it.
- Go to Safari , and visit a web page that you’d like to inspect.
- Tap on the Double-A icon from the left side of the Safari Address bar.
- Tap on Web Inspector from the menu.
- You may get a pop-up asking you to allow Web Inspector to access the website data. Tap on Allow for One Day or Always Allow… depending on your preference.
The Web Inspector will now open a familiar developer console in the bottom part of the screen. Although it’s not the full-featured Developer Tools found in the desktop version, it does contain the essential elements, such as DOM, Elements, Console, Network, and Resources.
To close the Web Inspector, simply tap on the Double-A icon from the left of the Safari Address bar, and tap on Web Inspector again from the menu. Alternatively, you may also refresh the page to close the inspector.
Note: You may enable or disable extensions directly from Safari by tapping on the Double-A icon from the left side of the Safari Address bar, and then tapping on Manage Extensions. Here, you can turn on or turn off any and all the Safari extensions installed from the App Store.
This is how you can use the native or third-party web inspector tool to inspect an element in Safari on the iPhone or iPad. If you’re interested to know how to inspect an element on Android, check out our dedicated article.
Inspect element (Mac)
Martina Nikolova
Hey there! If you’re a budding front-end developer or working on debugging web applications, you’ve probably been using Safari as one of your go-to browsers. And for a good reason, too! Safari comes with a fantastic tool called Inspect Element that allows you to dig deep into the nitty-gritty of a webpage. Let us walk you through how to use this fantastic tool on your Mac.
How to enable Inspect Element on Mac
Before diving in, you’ll need to enable Inspect Element on your Mac’s Safari. Just follow these simple steps:
- Fire up Safari, click the browser’s menu from the menu bar on the top, and go to Preferences.
- Jump over to the Advanced tab in the Safari Preferences window.

Voila! Inspect Element is now enabled and ready to roll in Safari on your Mac.
To access this powerful tool, you have a couple of options:
- Either click on Develop > Show Web Inspector in the menu bar.
- Or right-click the page and choose Inspect Element from the context menu that appears.
Mac Inspect Element shortcut
You can also use the Inspect Element shortcut on your Mac’s Safari to access the feature more quickly. Simply select/highlight the element on a webpage that you wish to inspect and press together Command, Option, and i keys and the interface of the feature will appear.
Inspect Element on Mac Overview
Once you’ve got Inspect Element up and running on your Mac’s Safari, you’ll be able to dissect every single component of the webpage you’re working on. Here’s a quick primer on using this awesome tool:
- Adjust the position and size of the Inspect Element interface to suit your needs. Possible ways you can do hat are by docking it to the side or bottom of the page or even popping it out into a separate window.
- Customize each of the tabs in the toolbar to your liking. You’ll find tabs like Elements, Storage, and Timelines, and you’ll be able to choose which ones to be shown.
- If you’re searching for a particular item on the page, just click the search icon on the right side of the toolbar and type your search term in the box that appears.
That’s the lowdown on using Inspect Element in Safari for Mac! This incredible tool is an invaluable resource for web developers or anyone curious about how websites tick. So, go ahead and dive into code inspection, testing, and debugging like a boss. Good luck!
How to use Inspect Element (Safari)
We’ll now show you ways you can use the Inspect Elements feature in Safari and how to customize in accordance with your preferences.
First up, let’s optimize the Inspect Element interface to suit your preferences. You have the freedom to situate the tool at the bottom, along the side of the page, or even detach it into a standalone window. To achieve this, simply interact with the icons nestled in the top left corner of the toolbar. And if you desire more or less visual space, effortlessly drag the border to resize it to your liking.
With the layout tailored to your needs, it’s time to customize the tabs. Inspect Element boasts an array of nine tabs, encompassing Elements, Storage, Layers, and Timelines, among others. Feel empowered to conceal the ones you deem unnecessary by right-clicking a tab and cherry-picking the ones you’d like to keep in plain sight. This action will place checkmarks beside your elected tabs and exhibit them in the toolbar.

Eager to scrutinize an element on the page? Activate the compass icon within the toolbar, then either glide through or click the element that piques your curiosity. Alternatively, you can cherry-pick the code or item inside the tool, and it’ll materialize on the page for your convenience.
Suppose you’re on a quest to locate a specific item on the page, such as a text string. Fear not! Merely click the search icon on the right extremity of the toolbar, input your search term, and behold! Your results will materialize beneath the search box.

During your creative process, you might observe warning or error icons emerging in the toolbar. These notifications are invaluable for pinpointing issues. To delve deeper, just click on the corresponding icon.
Should you feel inspired to modify Inspect Element’s aesthetics, enable page rulers, or make use of additional features like zooming and source maps, venture to the gear icon on the toolbar’s far right. This action will unveil the settings menu, where you can make a plethora of adjustments to mold the tool to your unique preferences.
Upon completing your work with Inspect Element in Safari, simply tap the X icon in the top left corner to bid the tool farewell. And there you have it! Armed with Inspect Element, you’re now poised to elevate your code inspection, application testing, and debugging prowess to unparalleled heights. Revel in the thrill of uncovering the hidden depths of web pages on your Mac using Safari’s exceptional Inspect Element tool!
Martina likes to get into nitty-gritty of tomorrow’s tech, from product design across to security based solutions. A long time mac user and developer, she has the expertise and strives to give new insight
Leave a Reply Cancel reply
Your email address will not be published. Required fields are marked *
Save my name, email, and website in this browser for the next time I comment.
How to Use Inspect Element in Chrome, Safari, & Firefox
Published: May 20, 2024
When I started my coding journey, I couldn’t always pinpoint what made a web page great — all of the code underneath that craft a well-designed experience. So, I would use the inspect element on my browser to peel back the curtain. Here, I could see how pages were coded so I could understand how to recreate elements for my own projects.

The inspect element feature lets us view and even modify any website’s front end. This simple trick can help you understand how websites work and even help you build your own.
In this post, I’ll discuss what it means to “inspect” page elements and how to do so on three common web browsers. If you’re in a pinch, jump ahead to what you’re looking for.
Table of Contents
How to Inspect Elements in Chrome
How to inspect elements in safari, how to inspect elements in firefox, get a closer look with inspect, what does “inspect element” mean.
Inspect element is a feature of modern web browsers that enables anyone to view and edit a website’s source code, including its HTML, CSS, JavaScript, and media files. When the source code is modified with the inspect tool, the changes are shown live inside the browser window.
Inspect is a web professional’s scout team. Developers, designers, and marketers frequently use it to peek inside any website (including their own) to preview content and style changes, fix bugs, or learn how a particular website is built. For instance, if I find an intriguing interface on a competing website, the inspect element lets me see the HTML and CSS that make it up.
I also think of my browser’s inspect feature as a “sandbox” of sorts. I can play around with a web page as much as I want by changing content, colors, fonts, layouts, etc. When finished, I just refresh the page to revert everything to normal.
Inspect doesn’t change the website itself — only how it appears in your browser. You can then experiment without worry!
Inspect is also an incredibly valuable tool for those learning web development. Instead of viewing plain source code, I can use the inspect element to interact with the page and see how each line of code maps to an element or style.
By better understanding what constitutes the typical web page, I can communicate effectively with developers in the case of an error or if I want to make a change.
Inspect may be a “developer tool,” but you don’t need to write any code or install any additional software to use it. You can do everything I’ve described right inside your browser. Let’s learn how.
How to Inspect Elements
To inspect elements, you have to right-click any part of a web page and click Inspect > Inspect Element. Alternatively, you can press Command+Option+i on your Mac or F12 on your PC to do the same.
Every modern web browser has a native tool for inspecting elements. It can be accessed in any browser, but some browsers like Chrome and Safari have slight differences. Let’s discuss how to use the inspect tool in three desktop web browsers: Google Chrome, Apple’s Safari, and Mozilla Firefox.
Chrome comes with a handy developer tool that allows you to inspect individual elements. This allows you to see the code behind a web page and even edit it on your own browser. (Note that the changes are only visible to you, not to anyone else across the web.)
Here's how to get started.

Free Guide: 25 HTML & CSS Coding Hacks
Tangible tips and coding templates from experts to help you code better and faster.
- Coding to Convention
- Being Browser-Friendly
- Minimizing Bugs
- Optimizing Performance
Download Free
All fields are required.
You're all set!
Click this link to access this resource at any time.
1. Launch Chrome and navigate to the page you want to inspect.
To use the element inspector in Google Chrome, I first navigate to any web page. In these examples, I’ll be using HubSpot.com .
2. Open up the Inspect panel.
Once I arrive at my desired page, I have several ways to open Chrome's Inspect tool.
- Option 1 : I can right-click any part of the page and choose Inspect . Right-clicking a specific page element will open that element in the inspector view.
- Option 2 : In the top menu bar, I can select View > Developer > Developer Tools .
- Option 3: I can click the three-dot icon in the top right corner of the browser window. From there, I can choose More Tools > Developer Tools . Then, I can click the Inspect tab in the popup.
- Option 4 : I can use the shortcut control-shift-C on Windows or command-option-C on macOS.
3. Change the location of the inspect panel.
To better view the code, I can change the position of the inspector window.
The Chrome Developer Tools panel will open at the bottom of the browser window, but sometimes it opens in a separate window altogether.
If I want to change the location of the panel, I can click the three-dots icon in the top right corner of the panel (next to the X icon), and then choose my preferred dock position.
Pro tip: Choosing Dock to right makes it easier to view the rendered page and its source:

Along the top of the inspect panel, I see tabs for Elements , Console , Sources , etc. These are all tools I can use to assess a page’s contents and performance. However, everything I need to inspect is under the Elements tab.
4. Look at the source HTML code of the page.
The biggest area of the panel will contain the source HTML of the current page. I always spend some time exploring this region. Hovering the cursor over the piece of code highlights the corresponding element on the page.
Blue indicates the contents of an element, green corresponds to padding, and areas in orange are margins.
Pro tip: If you’re a beginner and want to learn more about the different elements you’re inspecting, check out this HTML guide for beginners.
5. Select a specific element to inspect.
Rather than trying to read through the code to find an element, I can also do the opposite. I can locate a piece of code by hovering over the page element itself. To do this, I click the Element select icon in the top left corner of the panel.

8. Edit the page's CSS code.
Moving down the Chrome inspect panel, I see the Styles tab. This shows me what CSS styling has been applied to the selected element. I can click on lines of code to rewrite them, or I can activate/deactivate certain declarations by checking/unchecking the boxes next to them. I’ll do this for my <h1> element’s font-weight property:
9. View the page's mobile version.
Finally, let’s cover one more feature of Chrome’s inspect feature: mobile view. When building a site, designers need to consider how its pages appear on desktop, mobile, and tablet screens alike.
Fortunately, Chrome lets me preview the same web page in multiple screen resolutions. Start by clicking the Toggle device icon in the top left corner of the panel:

Now, when I click a page element, the Web Inspector reveals the corresponding source code.
7. Edit, add, or delete page elements.
Like Chrome’s inspector, Safari lets me modify, add, and remove page elements. To edit the page, I can right-click an HTML element in the inspect panel. I can then choose an option from the Edit menu.
Web Inspector will prompt me for a new text input and then display my changes in real time:

If I want to delete a page element, I just select some code and delete it. Or, I can right-click and choose Toggle Visibility to hide an element without deleting it.
8. Activate or deactivate the page's CSS code.
To the right, I have the Styles column, where I can change or activate/deactivate CSS declarations for any element, like so:
When testing content and style changes, I want to see the effect on mobile screens as well as desktops. I’ll cover that next.
Pro tip: When seeking inspiration from other web pages, I always take advantage of the Styles tab in my browser’s developer tools to tailor the CSS according to how I envision it on my own page. Try it out. This allows you to refine and adapt design elements to suit your specific preference before moving forward with coding it in your own workspace.
Safari’s Responsive Design Mode allows me to preview a website across common devices.
To view the page in a mobile viewport, I choose Develop → Enter Responsive Design Mode . In this mode, I can use the same inspector tools on pages formatted for Apple devices or set the dimensions myself:

What I like: Safari’s responsive design tab not only lets you test your web page’s responsiveness on devices, but you can also test its behavior across different browsers. Serving as a one-stop-shop for testing responsiveness, the Safari dev tools are a huge time saver.
Firefox is another great option for inspecting a web page in either macOS, Windows, or Linux. Here’s how to get started.
1. Open Firefox's inspect element tool.
To open the Firefox Inspector, I have several options:
- Option 1: I can right-click any part of the page and choose Inspect Element . Right-clicking a specific page element will open that element in the inspector view.
- Option 2: I can select Tools → Browser Tools → Web Developer Tools from the top menu bar.
- Option 3: I can use the shortcut control-shift-I or press f12 in Windows or command-option-I in macOS.
Next, I go to the web page I’d like to inspect. I’ll be using HubSpot.com again.
3. Change the location of the inspector panel.
The Firefox inspector appears along the bottom of the window by default. To change its position, I can select the three-dots icon in the top right corner of the inspector, then choose an alternative display option.

4. Look at the HTML code of the page.
Firefox’s inspector panel is comparable in features to Chrome’s and Safari’s. The HTML source code indicates the corresponding page element with color codes — content is blue, padding is purple, and margins are yellow:
I can also find code by selecting elements on the page. To enter selection mode, I click the cursor icon in the top left corner:

I can then click any page element to reveal its source code in the inspect panel.
6. Modify or delete page elements.
To modify or delete a page element, I select its code in the inspector. Then, I can either double-click to change the text, right-click and choose Edit as HTML, or click Plus Button next to the “Search HTML” bar to add code. Or I can simply delete the code and see the resulting changes on the page.

7. Toggle the page's CSS styles.
To toggle the CSS styling of an element, I use the Filter Styles region at the bottom of the inspect panel. There, I can uncheck the box next to a CSS declaration to deactivate it (or write in new code myself):
8. View the page's mobile version.
Finally, Firefox’s tools also come with a mobile preview option. To use it, I can click the Responsive Design Mode icon in the top right corner of the panel:

Responsive Design Mode lets me choose from several preset screen resolutions or set my own. I can also toggle connection speed and device pixel ratio:

What I like: As a software developer, it is very important that I make web pages that can be easily used by anyone. Firefox’s accessibility tab in its inspector tool allows me to check if my nodes accessibility tree is missing any important properties. I can verify color contrasts too.
The quickest way to access this feature is by right clicking on the page → choose Inspect → select the two arrows next to debugger → select Accessibility .
Once you learn the basics of your browser’s inspect tool, you might realize just how much information about your favorite websites is publicly available. With a few clicks, you can explore how exactly web pages are built, what styles they use, how they optimize for search engines, how they format on mobile screens, and a lot more.
Editor's note: This article was originally published in December 2020 and has been updated for comprehensiveness.

Don't forget to share this post!
Related articles.

20 Best WYSIWYG HTML Editors for 2024

11 Web Development Trends to Expect in 2024, According to Experts & Data

A Simple Explanation of SSL Certificate Errors & How to Fix Them
![How to Make a Website With User Accounts and Profiles [With WordPress, Wix, and More]](https://knowledge.hubspot.com/hubfs/make-website-with-user-accounts-1-20240712-739219.webp "safari extension inspect element")
How to Make a Website With User Accounts and Profiles [With WordPress, Wix, and More]

How to Start Coding: The Ultimate Guide for Beginner Programmers

XML Files: What They Are & How to Open Them

The Beginner's Guide to Website Development
![How to Get an SSL Certificate [+10 Best Free SSLs]](https://www.hubspot.com/hubfs/free-ssl%20%284%29.webp "safari extension inspect element")
How to Get an SSL Certificate [+10 Best Free SSLs]

Are .io Domains Good? Why Tech Startups Love .io Domains

15 Backend Project Ideas for Your Developer Portfolio
CMS Hub is flexible for marketers, powerful for developers, and gives customers a personalized, secure experience
- PRO Courses Guides New Tech Help Pro Expert Videos About wikiHow Pro Upgrade Sign In
- EDIT Edit this Article
- EXPLORE Tech Help Pro About Us Random Article Quizzes Request a New Article Community Dashboard This Or That Game Happiness Hub Popular Categories Arts and Entertainment Artwork Books Movies Computers and Electronics Computers Phone Skills Technology Hacks Health Men's Health Mental Health Women's Health Relationships Dating Love Relationship Issues Hobbies and Crafts Crafts Drawing Games Education & Communication Communication Skills Personal Development Studying Personal Care and Style Fashion Hair Care Personal Hygiene Youth Personal Care School Stuff Dating All Categories Arts and Entertainment Finance and Business Home and Garden Relationship Quizzes Cars & Other Vehicles Food and Entertaining Personal Care and Style Sports and Fitness Computers and Electronics Health Pets and Animals Travel Education & Communication Hobbies and Crafts Philosophy and Religion Work World Family Life Holidays and Traditions Relationships Youth
- Browse Articles
- Learn Something New
- Quizzes Hot
- Happiness Hub
- This Or That Game
- Train Your Brain
- Explore More
- Support wikiHow
- About wikiHow
- Log in / Sign up
- Computers and Electronics
- Basic Computer Skills
Easy Ways to Inspect Element on Mac in Different Web Browsers
Last Updated: September 15, 2023 Fact Checked
This article was reviewed by Stan Kats and by wikiHow staff writer, Darlene Antonelli, MA . Stan Kats is a Professional Technologist and the COO and Chief Technologist for The STG IT Consulting Group in West Hollywood, California. Stan provides comprehensive technology solutions to businesses through managed IT services, and for individuals through his consumer service business, Stan's Tech Garage. Stan holds a BA in International Relations from The University of Southern California. He began his career working in the Fortune 500 IT world. Stan founded his companies to offer an enterprise-level of expertise for small businesses and individuals. This article has been fact-checked, ensuring the accuracy of any cited facts and confirming the authority of its sources. This article has been viewed 4,878 times.
Is there a box or element on a page that you want to inspect? If you're on a Mac, inspecting elements is easy, no matter which browser you're using! This wikiHow article teaches you how to inspect elements on Mac using different web browsers.
Things You Should Know
- In Safari, first enable the developer tool, then press "Cmd + Opt + I."
- In Chrome, press "Cmd + Opt + C."
- In Firefox, press "Cmd + Opt + I."

- You first have to enable the "Inspect Element" tool before you can use it in Safari.

- Go to Develop > Show Web Inspector OR
- Right-click or ctrl-click the page and click Inspect Element from the drop-down menu OR
- Press Cmd + Opt + I on your keyboard. [1] X Research source
- To close this window, click the X in the top left corner of the toolbar.

- Right-click or ctrl-click the page and select Inspect OR
- Press Cmd + Opt + C .
- When you're done, close the Web Inspector window by clicking the small X in the toolbar. [2] X Research source

- Press Cmd + Opt + I .
- When you're done, close the Web Inspector window by clicking the small X in the toolbar or press Cmd + Opt + I again. [3] X Research source
Expert Q&A
You might also like.

- ↑ https://support.apple.com/en-gb/guide/safari-developer/dev654e5967f/11.0/mac/10.13
- ↑ https://developer.chrome.com/docs/devtools/open/
- ↑ https://firefox-source-docs.mozilla.org/devtools-user/index.html
About This Article

- Send fan mail to authors
Is this article up to date?

Featured Articles

Trending Articles

Watch Articles

- Terms of Use
- Privacy Policy
- Do Not Sell or Share My Info
- Not Selling Info
wikiHow Tech Help Pro:
Level up your tech skills and stay ahead of the curve
- Web Browser
- Google Chrome Browser
- Mozilla Firefox Browser
- Microsoft Edge Browser
- Apple Safari Browser
- Tor Browser
- Opera Browser
- DuckDuckGo Browser
- Brave Browser
How to use inspect element in Chrome, Firefox and Safari ?
Inspect Elements , as the name suggests, is a part of identifying and observing the different elements of a web page. It is a Development tool, that helps us manipulate the Front-end base, but temporarily , to check which changes fit where, which image might look good, or debug the page, etc. In this article, we’ll be covering the steps to inspect an element in the web browser.
Table of Content
Google Chrome
Benefits of using inspect elements.
There can be multiple ways to inspect elements on the browser window:
1. Right-click on the web page and select inspect elements from the dropdown list.

Inspect Elements Option
2. Click on the three dots at the topmost right side and click More Tools . Select the option of Dev Tools.

Developer Tools
3. Shortcut – Ctrl+Shift+I: The dev tools have features such as inspect elements, console window etc. They are of much use a they let us make changes in CSS, content and let us check the meta data of the file. It also helps in knowing the search engine optimization (SEO) of the page.

Inspect Elements & Console Window
1. The method of inspecting elements is similar to that of Chrome. Right click and click on inspect element(Q) will show the browser console.

Inspect Element
2. Second method is to click on the three lines made at the topmost right side of the browser and click on Web Developer and then either of the two – Inspector or Web Console.

Web Developer -> Inspector
3. Shortcuts can also be used: Inspector – Ctrl + Shift + C
Console Window: Ctrl + Shift + K

Console Window
Safari is another web browser on which we can inspect elements. However, a major point that needs to be noted is that Safari can no more be used on Windows Applications, it can be used only on Mac OS. But before inspecting elements in safari browser, one needs to enable it. Go to the top let corner of the browser page and click on settings. Then click on Preferences and click advanced. The option of inspect elements is now enabled.

Go to preferences

Click on Advanced
Now follow the same steps as the other browsers:

Enable Inspect Elements
1. Right click and click on inspect elements.
2. More tools -> Developer tools
3. Shortcut: Cmd + Option + I
or simply press F2 to get the console window.
- Helps in Search Engine Optimization (SEO)
- Front End Manipulation
- Debugging software as errors are displayed in the console window
- Design and content can be changed according to user demands for temporary purposes
- Handling of meta data

Similar Reads
- Geeks Premier League
- Web Browsers
- Apple Safari
- Geeks Premier League 2023
- Mozilla Firefox
Please Login to comment...
- How to Underline in Discord
- How to Block Someone on Discord
- How to Report Someone on Discord
- How to add Bots to Discord Servers
- GeeksforGeeks Practice - Leading Online Coding Platform
Improve your Coding Skills with Practice
What kind of Experience do you want to share?
This page requires JavaScript.
Please turn on JavaScript in your browser and refresh the page to view its content.
WebKit Features in Safari 18.0
Sep 16, 2024
by Jen Simmons
New in Safari 18
Web apps for mac, spatial web, managed media source, web inspector, safari extensions, deprecations, bug fixes and more, updating to safari 18.0.
Safari 18.0 is here. Along with iOS 18, iPadOS 18, macOS Sequoia and visionOS 2, today is the day another 53 web platform features, as well as 25 deprecations and 209 resolved issues land in WebKit, the rendering engine driving Safari.
Distraction Control
Distraction Control lets you hide distracting items as you browse the web, such as sign-in banners, cookie preference popups, newsletter signup overlays, and more, in Safari for iOS 18, iPadOS 18 and macOS Sequoia.

We always recommend using semantic HTML when creating a website, including <video> , <main> , <article> and other elements that describe content. Doing so helps ensure both Safari Reader and Safari Viewer work best for the users of your website.

iPhone Mirroring and remote inspection
With iPhone Mirroring on macOS Sequoia, you can use your iPhone from your Mac. Combine it with remote inspection from Safari, and now it’s easier than ever to test and debug websites on iOS using Web Inspector .
Get set up for remote inspection by first ensuring you have Safari’s developer tools enabled on your Mac (if you can see the Develop menu in Safari, you’ve already done this step). Next, enable Web Inspector on your iPhone at Settings > Apps > Safari > Advanced > Web Inspector. Then, you’ll need to connect the device to your Mac using a cable to grant permission. Once plugged in, your device will appear in the Develop menu in Safari. Finally, to enable wireless debugging, go to Safari on macOS > Develop > [your device] > Connect via Network.
Now you can use Web Inspector to wirelessly debug websites running on iPhone anytime. And with iPhone Mirroring, you don’t even have to pull out your phone. Everything is on your Mac’s screen.
Learn more about remote inspection by reading Inspecting iOS and iPadOS , or by watching Rediscover Safari developer features from WWDC. Learn more about iPhone Mirroring 1 on apple.com .
Last year , we added support for web apps in macOS Sonoma. You can add any website to your dock — whether or not it was built with a Manifest file, Service Worker, or other technology to customize the web app experience. Go to the site in Safari, then File > Add to Dock… where you can customize the icon, change the name, and even adjust the URL. Then, just click on the web app icon in your Dock, and the website will open as a stand-alone app.
This year brings two improvements to web apps on Mac.
Opening links
macOS Sequoia adds support for opening links directly in web apps. Now, when a user clicks a link, if it matches the scope of a web app, that link will open in the web app instead of their default web browser. For example, imagine you have added MDN Web Docs to your Dock. Then a colleague sends you a link to an MDN page in Messages, Mail, Slack, Discord, IRC, or any non-browser application on your Mac. Now when you click on that link, it will open in the MDN Web Docs web app instead of your default browser.
Clicking a link within a browser will maintain the current behavior. This feature only affects links opened elsewhere. (When a user is in Safari, clicking on a link that matches the scope of a web app that is added to Dock, they will see an “Open in web app” banner, unless they have previously dismissed the banner.)
By default, this behavior applies when the link matches the host of the web page used to create the web app. As a developer, you can refine this experience by defining the range of URLs that should open in the web app with the scope member in the web app manifest .
Extension support
Now users can personalize web apps on Mac with Safari Web Extensions and Content Blockers. Navigate to the web app’s Settings menu to access all the installed Content Blockers and Web Extensions. Any enabled in Safari will be on by default in the web app. Each web app is uniquely customizable, just like Safari profiles.
View Transitions
WebKit added support for the View Transitions API in Safari 18. It provides an optimized browser API to animate elements from one state to another. Safari supports the CSS View Transitions Module Level 1 specification that adds new CSS properties and pseudo-elements for defining transition animations, along with a new browser API to start transition animations and react to different transition states. It works by capturing the current (old) state of the page and applying an animated transition to the new state. By default, the browser applies a cross-fade between the states.
Call the document.startViewTransition() method to initiate the capture. You can pass a callback function as the first argument to make DOM state changes between the old and new captures. The method returns a ViewTransition object which contains promises that can be used to track when the view transition starts or ends.
Once the states are captured, a pseudo-element tree is built which can be targeted with CSS, allowing you to modify the CSS animations used for the transitions. The animations out of the old page state and into the new page state can be modified via the ::view-transition-new(*) and ::view-transition-old(*) selectors. You can also ask the browser to independently track state changes for a specific element by naming it with the CSS view-transition-name property. You can then use the pseudo-elements to customize animations for it.
The :active-view-transition pseudo-class becomes active on the root element when a view transition is running.
The example below demonstrates state management with tabbed navigation. Each tab view has a custom transition animation out and a subtly different animation in, while the tabs themselves rely on the default page transition.
Style Queries
WebKit for Safari 18.0 adds support for Style Queries when testing CSS Custom Properties. Similar to how developers can use Sass mixins, Style Queries can be used to define a set of reusable styles that get applied as a group.
Here, if the --background custom property is set to black, then certain styles will be applied — in this case to make the headline and paragraph text color white.
Don’t forget to pay attention the HTML structure. By default, Style Queries reference the styles on the direct parent element. You can create a different reference through the use of Container Query names.
currentcolor and system color keywords in Relative Color Syntax
Support for Relative Color Syntax shipped in Safari 16.4 . It lets you define colors in a more dynamic fashion, creating a new color from an existing color. The value lch(from var(--color) calc(L / 2) C H) for instance uses the lch color space to take the variable --color and calculate a new color that’s half its lightness, calc(L / 2) .
Now in Safari 18.0, the first browser to ship support, you can reference the currentcolor or a system color keyword as you define the new color. For example, this code will set the background color to be the same color as the text color, only 4 times lighter, as calculated in the oklch color space.
Being able to reference system color keywords opens up another world of options. System colors are like variables that represent the default colors established by the OS, browser, or user — defaults that change depending on whether the system is set to light mode, dark mode, high contrast mode, etc. For example, canvas represents the current default background color of the HTML page, while fieldtext matches the color of text inside form fields. Find the full list of system colors in CSS Color level 4 .
Relative Color Syntax lets you define dynamic connections between colors in your CSS, lessening the need to control color through variables in a tightly-regimented design system. Learn more about Relative Color Syntax by watching this portion of What’s new in CSS from WWDC23.
Translucent accent colors
Partially transparent colors in accent-color are now blended on top of the Canvas system color to match the latest updates to the web standard. This means that any of the many ways to define colors using an alpha channel will now work as expected when used to define an accent color for a form control.
Animating display
WebKit for Safari 18.0 adds support for transition animation of the display property.
Many developers are excited to use @starting-style along with transition-behavior and display: none interpolation. WebKit for Safari 17.4 added general support for transition-behavior , including transition-behavior: allow-discrete . WebKit for Safari 17.5 added support for @starting-style , letting you define starting values for transitioning an element as it’s created (or re-created). Now in WebKit for Safari 18.0, you can use these features together to transition the display property.
Backdrop Filter
Originally shipped in Safari 9.0, backdrop filter provides a way to apply graphics effects to the content behind a particular element. You can apply backdrop-filter to a headline, for example, and everything behind the headline will be blurred, or have decreased saturation, or increased contrast. Any of the filter functions from SVG can be used — blur() , brightness() , contrast() , drop-shadow() , grayscale() , hue-rotate() , invert() , opacity() , saturate() , and sepia() .
For many years, backdrop filter only worked in Safari. It was available when you prefixed the property with -webkit-backdrop-filter . Now, starting in Safari 18.0, you don’t need the prefix. We also improved our implementation, fixing bugs and boosting interoperability.
This demo shows eight different filters and what you might do with each one alone. You can, of course, combine filters to create even more interesting results. With backdrop filter supported in Safari since 2015, Edge since 2018, Chrome since 2019, Samsung Internet since 2020, and Firefox since 2022, this is a great time to consider the kind of graphic design possibilities it enables.
Content visibility
WebKit for Safari 18.0 adds support for content-visibility . This property controls whether or not an element renders its contents in a fashion that’s useful for making performance optimizations. It lets you communicate to the browser that certain portions of the page will likely be initially offscreen, and suggest they be omitted from layout and rendering. This can make the page load faster.
WebKit for Safari 18.0 adds parsing support for the custom value for the prefers-contrast media query. (It does not return “true” on Apple platforms, since there is no forced-colors mode in iOS, iPadOS, macOS or visionOS.)
Safari 18.0 for visionOS 2 adds support for immersive-vr sessions with WebXR . Now you can create fully immersive experiences for people using Apple Vision Pro and deliver them through the web. WebXR scenes are displayed using hardware-accelerated graphics driven by WebGL .

Safari for visionOS 2 supports the new WebXR transient-pointer input mode. It lets you make the most of natural input on visionOS, and allow your users to interact with a look and a pinch.

If you want to animate a 3D model of the user’s hands, Safari for visionOS 2 also includes support for WebXR hand tracking . To ensure privacy, permission to allow hand tracking will be requested from users at the start of their WebXR session.
Learn all about WebXR on visionOS 2 by watching Build immersive web experiences with WebXR from WWDC. Learn more about transient-pointer input mode by reading Introducing natural input for WebXR in Apple Vision Pro . And learn all about how to use Safari’s developer tools on Mac to inspect and debug in Apple Vision Pro by reading Try out your website in the spatial web .
Spatial photos and panoramas
One of the amazing experiences you can have on Apple Vision Pro is looking at spatial photos and panoramas. The web is a great place to share these photos with others.

When you open the Photos app in visionOS, you see your library of photos. When you tap an image, it appears alone in a floating frame in front of you. Spatial photos appear at just the right height and viewing angle to make it feel like you’ve gone back to a moment in time. A second tap of the UI breaks a spatial photo out of its frame, becoming even more immersive. Similarly, a panorama floats in a frame on first tap. Then on second tap of the UI, it expands to wrap all around you, creating a fully immersive experience.
Now in Safari 18.0 for visionOS 2, you can use the JavaScript Fullscreen API to create a similar experience on the web. You can embed the photo in a web page, and provide the ability to tap. The photo will pop into a floating frame as the Safari window disappears. Then when the user taps on the spatial photo or panorama UI that visionOS provides, the photo will further expand to create a more immersive experience. When they exit the image, the Safari window will return.
Let’s walk through how to support experiencing a spatial photo or panorama on the web using Fullscreen API. First, include the image on your web page using any of the techniques used for years. Here, we can embed a flattened panoramic photo into the web page using simple HTML.
Then using JavaScript, we’ll trigger .requestFullscreen() on tap. Perhaps like this.
You could, of course, create your own UI for the user to tap, rather than making the entire photo the tap target.
Spatial images work just the same, although it’s likely we want to provide fallbacks for browsers that do not support HEIC files . We can do so with the picture element.
Spatial images are stereoscopic, with both a left and right channel. In Safari, when the image is embedded in the web page, the browser will show the left channel. And there’s no need to worry about providing a fallback of any sort for Safari on macOS, iOS, or iPadOS — the stereoscopic HEIC file works great.
This technique will also cause images to go fullscreen in any browser that supports Fullscreen API. Learn more about adding panorama and spatial photos to your websites by watching Optimize for the spatial web from WWDC.
Shaping interaction regions on visionOS
As a web developer, you’re very familiar with how link styling works on the web. For decades you’ve been able to use CSS to style text-decoration , color and more for :link , :hover , :active , and :visited states. You’ve also been able to adjust the size of the invisible tap target through use of padding.
Apple Vision Pro adds a new dimension to how links work — tap targets are visible on visionOS. Anytime a user looks at an interactive element, it’s highlighted to let them know that it can be tapped. And you as a designer or developer can intentionally design how an interaction region looks. You may want to add padding, for instance, or even a rounded corner to the otherwise invisible box.
Now in Safari in visionOS 2 , when you use CSS clip-path to change the shape of tappable area of a link, the visible interaction region will change shape as well. Interactive UI elements built with SVG and cursor: pointer will also be highlighted with the proper shape. Learn more by watching Optimize for the spatial web from WWDC.
Video on visionOS
Safari for visionOS 2 adds support for docking fullscreen videos into the current Environment . Anytime a user is watching a video fullscreen, they can tap the mountain symbol to enter an immersive experience. Turning the Digital Crown adjusts the immersion.
Writing Suggestions
At last year’s WWDC, Apple unveiled inline predictive text on iOS, iPadOS, macOS and more. It helps users input text faster by predicting what they might be typing and finishing the word, phrase or even a whole sentence when the user taps the space bar. Now, WebKit for Safari 18.0 on iOS, iPadOS, visionOS, macOS Sequoia and macOS Sonoma brings inline predictive text to the web.
While inline predictive text makes for a fantastic, personalized user experience, there might be specific situations on the web where it’s better to not have predictions. WebKit for Safari 18.0 on iOS, iPadOS, visionOS, macOS Sequoia and macOS Sonoma gives web developers the opportunity to disable inline predictions through the writingsuggestions attribute. By default, writing suggestions is set to true. You can turn off the capability by including the writingsuggestions="false" attribute on any type of text input field.
WebKit for Safari on iOS 18 adds haptic feedback for <input type=checkbox switch> . This means, now when a user taps a switch control on iPhone, a single tap is felt — just like how toggling a switch feels in Settings app on iOS. Try this demo to see what it’s like.
Date and time inputs
WebKit for Safari 18.0 on macOS improves accessibility support for date and time input field types. Now <input type="date"> , <input type="datetime-local"> , and <input type="time"> elements work properly with VoiceOver.
Usually elements have the labels they need, but sometimes there is no text label for a particular button or UI. In this situation, ARIA can be used to provide an accessible label. The aria-label attribute provides names of labels while aria-roledescription provides the description for the role of an element.
On very rare occasions, you may need to override aria-label or aria-roledescription to provide different names or descriptions specifically for braille. The aria-braillelabel and aria-brailleroledescription attributes provide such an ability. They exist to solve very specific needs, including educational contexts where the site needs to render the specific braille table dot pattern. If you do use braille-related ARIA attributes, be sure to test them using a braille reader. If in doubt, relying on the accessible name from content or aria-label / aria-roledescription is almost always the better user experience . WebKit has supported these ARIA attributes for years.
Now, WebKit for Safari 18.0 adds support for the ariaBrailleLabel and ariaBrailleRoleDescription element reflection properties. These make it possible to get and set the aria-braillelabel and aria-brailleroledescription ARIA attributes on DOM elements directly via JavaScript APIs, rather than by using setAttribute and getAttribute .
WebKit for Safari 18.0 adds support for Unicode 15.1.0 characters in RegExp. Unicode 15.1 added 627 characters, bringing the total of characters to 149,813. Now, these new characters can be used in regular expressions.
WebKit for Safari 18.0 also adds support for the v flag with RegExp.prototype[Symbol.matchAll] . providing more powerful ways to match Unicode characters, as specified in the ECMAScript 2024 standard.
For example, you can now specify to only match on Latin characters, while avoiding matching on Cyrillic script characters.
Or split a string matching on Emojis.
WebKit for Safari 18.0 adds support for URL.parse() , a way to parse URLs which returns null rather than an exception when parsing fails.
WebKit for Safari 18.0 expands Declarative Shadow tree support by adding the shadowRootDelegatesFocus and shadowRootClonable IDL attributes to the <template> element. It also adds the shadowRootSerializable attribute and shadowRootSerializable IDL attribute to the <template> element, enabling those using Declarative Shadow roots to opt into making them serializable. Serializing can be done through the new getHTML() method that has been added at the same time.
WebKit for Safari 18.0 adds support for PopStateEvent ’s hasUAVisualTransition , indicating whether the user agent has a visual transition in place for the fragment navigation.
WebKit for Safari 18.0 adds support for subresource integrity in imported module scripts, which gives cryptographic assurances about the integrity of contents of externally-hosted module scripts.
WebKit for Safari 18.0 adds support for the bytes() method to the Request, Response , Blob , and PushMessageData objects. This replaces the need for web developers to call arrayBuffer() , which can be difficult to use, and wraps the result in a Uint8Array . Calling bytes() is now the recommended way going forward when you need to access the underlying bytes of the data these objects represent.
WebKit for Safari 18.0 adds support for feature detecting text fragments by exposing document.fragmentDirective . Note that the returned object (a FragmentDirective ) doesn’t provide any functionality, but it’s helpful if you need to know if Fragment Directives are supported by the browser.
WebKit for Safari 18.0 adds support for the willReadFrequently context attribute for the getContext() method. It indicates whether or not a lot of read-back operations are planned. It forces the use of a software accelerated 2D or offscreen canvas, instead of hardware accelerated. This can improve performance when calling getImageData() frequently.
WebKit for Safari 18.0 extends 2D canvas support for currentcolor . It can now be used inside color-mix() or Relative Color Syntax. Here currentcolor will default to the computed color property value on the canvas element.
WebKit for Safari 18.0 adds Workers support for both Managed Media Source (MMS) and Media Source Extensions ( MSE ). This can be especially helpful on complex websites that want to ensure continuous and smooth video playback even when other site activity (such as live commenting) causes a very busy main thread. You can see the performance difference in this demo .
WebKit for Safari 18.0 adds support for the WebRTC HEVC RFC 7789 RTP Payload Format. Previously, the WebRTC HEVC used generic packetization instead of RFC 7789 packetization. This payload format provides a new option for improving videoconferencing, video streaming, and delivering high-bitrate movies and TV shows.
WebKit for Safari 18.0 adds support for MediaStreamTrack processing in a dedicated worker. And it adds support for missing WebRTC stats.
WebKit for Safari 18.0 adds support for secure HTTPS for all images, video, and audio by upgrading passive subresource requests in mixed content settings. This means that if some files for a website are served using HTTPS and some are served using HTTP (known as “mixed content”), all images and media will now be auto-upgraded to HTTPS, in adherence with Mixed Content Level 2 .
WebKit for Safari 18.0 adds support for six new WebGL extensions:
- EXT_texture_mirror_clamp_to_edge
- WEBGL_render_shared_exponent
- WEBGL_stencil_texturing
- EXT_render_snorm
- OES_sample_variables
- OES_shader_multisample_interpolation
WebKit for Safari 18.0 adds support for fuzzy search code completion in the Web Inspector’s CSS source editor.
Two years ago at WWDC22, we announced support for passkeys — a groundbreaking industry-standard way to login to websites and app services. Passkeys provide people with an extremely easy user experience, while delivering a profound increase in security. To learn more, watch Meet Passkeys or read Supporting passkeys .
WebKit for Safari 18.0 adds support for three new features as we continue to improve passkeys. First, Safari 18.0 adds support for using mediation=conditional for web authentication credential creation. This allows websites to automatically upgrade existing password-based accounts to use passkeys. Learn more by watching Streamline sign-in with passkey upgrades and credential managers from WWDC.
Second, WebKit for Safari 18.0 adds support for using passkeys across related origins. This lets websites use the same passkey across a limited number of domains which share a credential backend.
And third, WebKit for Safari 18.0 adds support for the WebAuthn prf extension. It allows for retrieving a symmetric key from a passkey to use for the encryption of user data.
Safari 18.0 also adds support for Mobile Device Management of extension enabled state, private browsing state, and website access on managed devices. This means schools and businesses that manage iOS, iPadOS, or macOS devices can now include the configuration of Safari App Extensions, Content Blockers, and Web Extensions in their management.
WebKit for Safari 18.0 adds support for funds transfer via Apple Pay.
While it’s rare to deprecate older technology from the web, there are occasions when it makes sense. We’ve been busy removing -webkit prefixed properties that were never standardized, aging media formats that were never supported in other browsers, and more. This helps align browser engines, improve interoperability, and prevent compatibility problems by reducing the possibility that a website depends on something that’s not a web standard.
WebKit for Safari 18.0 removes support for OffscreenCanvasRenderingContext2D ’s commit() method.
WebKit for Safari 18.0 deprecates support for a number of rarely used -webkit prefixed CSS pseudo-classes and properties — and even one -khtml prefixed property.
- -webkit-alt and alt properties
- :-webkit-animating-full-screen-transition pseudo-class
- :-webkit-full-screen-ancestor pseudo-class
- :-webkit-full-screen-controls-hidden pseudo-class
- :-webkit-full-page-media pseudo-class
- :-webkit-full-screen-document pseudo-class
- :-khtml-drag pseudo-class
WebKit for Safari 18.0 also deprecates support for the resize: auto rule. Support for the resize property remains, just as it’s been since Safari 4. The values Safari continues to support include : none , both , horizontal , vertical , block , inline , plus the global values. Early versions of CSS Basic User Interface Module Level 3 defined auto , but it was later written out of the web standard.
WebKit for Safari 18.0 also deprecates support for non-standardize WEBKIT_KEYFRAMES_RULE and WEBKIT_KEYFRAME_RULE API in CSSRule .
WebKit for Safari 18.0 removes support for the JPEG2000 image format. Safari was the only browser to ever provide support.
If you’ve been serving JPEG2000 files using best practices, then your site is using the picture element to offer multiple file format options to every browser. Safari 18.0 will simply no longer choose JPEG2000, and instead use a file compressed in JPEG XL, AVIF, WebP, HEIC, JPG/JPEG, PNG, or Gif — choosing the file that’s best for each user. Only one image will be downloaded when you use <picture> , and the browser does all the heavy lifting.
We have noticed that some Content Deliver Networks (CDN) use User Agent sniffing to provide one file to each UA, offering only JPEG2000 images to Safari — especially on iPhone and iPad. If you expect this might be happening with your site, we recommend testing in Safari 18.0 on both macOS Sequoia and iOS or iPadOS 18. If you see problems, contact your SaaS provider or change your image delivery settings to ensure your website provides fallback images using industry best practices.
If you notice a broken site, please file an issue at webcompat.com .
WebKit for Safari 18.0 removes [[VarNames]] from the global object to reflect changes in the web standard, a change that now allows this code to work:
WebKit for Safari 18.0 removes support for non-standard VTTRegion.prototype.track .
WebKit for Safari 18.0 removes the last bits of support for AppCache.
When AppCache first appeared in 2009, in Safari 4, it held a lot of promise as a tool for caching web pages for use offline. It was imagined as “HTML5 Application Cache” back when HTML itself was being further expanded to handle more use cases for web applications. A developer could create a simple cache manifest file with a list of files to be cached. Its simplicity looked elegant, but there was no mechanism for cache busting, and that made both developing a site and evolving the site over time quite frustrating. AppCache also had security challenges. So new web standards were created to replace it. Today, developers use Service Workers and Cache Storage instead.
WebKit deprecated AppCache with a warning to the Console in Safari 11.0. Then in 2021, we removed support for AppCache from Safari 15.0, with a few exceptions for third-party users of WKWebView . Now we are removing those exceptions. This change to WebKit will only affect the rare web content loaded in older third-party apps that have JavaScript code which relies on the existence of AppCache related interfaces.
WebKit for Safari 18.0 removes the SVGAnimateColorElement interface, as well as the non-standard getTransformToElement from SVGGraphicsElement .
WebKit for Safari 18.0 removes support for four non-standard Web APIs:
- KeyboardEvent.altGraphKey
- AES-CFB support from WebCrypto
- KeyboardEvent.prototype.keyLocation
- HashChangeEvent ’s non-standard initHashChangeEvent() method
Deprecated some legacy WebKit notification names including:
- WebViewDidBeginEditingNotification
- WebViewDidChangeNotification
- WebViewDidEndEditingNotification
- WebViewDidChangeTypingStyleNotification
- WebViewDidChangeSelectionNotification
In addition to all the new features, WebKit for Safari 18.0 includes work to polish existing features.
Accessibility
- Fixed role assignment for <header> inside <main> and sectioning elements.
- Fixed range input not firing an input event when incremented or decremented via accessibility APIs.
- Fixed setting aria-hidden on a slot not hiding the slot’s assigned nodes.
- Fixed VoiceOver to read hidden associated labels.
- Fixed comboboxes to expose their linked objects correctly.
- Fixed VoiceOver support for aria-activedescendant on macOS.
- Fixed time input accessibility by adding labels to subfields.
- Fixed aria-hidden=true to be ignored on the <body> and <html> elements.
- Fixed datetime values being exposed to assistive technologies in the wrong timezone.
- Fixed wrong datetime value being exposed to assistive technologies for datetime-local inputs.
- Fixed ignored CSS content property replacement text when it is an empty string.
- Fixed the computed role for these elements: dd , details , dt , em , hgroup , option , s , and strong .
- Fixed hidden elements targeted by aria-labelledby to expose their entire subtree text, not just their direct child text.
- Fixed accessible name computation for elements with visibility: visible inside a container with visibility: hidden .
- Fixed updating table accessibility text when its caption dynamically changes.
- Fixed updating aria-describedby text after the targeted element changes its subtree.
- Fixed the transition property to produce the shortest serialization.
- Fixed the animation property to produce the shortest serialization.
- Fixed arbitrary 8 digit limit on a line item’s total amount.
Authentication
- Fixed navigator.credentials.create() rejects with “NotAllowedError: Operation Failed” after a conditional UI request is aborted.
- Fixed setting the cancel flag once the cancel completes regardless of a subsequent request occurring.
- Fixed drawImage(detachedOffscreenCanvas) to throw an exception.
- Fixed OffscreenCanvas failing to render to the placeholder with nested workers.
- Fixed losing the contents layer of the placeholder canvas of OffscreenCanvas when switching off the tab.
- Fixed drawImage to not alter the input source or the destination rectangles.
- Fixed toggling the visibility on a canvas parent undoing the effect of clearRect() .
- Fixed the Canvas drawImage() API to throw an exception when the image is in broken state.
- Fixed a detached OffscreenCanvas to not transfer an ImageBuffer.
- Fixed treating the lack of an explicit “SameSite” attribute as “SameSite=Lax”.
- Fixed setting white-space to a non-default value dynamically on a whitespace or a new line.
- Fixed custom counter styles disclosure-open and disclosure-closed to point to the correct direction in right-to-left.
- Fixed backface-visibility to create a stacking context and containing block.
- Fixed getComputedStyle() to work with functional pseudo-elements like ::highlight() .
- Fixed: Aliased :-webkit-full-screen pseudo-class to :fullscreen .
- Fixed: Aliased :-webkit-any-link to :any-link and :matches() to :is() .
- Fixed getComputedStyle() pseudo-element parsing to support the full range of CSS syntax.
- Fixed @supports to correctly handle support for some -webkit prefixed pseudo-elements that were incorrectly treated as unsupported.
- Fixed updating media-query sensitive meta tags after style changes.
- Fixed changing color scheme to update gradients with system colors or light-dark() .
- Fixed incorrect inline element size when using font-variant-caps: all-small-caps with font-synthesis .
- Fixed :empty selector to work with animations.
- Fixed preserving whitespace when serializing custom properties.
- Fixed updating style correctly for non-inherited custom property mutations.
- Fixed element removed by parent to end up losing the last remembered size.
- Fixed an incorrect difference between implicit and explicit initial values for custom properties.
- Fixed the contrast of Menu and MenuText system colors.
- Fixed keeping the shorthand value for CSS gap as-is in serialized and computed values.
- Fixed the style adjuster for @starting-style incorrectly invoking with a null element.
- Fixed excluding -apple-pay-button from applying to any element that supports appearance: auto and is not a button.
- Fixed missing color interpretation methods added to CSS color specifications.
- Fixed hsl() and hsla() implementation to match the latest spec changes.
- Fixed the implementation of rgb() and rgba() to match the latest spec.
- Fixed the hwb() implementation to match the latest spec.
- Fixed the remaining color types to be synced with the latest spec changes.
- Fixed carrying analogous components forward when interpolating colors.
- Fixed applying the fill layer pattern for mask-mode .
- Fixed backdrop-filter: blur to render for elements not present when the page is loaded.
- Fixed: Improved large Grid performance.
- Fixed some CSS properties causing quotes to be reset.
- Fixed an issue where input method editing would sporadically drop the composition range.
- Fixed dictation UI no longer showing up when beginning dictation after focusing an empty text field. (FB14277296)
- Fixed displayed datalist dropdown to sync its options elements after a DOM update.
- Fixed input elements to use the [value] as the first fallback step base.
- Fixed <select multiple> scrollbars to match the used color scheme.
- Fixed updating the input value when selecting an <option> from a <datalist> element. (FB13688998)
- Fixed the value attribute not getting displayed in an input element with type="email" and the multiple attribute.
- Fixed the iOS animation for <input type=checkbox switch> .
- Fixed form controls drawing with an active appearance when the window is inactive.
- Fixed constructed FormData object to not include entries for the image button submitter by default.
- Fixed the properties of History to throw a SecurityError when not in a fully active Document.
- Fixed “about:blank” document.referrer initialization.
- Fixed parsing a self-closing SVG script element. It now successfully executes.
- Fixed RegExp.prototype.@@split to update the following legacy RegExp static properties: RegExp.input , RegExp.lastMatch , RegExp.lastParen , RegExp.leftContext , RegExp.rightContext , and RegExp.$1, ... RegExp.$9 .
- Fixed String.prototype.replace to not take the fast path if the pattern is RegExp Object and the lastIndex is not numeric.
- Fixed spec compliance for Async / Await, Generators, Async Functions, and Async Generators.
- Fixed async functions and generators to properly handle promises with throwing “constructor” getter.
- Fixed return in async generators to correctly await its value.
- Fixed Symbol.species getters to not share a single JS Function.
- Fixed throwing a RangeError if Set methods are called on an object with negative size property.
- Fixed eval() function from another realm to not cause a direct eval call.
- Fixed eval() call with ...spread syntaxt to be a direct call.
- Fixed try/catch to not intercept errors originated in [[Construct]] of derived class.
- direct eval() in a default value expression inside a rest parameter creates a variable in the environment of the function rather than the separate one of the parameters;
- a ReferenceError is thrown when accessing a binding, which is defined inside rest parameter, in eval() , or a closure created in a default value expression of a preceding parameter, but only if there is a var binding by the same name;
- a closure, created in the default value expression inside a rest parameter, is created in a different VariableEnvironment of the function than its counterparts in preceding parameters which causes the incorrect environment to be consulted when querying or modifying parameter names that are “shadowed” by var bindings.
- Fixed TypedArray sorting methods to have a special-case for camparator returning false .
- Fixed programming style for bitwise and in setExpectionPorts.
- Fixed emitReturn() to load this value from arrow function lexical environment prior to the TDZ check.
- Fixed NFKC normalization to work with Latin-1 characters.
- Fixed parsing of private names with Unicode start characters.
- Fixed instanceof to not get RHS prototype when LHS is primitive.
- Fixed bracket update expression to resolve property key at most once.
- Fixed bracket compound assignement to resolve the property key at most once.
- Fixed Object.groupBy and Map.groupBy to work for non-objects.
- Fixed Array.fromAsync to not call the Array constructor twice.
- Fixed inconsistent output of Function.prototype.toString for accessor properties.
- Fixed Set#symmetricDifference to call this.has in each iteration.
- Fixed logical assignment expressions to throw a syntax error when the left side of the assignment is a function call.
- Fixed throwing a syntax error for nested duplicate-named capturing groups in RegEx.
- Fixed ArrayBuffer and SharedArrayBuffer constructor to check length before creating an instance.
- Fixed Intl implementation to ensure canonicalizing “GMT” to “UTC” based on a spec update.
- Fixed RegEx lookbehinds differing from v8.
- Fixed fractionalDigits of Intl.DurationFormat to be treated as at most 9 digits if it is omitted.
- Fixed optimized TypedArrays giving incorrect results.
- Fixed Intl.DurationFormat for numeric and 2-digit .
- Fixed navigator.cookieEnabled to return false when cookies are blocked.
- Fixed MediaSession to determine the best size artwork to use when the sizes metadata attribute is provided. (FB9409169)
- Fixed video sound coming from another window after changing tabs in the Tab Bar in visionOS.
- Fixed playback for MSE videos on some sites.
- Fixed allowing a video’s currentTime to be further than the gap’s start time.
- Fixed broken audio playback for a WebM file with a Vorbis track.
- Fixed sampleRate and numberOfChannels to be required and non-zero in a valid AudioEncoderConfig.
- Fixed media elements appending the same media segment twice.
- Fixed an issue where Safari audio may be emitted from the wrong window in visionOS.
- Fixedrejecting valid NPT strings if ‘hours’ is defined using 1 digit.
- Fixed picture-in-picture when hiding the <video> element while in Viewer.
- Fixed the return button not working after the video is paused and played in picture-in-picture.
- Fixed upgrading inactive or passive subresource requests and fetches in would-be mixed security contexts to match standards.
- Fixed incorrect Sec-Fetch-Site value for navigation of a nested document.
- Fixed loading WebArchives with a non-persistent datastore.
- Fixed Timing-Allow-Origin to not apply to an HTTP 302 response.
- Fixed print buttons with a print action implementation.
- Fixed Open in Preview for a PDF with a space in its name.
- Fixed “Open with Preview” context menu item to work with locked PDF documents.
- Fixed Greek uppercase transforms failing for some characters.
- Fixed resizing a <textarea> element with 1rem padding.
- Fixed the color correctness of the color matrix filter.
- Fixed backdrop-filter to apply to the border area of an element with a border-radius .
- Fixed intrinsic inline size calculators to account for whitespace before an empty child with nonzero margins.
- Fixed overlapping elements with flex box when height: 100% is applied on nested content.
- Fixed incorrect grid item positioning with out-of-flow sibling.
- Fixed break-word with a float discarding text.
- Fixed min-content calculation for unstyled only-child inlines elements.
- Fixed ellipsis rendering multiple times when position: relative and top are used.
- Fixed a bug for inline elements inserted in reverse order after a block in a continuation.
- Fixed the flash of a page background-colored bar in the footer when the window is resized.
- Fixed garbled bold text caused by glyph lookup using the wrong font’s glyph IDs when multiple installed fonts have the same name. (FB13909556)
- Fixed selecting Japanese text annotated with ruby in a vertical-rl writing mode table.
- Fixed support for border, padding, and margin on mfrac and mspace elements in MathML.
- Fixed the cursor not updating as content scrolls under it on some pages.
- Fixed stripping the scroll-to-text fragment from the URL to prevent exposing the fragment to the page.
- Fixed CORS bypass on private localhost domain using 0.0.0.0 host and mode “no-cors”.
- Fixed blocking cross-origin redirect downloads in an iframe.
- Fixed blocked cross-origin redirect downloads to attempt rendering the page instead.
- Fixed the SVG parser to interpret “form feed” as white space.
- Fixed error handling for invalid filter primitive references.
- Fixed displaying an SVG element inside a <switch> element.
- Fixed SVG title to have display: none as the default UA style rule.
- Fixed the UA stylesheet for links in SVGs to apply cursor: pointer matching standards.
- Fixed returning the initial value for the SVG gradient stop-color if it is not rendered in the page.
- Fixed the SVG marker segment calculations if the marker path consists of sub-paths.
- Fixed SVGLength to sync with the WebIDL specification.
- Fixed disclosure counter styles to consider writing-mode .
Web Animations
- Fixed percentage transform animations when width and height are animated.
- Fixed updating an animation when changing the value of a transform property while that property is animated with an implicit keyframe.
- Fixed display transition to none .
- Fixed cssText setter to change the style attribute when the serialization differs. (FB5535475)
- Fixed history.pushState() and history.replaceState() to ignore the title argument.
- Fixed URL text fragment directives not fully stripped from JavaScript.
- Fixed showPicker() method to trigger suggestions from a datalist .
- Fixed lang attribute in no namespace to only apply to HTML and SVG elements.
- Fixed unnecessarily unsetting the iframe fullscreen flag.
- Fixed DOM Range to correctly account for CDATASection nodes.
- Fixed getGamepads() to no longer trigger an insecure contexts warning.
- Fixed inserting a <picture> element displaying the same image twice.
- Fixed throwing exceptions in navigation methods if in a detached state.
- Fixed a minor issue in URL’s host setter.
- Fixed cloning of ShadowRoot nodes following a DOM Standard clarification.
- Fixed GeolocationCoordinates to expose a toJSON() method.
- Fixed IntersectionObserver notifications that sometimes fail to fire.
- Fixed GeolocationPosition to expose a toJSON() method.
- Fixed setting CustomEvent.target when dispatching an event.
- Fixed navigator.language only returning the system language in iOS 17.4.
- Fixed: Removed presentational hints from the width attribute for <hr> .
- Fixed an issue when inserting writing suggestions into an editable display: grid container.
- Fixed the warning message for window.styleMedia .
- Fixed resolving www. sub-domain for Associated Domains for all web apps.
Web Assembly
- Fixed initialization of portable reference typed globals.
Web Extensions
- Fixed getting an empty key from storage. (FB11427769)
- Fixed Service Workers not appearing in the Develop menu or remote Web Inspector menu. (130712941)
- Fixed web extensions unable to start due to an issue parsing declarativeNetRequest rules. (FB14145801)
- Fixed font sizes in the Audits tab.
- Fixed expanded sections of Storage to not collapse.
- Fixed Web Inspector to show nested workers.
- Fixed CSS font property values marked !important not getting overridden when using the interactive editing controls.
- Fixed an issue where the Web Inspector viewport might appear cut off.
- Fixed runtimes to be aligned in the Audit tab.
- Fixed remembering the message type selection in the Console tab.
- Fixed autocomplete for the text-indent property suggesting prefixed properties instead of each-line or hanging .
- Fixed background autocompletion suggestion to include repeating-conic-gradient .
- Fixed the list of breakpoints in the Sources tab disappearing when Web Inspector is reloaded.
- Fixed console clearing unexpectedly when Web Inspector reopens.
- Fixed console code completion to be case-insensitive.
- Fixed overflow: scroll elements to scroll as expected when highlighting an element from the DOM tree.
- Fixed showing additional Safari tabs from an iOS device in the Develop menu.
- Fixed Console and code editor completion not auto-scrolling the suggestion into view.
- Fixed search in the DOM tree view unexpectedly chaning the text display.
- Fixed clicking the “goto” arrow for computed CSS when “show independent Styles sidebar” is disabled.
- Fixed inspectable tabs from Safari in the visionOS Simulator don’t appear in Developer menu on the host macOS.
- Fixed Accessibility inspector for switch controls to report “State: on/off” instead of “Checked: true/false”.
- Fixed Gamepad API in WKWebView.
- Fixed repainting HTML elements when their width or height change in legacy WebView.
- Fixed retrieving titles containing multibyte characters.
- Fixed RTCEncodedVideoFrame and RTCEncodedAudioFrame to match the WebIDL specification.
- Fixed VideoTrackGenerator writer to close when its generator track (and all its clones) are stopped.
- Fixed WebRTC AV1 HW decoding on iPhone 15 Pro.
- Fixed black stripes with screen sharing windows.
- Fixed black stripes with getDisplayMedia captured windows when the window is resized.
Safari 18.0 is available on iOS 18 , iPadOS 18 , macOS Sequoia , macOS Sonoma, macOS Ventura, and in visionOS 2 .
If you are running macOS Sonoma or macOS Ventura, you can update Safari by itself, without updating macOS. Go to > System Settings > General > Software Update and click “More info…” under Updates Available.
To get the latest version of Safari on iPhone, iPad or Apple Vision Pro, go to Settings > General > Software Update, and tap to update.
We love hearing from you. To share your thoughts on Safari 18.0, find us on Mastodon at @[email protected] and @[email protected] . Or send a reply on X to @webkit . You can also follow WebKit on LinkedIn . If you run into any issues, we welcome your feedback on Safari UI (learn more about filing Feedback ), or your WebKit bug report about web technologies or Web Inspector. If you notice a website that seems broken in Safari, but not in other browsers, please file a report at webcompat.com . Filing issues really does make a difference.
Download the latest Safari Technology Preview on macOS to stay at the forefront of the web platform and to use the latest Web Inspector features.
You can also find this information in the Safari 18.0 release notes .
1. iPhone Mirroring is available on Mac computers with Apple silicon and Intel-based Mac computers with a T2 Security Chip. Requires that your iPhone and Mac are signed in with the same Apple ID using two-factor authentication, your iPhone and Mac are near each other and have Bluetooth and Wi-Fi turned on, and your Mac is not using AirPlay or Sidecar. iPhone Mirroring is not available in all regions.
IMAGES
VIDEO
COMMENTS
The first is via the Develop menu. With the webpage you wish to inspect frontmost in Safari, go to the Develop menu and choose Show Web Inspector (⌥⌘I). Web Inspector will then appear, and will be inspecting the webpage. The second was to show Web Inspector is to right click on the webpage and choose Inspect Element from the context menu.
Use Safari on your iPhone to navigate to the site on which you want to use Inspect Element. 5. On your Mac, click the Develop menu. You will see your iPhone listed here. 6. Hover your mouse over your iPhone and select the website. This opens the Inspect Element panel on your Mac for the site that's open on your iPhone.
Enabling inspecting your device from a connected Mac. Before you can connect your device to a Mac to inspect it, you must allow the device to be inspected. Open the Settings app. Go to Apps > Safari. Scroll down to Advanced. Enable the Web Inspector toggle. Now, connect the device to your Mac using a cable. In Safari, the device will appear in ...
In your Safari menu bar click Safari > Preferences & then select the Advanced tab. Select: "Show Develop menu in menu bar". Now you can click Develop in your menu bar and choose Show Web Inspector. See the detailed guide here for more info: LINK. You can also right-click and press "Inspect element".
In Safari, click Safari in the tool bar. Click Settings and head to Advanced. Check Show Develop menu in menu bar. On a webpage, right click an element. Click Inspect Element. Read on to see ...
Right-click on any part of a web page and select "Inspect Element." A new window pops up with all the page's code. You can change things and see the results right away on the page. Safari's Arsenal of Inspection Tools Opening the Develop Menu. To harness Safari's developer tools, you first need to activate the "Develop" menu.
Follow the steps below to Inspect Element on macOS using Safari: 1. To enable the Developer Menu open the Safari browser and click Safari > Settings. 2. Click on Advanced. Check the Show Develop menu in Menu bar checkbox. Doing this also allows you to Inspect Elements on iPhones by connecting them. 3.
It can be beneficial both for the app developer, as well as web authors, to be able to inspect content in these views, as the size of the view may not match that of Safari's, or the app developer may be injecting script into the view to provide integration with their app. Web content is often dynamic, delivered by a server—not in the app ...
Keyboard Shortcuts. For those who prefer to streamline their workflow with keyboard shortcuts, Safari offers a quick and efficient way to open the Inspector. By pressing "Option + Command + I" on a Mac, or "Ctrl + Option + I" on a Windows PC, you can instantly access the Inspector, saving valuable time and effort.
To get to Inspect Element on Firefox you have three options (just like on Chrome). Method 1: Right-click anywhere on the page and click Inspect at the bottom of the menu. Method 2: Click the hamburger menu (three horizontal lines at the top-right corner of the window), select More tools, then click Web Developer Tools.
Whether it's a personal blog, a professional website, or a popular online platform, Safari's Inspect Element feature allows you to analyze and manipulate the elements of any webpage. Activate Inspect Element: With the webpage open, right-click on any element within the page, such as text, images, or buttons. From the context menu that appears ...
On your Mac, open the Safari web browser. Go to the Safari menu from the top-left corner, and click on Preferences…. Click on the Advanced tab. Select the checkbox labeled Show Develop menu in the menu bar. The Develop menu should now be enabled in the Safari menu bar. Step #3: Use Web Inspector with iPhone, iPad.
Before diving in, you'll need to enable Inspect Element on your Mac's Safari. Just follow these simple steps: Fire up Safari, click the browser's menu from the menu bar on the top, and go to Preferences. Jump over to the Advanced tab in the Safari Preferences window. Check the box that labelled " Show Develop menu in menu ba r".
Web Inspector helps you inspect all the resources and activity on webpages, Service Workers, Mac and Home Screen web apps, and JavaScript running inside your applications, making development more efficient across Apple platforms. The clean, unified design puts each core function in a separate tab, which you can rearrange to fit your workflow.
3. Open up Web Inspector. There are three ways to open Web Inspector in Safari: Option 1: I can right-click any part of the page and choose Inspect Element. Right-clicking a specific page element will open that element in the inspector view. Option 2: I can choose Develop → Show Web Inspector from the top menu bar.
Steps to Open Inspect Element in Safari. Right-Click the Page Element: Right-click on any page element and select "Inspect Element" from the context menu. This will open the Web Inspector with the element that was selected. Keyboard Shortcut: Open Web Inspector via Cmd+Option+I without any further delay.
Click the multicolored orb icon to launch Chrome. 2. Navigate to the site you want to inspect. Use the address bar to go to the page with elements that you want to look at. 3. Inspect the page. You can do this in a few different ways: Right-click or ctrl-click the page and select Inspect OR. Press Cmd + Opt + C.
Enable Web Inspector on iOS: Open the Settings app on your iPhone or iPad. Scroll down and tap Safari. Scroll to the bottom of the page and tap Advanced. Tap the toggle next to Web Inspector to the On position. Enable Safari Developer Mode on Mac: Open Safari on your Mac. Click Safari in the top left corner of your Menu Bar.
Right click and click on inspect element (Q) will show the browser console. 2. Second method is to click on the three lines made at the topmost right side of the browser and click on Web Developer and then either of the two - Inspector or Web Console. 3. Shortcuts can also be used: Inspector - Ctrl + Shift + C.
To tell Safari to add your tool as a tab in Web Inspector, you must create the inspector tab in your extension using browser.devtools.panel.create(). Don't conditionally create the inspector tab after you check permissions; if you do, Safari won't add a tab for your tool. Let Safari handle permissions with its dialogs; then update your user ...
Safari 8.0.8 on OS X. Right-click any element and select Inspect Element from the pop-up menu. Ensure Styles and Rules are selected on the right hand side of the inspector. You can then either add individual rules by clicking + New Rule, or simply click and start typing rules where Click to Edit appears (refer to image below)
Then tap the element you want to disappear, and watch it fade away. ... And learn all about how to use Safari's developer tools on Mac to inspect and debug in Apple Vision Pro by reading Try out your website in the spatial web. ... Safari Extensions. Safari 18.0 also adds support for Mobile Device Management of extension enabled state ...