Grab the FREE CHORE CHARTS
Love Our Real Life

How to Make a DIY Push Pin World Travel Map
Learn how to make your own personalized push pin world travel map to show your past and future family adventures!

See more diy home decor here.
Personal decor is the best decor
I’m a sucker for personalized home decor. This little ‘map to show our travels’ project has been on my list of to-do’s for the longest time and I’m so excited I had an opportunity to finish it.
Several years ago, a dear friend of mine selected the word LIVE as her word for the year. This continues to inspire me to find ways to enjoy living in the moment and appreciate the life God has given us.
Part of that has included family travel.

As with many of you, we are making an effort to enjoy more experiences and adventures versus just buying more things.
This fun map of the world is a great way for our family to see the ‘places I’ve been’ as well as the ‘places I’d like to go’.
Our experiences and adventures.
Let’s jump into the How-To portion of this project.
Supplies for a Push Pin Travel Map
– Map ( This is the map I used from Amazon ) – Push Pins – Thumb tacks – Lumber to build frame (length of boards will vary depending on size of map) – Mending plates or corner braces – Wood glue – D-Ring Hangers – Drywall anchors – Hardware to attach mending plates and d-rings
DIY Places I’ve Been Travel Map, Step-by-Step
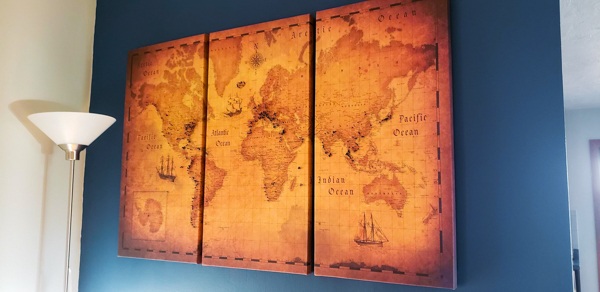
There are lots of different ways one could make a push pin travel map. But, I wanted a REALLY BIG map that took up the greater portion of a wall.
When I say really big, the oversized poster map I purchased was 77.5 x 46 inches to be exact.
To give perspective to the size of our poster map, here is an image of the map unrolled on our dining table:

So, to keep the cost reasonable for a map wall of this size, I’m showing you the best (and easiest) solution I could find.
1. Determine the size of the map you purchase based on wall location in your home
We are still in the process of redecorating our basement and I had a large blank wall that needed a little dressing up!
I wanted a big map to make a bit of a statement.
We quickly realized this would have to be a DIY project as pre-made oversized travel maps are SUPER expensive.
When considering maps for your home, you should select a map that works for you and your space. As I mentioned the map I purchased measured 77.5 x 46 inches.
If this is too big, find something that works for you!
Durability was also important, so I ensured the map we picked was laminated as I knew it would get handled quite a bit by our family.
2. Consider Color Scheme of Map
We wanted neutral colors for our map based on our basement decor. But, perhaps you want more traditional map colors?
Pick what works for your space!
3. Hang map in exact location on wall
We’ll get to building the frame in a moment.
Prior to purchasing lumber for the frame, I would strongly suggest getting the map home and putting it up on the wall.
Basic, round/flat head thumb tacks were used to hold the map in place.
The frame will go directly over the edges of the map, which we’ll get to in just a bit!
If you happen to select an extremely large map like I did, you will need a helper. It’s really challenging to maneuver a poster this large and ensure you get it on the wall straight.

I would suggest placing a thumb tack in the top center, smoothing out the map, then putting thumb tacks in each of the corners once it is smooth.
With a poster of this size, it took a little effort to get it nice and smooth. As you can see in the above image, I wasn’t quite there yet;-)
Either ‘eyeball’ the map or use a level to ensure it is straight. I, personally, am a eyeballer!
4. Measure for your boards to make a simple frame to hang over the map
Once the map is on the wall, then you can measure to get the exact board lengths you will need to make a frame.
Keep in mind, the frame you make will hang directly over your poster map.
For reference I got 1×3 boards, two at 43 inches long and two at 79 1/2 inches long to cover my poster.
For more specific tips on measuring boards to make a basic frame, read How to Hang a DIY Frame to Hang Over a Bathroom Mirror . In this post, I use the exact same process for making a simple frame, providing lots of step-by-step detail.
You do NOT need any major woodworking tools for this project!
Go to any big box store such as Lowe’s, Home Depot, Menard’s. If you tell them the length of boards you want, they can cut them for you for no additional cost.
I typically pick up cheap pine boards which work great for this kind of project.
This frame could easily be made for around $10-15!
5. Stain or paint boards to your preference
On many of my other basement projects, I used Minwax Special Walnut stain. So, to keep the look consistent in this space, this is what I used for this frame as well.

Or, you could paint the wood to coordinate with your home decor if you’d rather.
Related: DIY Wood Shelves Hung with Drywall Anchors (this post gives detailed instruction for staining wood AND using drywall anchors which we’ll use in a bit).
6. Secure the boards together for the frame
The boards were held together with wood glue and corner braces.
Prior to gluing the boards together, I painted the corner braces and screws with some left over black chalk paint as they came in silver.
TIP: It’s much easier to paint these prior to putting them on the boards!

To be quite honest, the boards were so long, the wood glue didn’t do a whole lot to secure them together.
I relied primarily on the corner plates and the 3 hole D-ring hangers (see below) to give the frame more stability.

7. Attach D-rings to back of frame to hang
In addition to providing a hanger for the frame, large d-rings hangers were used to give a little extra stability for the frame.
See how I used a 3-hole d-ring hanger to help secure the two boards together.
I went ahead and put these hangers on all four corners to give the boards a little more support.
There are lots of other ways you could likely secure them together, but these were supplies I already had at home. I’m all about using what I have!

8. Use Drywall Anchors to give frame more stability on the wall
Chances are good, you will not have studs exactly where you need to hang the frame.
Drywall anchors will allow the frame to be secure on the wall. If you aren’t familiar with using drywall anchors, read this linked post for tips !
Be sure to measure, measure, measure!
You want to drywall anchors to be in the exact right spot to ensure your frame hangs well.
Think of this just like if you were hanging a picture on the wall.

9. Hang your new frame directly over the map poster!
The frame will go directly over the map. This just makes a simple map poster look a lot more put together.

10. Determine a push pin system for your travel map
My family was a bit all over the place on how we should use the push pins.
We considered a different pin color for each individual in our home, a pin color for just Jason and I, a pin color for the entire family.
As you can tell, we are a family of over-thinkers.
Ultimately, we decided on different pin colors for:
- Places we’ve been as a family
- Places we are planning on visiting as a family

You can make this your own! Do what works for you and your home.
Now it’s time to get all the nostalgic feels, thinking about the places you’ve traveled the world with your family!

We have just started putting the pins into the map. We’ll work on it slowly.
So far, we have only marked a few of the places we’ve traveled.
AND YES, the pins are going directly into the wall!
If I decide I want to take this down at some point later, I would need to use a thin layer of spackle to fill the holes and paint over it.
To me, that would be totally worth the cost savings to have an oversized feature wall decor item like this.
Now, to plan more trips!
Curious about our other basement projects?
- Basement Guest Bathroom Makeover Reveal
- How to Paint Tile Floors Using Stencils
- How to Update a Stone Fireplace with Paint
Take a moment to save this to your favorite Pinterest board for later reference!

Love Our Real Life is all about ways to love YOUR real life. DIY projects, simple home decorating, organization, recipes, and day-to-day living that is real! Read more about me .
Similar Posts

How to Create a Charging Station for your Electronic Devices in a Cabinet

Easy Envelope Pillow Cover Tutorial: With Pictures

Magnolia Wreath DIY: Make Your Own in Minutes

Winter Planter Ideas / Christmas Decorations for the Outdoors

Burlap Bulletin Board DIY

The Best Chalk Paint Brushes for a Beautiful Finish
LIVING THE DREAM
How to Build a Beautiful Push Pin Travel Map for Under $50

Published by Jeremy . Last Updated on April 23, 2024.
Disclaimers : Our site uses demographic data, email opt-ins, display advertising, and affiliate links. Please check out our Terms and Conditions for more information. Listed prices and attraction details may have changed since our visit and initial publication.
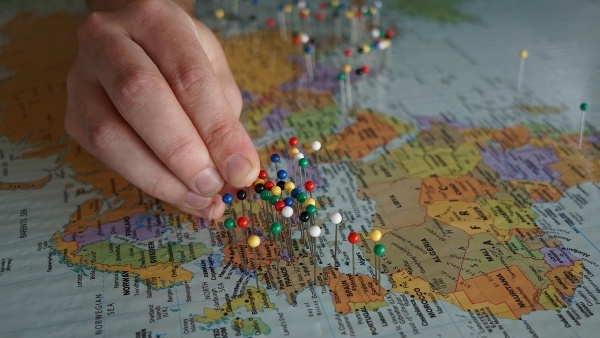
One of my favorite travel blogging images is the digital push pin travel map that highlights cities and destinations that its creator has visited.
In one quick glimpse you can see every place in the entire world they have been and with just a little thought, imagine where they may be going next.
As we are building a home full of travel decorations, I knew that one day I would be taking this popular digital map and converting it into a real-life decoration to be used as the centerpiece for one of our rooms (with a fantasy of it being in a travel-inspired bar room).
I always expected these maps to cost upwards of $150 or more when finished, as is the case with some of the nice ones available on Amazon or Conquest Maps , but I couldn't bring myself to spend that kind of money right away.
Instead, I put on my crafting hat and ended up being able to make my own professional style travel map with pins at home for just about $50 US and an hour of my time.
If you've ever fantasized about making a push pin travel map of your own, here's what you do.
Items Needed for Push Pin Travel Maps

The pre-made maps sold on Amazon or Conquest Maps have a decent mark-up in price mostly because the construction work is done for you. But for a bit of trade-off in overall quality and time to build it yourself, you can also put together a map with relative ease.
For those who wish to build theirs at home as we did, you'll need the following items for a 3-foot wide map:
- 36″ World Map Window Cling
- 36″ Bulletin Board
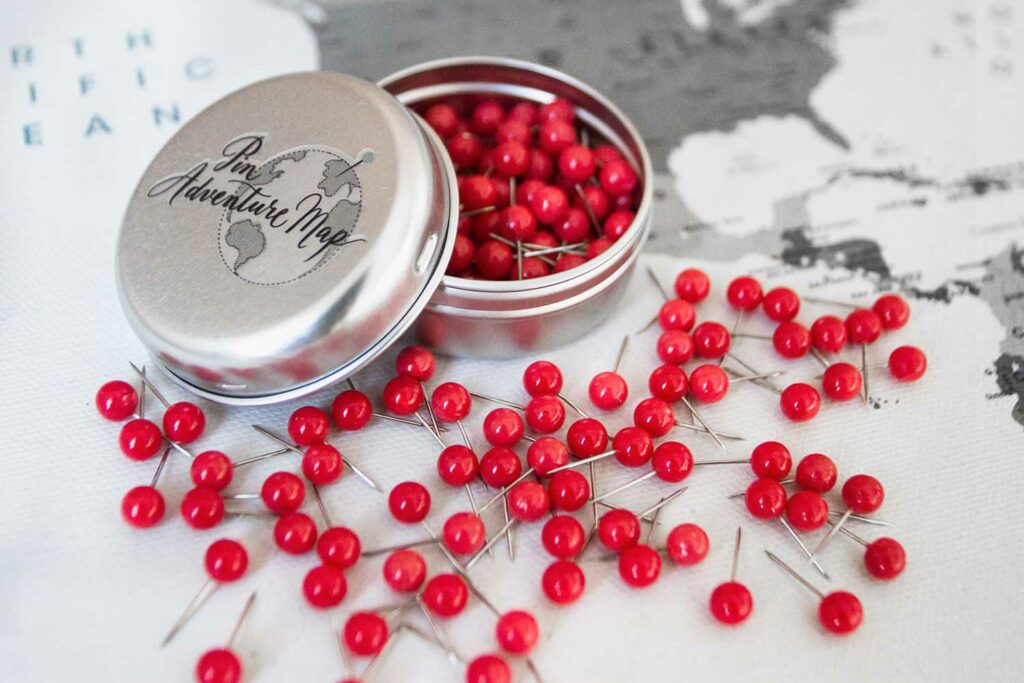
- Several Boxes of Color Coded Push or Sewing Pins ( How many cities have you been to I wonder…? )
- 2 Hanging Implements (minimum)
Method of Construction for a Travel Map with Pins

Building this travel map is pretty straight forward and follows a few simple steps.
1) Window Cling, Meet Bulletin Board
Take the window cling off of its backing and place it as evenly as possible on the bulletin board, ensuring you avoid adding air bubbles as best as possible. When the window cling is placed, push out any excess bubbles to the edges.
We had two major hurdles to deal with in this step.
First, our bulletin board was a bit warped so we had to weigh it down a bit to ensure it would level out (which was pretty easy). Second, the bulletin board we purchased measured 35″ edge to edge, so the 36″ window cling was just a bit too large.
• Planning a trip? Find a flight deal . • In need of a room? Check out hotel and apartment prices. • Taking a cruise? Find a cruise itinerary for your journey. • Don't overlook picking up a rental car or day tours as well!
When adhering we wrapped the excess map around the edge, giving the bulletin board an almost canvas-like appearance.
We decided that we liked this style better than trimming the map to fit the available bulletin space, which sounds like a bit of a nightmare, so we were glad to avoid it.
2) Test Placement and Hang

Determine where the push pin travel map will be hung and measure the height and distance between the mounting points accordingly. Making careful notes on the hole placements and distance between each in the bulletin board is key as they do not give you a good amount of wiggle room when hanging.
There are many different ways to hang a bulletin board, and the most common (and likely recommended in the bulletin board package) is by drilling a hole into the wall and installing a wall anchor.
As was the case with our Turkish lamp , I do not like to make recommendations when it comes to hanging objects in your house as wall materials and hanging methods can vary quite substantially.
For us, our walls are made of delicate plaster and we avoid drilling or installing nails wherever possible. We found that these wall hooks worked great for our bulletin board, although to be honest you may wish to wait to buy these at a local store once your board arrives and you can confirm the size and available opening space.
We did have to use a wrench to close the opening of the hook to improve the aesthetics when hung as well.
After placing the hooks on the wall we let them rest for the recommended 24-hour period before hanging our map permanently.
3) Start Pinning!

When the window cling is placed properly, and you have prepared a hanging spot on the wall for the map, you are ready to begin pinning. We recommend getting pins with the smallest heads possible (ours were 4mm width), especially if you are well traveled, as space becomes tight rather quickly. Typically sewing pins are smaller like ours, while a branded map pin is about the size of a standard push-pin and was too large for our needs (seriously, they're huge).

As with most bulletin boards, the holes you make get larger each time you place and remove a pin in the same spot, so take a few minutes before getting started to decide on a pinning method that interests you most.
Will you push them into various depths? Place them straight up or at angles? Color code trips or regions? Ensure a spectrum of colors in each region?
It is best to plan exactly how your board will look when finished before starting to ensure you do not repeatedly add or remove pins which will cause them to be loosely held in place.

Once you have a plan of attack, get to it!
This was quite possibly the most enjoyable decorating project we have done and finding some of the small, off-the-beaten-path cities we visited on a map made for a great challenge. You may need to have a computer handy for this one!
4) Hang Your Completed Travel Map!

Isn't that awesome?
We Upgraded to Conquest Maps Later On

We made our DIY travel map with pins as featured in this post in 2015 but always kept it in the back of our minds that at some point in the future we were going to upgrade to a professional looking map.
In late 2017 we decided to buy ourselves an early Christmas present and opted for a three panel map from Conquest Maps measuring 48″ x 32″ which fit perfectly on our wall (which as you can also tell, received a paint job since we first published this post as well). Click here to check out our map directly or check out our full Conquest Maps review here.
It is always hard in judging maps online, but we were pleasantly surprised with the high-quality nature of the map, and the corkboard had a nice robust feeling when we put our pins in unlike the one we purchased for our DIY setup which felt a bit flimsy to us.

The map itself came with one hundred pins with 1/4″ head and 1/2″ tack length, which was a great size but we thought the head was a bit large for our liking so we opted to buy a 600 pack on Amazon with 1/8″ head and 3/5″ tack length (roughly the same overall pin length) which worked really well for our large map.
They pop out ever-so-slightly but don't stick out too much like in our DIY map which admittedly had much longer pins. ( Grab the pins we use here ).
It is worth noting that the cork board is not that deep and has a hard backing that prevents you from sticking the pins in past a certain distance. We'd estimate that depth to be about half the tack length (about 3/10″), so we would highly recommend not getting too large of a pin if you go for a map from this company.
Overall, this map did come at a premium, about $284 in total mostly due to the fact that we bought one of their largest ones, but it is going to be a central focal point in our room for years moving forward.
Other pre-made maps we like are also available on Amazon, such as Antique Map , Executive Map with Black Frame , another Antique Framed Map , or Simple Map with Black Frame .
Looking to Build Your Own Map?
To build your own wall map, purchase your window cling , bulletin board , color coded pins , and hanging implements to build your own!
Looking for more travel inspired home designs? Check out our store about buying a Turkish rug in Istanbul or hanging a Turkish lamp .
Read More Lifestyle Design Articles

Financial Independence Retire Early? I’m Fine With Digital Freedom
Conquest Maps Review – The Most Beautiful Travel Map
5 of the Best Travel Rewards Credit Cards in Our Wallets
About jeremy.

About the Author: Jeremy is a full-time travel writer based in Pittsburgh and primary author of this site. He has been to 70+ countries on five continents and seeks out new food, adventure activities, and off-the-beaten-path experiences wherever he travels.
Leave a Comment Cancel reply
Save my name, email, and website in this browser for the next time I comment.

DIY Push Pin Travel Map for Under $100
Do you love cork board maps as much as we do? Why not DIY and customize your very own inexpensive push pin travel map to display your family memories.

Disclosure : This site contains affiliate links for products and services I recommend. When you make a purchase through an affiliate link, at no additional cost to you, I may earn a small commission. Read our full disclosure here.
Whether travel is suspended for the foreseeable future or you simply want to preserve travel memories, a DIY push pin travel map is a great way to keep the wanderlust alive in your home.
Using any canvas, standard size map, you can easily customize your world map and create a beautiful focal point. Showcase your travels, glance up at the memories, or share them with your kids.
This project is a great way to involve children in the travel process and show them different places, too. My three year old loved “helping” me put the pins in the different states we’ve been to or lived in. We discuss different things we’ve done in different places and show him where we’re heading next.

How to Make a DIY Push Pin Travel Map
What supplies do you need, spray adhesive.
- Pins or flags
A Canvas or Paper Map
There’s a ton of inexpensive maps online. A standard size – like 24×36 or 30×40 – is ideal for hanging above a mantle or TV console.
The beauty of this DIY push pin travel map is that you can pick your own map and go from there!

I love this paper map , this inexpensive one , and this one for a kid’s room , as well.
There’s a time and place to dish out money on higher end frames…but luckily this isn’t it. Since the actual map is what attracts your eye, a simple, inexpensive frame will do the trick.
We have a frame similar to this one and other frames around our home by the same company. I love this simple wood frame and this sleek one , as well.
For this project I searched for a frame with a styrene or acrylic front, since I wouldn’t be using the glass.
You’ll need a roll of cork with 1/4 inch thickness. The thickness replaces that of the glass/plastic front and guarantees a fit. This cork roll is easy to cut and already fits with a standard poster size map.
This 3M General Purpose Spray Adhesive is designed for lighter materials – like cork – and can create a strong bond in as little as 30 seconds. It’s photo safe, as well, if you order a photo map rather than canvas.
Map Pins / Tacks
We love these simple white tacks since they’re inexpensive and neutral. I also think it could be super fun to color code you map for different types of trips, people, or places you’ve lived!
Creating Your DIY Push Pin Travel Map
The process for this DIY travel map is quick and easy – you’ll be able to hang your map and display your push pins in under and hour!

Step 1: mount cork
Completely disassemble the frame; set the wood aside and put the glass or plastic front away. You won’t be using it.
Cover your working area with newspaper or a drop cloth and lay the mat board – or the piece of cardboard holding space in the frame – on top. I may or may not have forgotten to lay a drop cloth down…
After shaking spray adhesive according to package directions, spray the cardboard with an even layer of glue. You can test readiness with the back of a knuckle – when adhesive feels sticky, but leaves no residue on your finger, it’s ready (usually about 30 seconds)
Gently roll cork onto the sticky cardboard. Flatten out any bubbles and use a few heavy books to hold the cork down as it dries.
Step 2: mount map
The cork will dry pretty quickly – you’ll be able to move onto the map within twenty minutes.
Repeat the same process as above – spraying the cork now with an even layer of adhesive, testing readiness, and gently laying the map on top.
Again, smooth out any bubbles and use the same books during the drying process.

Step 3: reassemble frame and hang
If frame requires any assembly – such as hanging frame mounts or hardware – do that as the map dries.
After another twenty minutes, simply place the now single layer of cardboard, cork, and map back into the glassless frame.
That’s it! You’re ready to bust open the push pins and hang your masterpiece. My three year old loved “helping me” put tacks in all of the cities we’ve been.
That’s literally it! For under $100, you can customize and create your very own DIY push pin travel map to display your favorite travel memories and plan new adventures!
Let me know if you end up creating your own. And of course feel free to share your favorite travel themed, at home projects to keep the wanderlust alive!
Save to Pinterest:

You Might Also Enjoy:
- Travel Theme Preschool Activities
- The Many Benefits of Taking Family Vacations
- The Best Travel Gifts for Kids
I absolutely love this and you did such a great job. I have a huge map here my hubby purchased a long time ago for me and I haven’t done anything with it. The truth is we don’t have the wall space. I think it’s bigger than the one you mounted, haha.
I would love to do this in the future when I set up a home office.
Thanks for the tips! Oh, and your home is coming together so nice!
Thank you so much! We had this one for a while too and I decided something had to be done. Turns out it was an easy project! Anything bigger I think would definitely need an entire wall. We have a small space too..not can be tough!
This is such a great idea. It looks really nice. I would have had no idea how to do this, so it’s good to learn. Never know when I might have put up my own map. I also think it’s such a fun thing to do with your kids. You really are a great mama! I can almost imagine the conversations that this brought up with your little one. So sweet! Thanks for sharing.?
Thank you so much!! I try to put the kids first and always involve them…it’s definitely a challenge some days, though. I seriously had this map for a few years and when I finally got around to mounting and hanging it, I was like, wow, this is so easy and cheap and IDK why I didn’t do it sooner.
- Pingback: Best Travel Gifts For Toddlers That Kids And Parents Will Love! [+Photos]
Love this! Quick question, I’ve seen reviews about the cork roll that it doesn’t hold pins(tacks. I’m assuming you don’t have this issue, but just checking!
We definitely don’t have that problem!
Thanks for the tutorial! I’ve been wanting to do this. However, I noticed that you said to use 1/4” thick cork, but the cork you linked is 1/16” thick. I didn’t think you could buy cork in rolls 1/4” thick. Which is correct?
Leave a Reply Cancel reply
Your email address will not be published. Required fields are marked *
This site uses Akismet to reduce spam. Learn how your comment data is processed .
- learn more about Explore With Tori
- join our adventure mom squad: subscribe
- see how you can work with me
WHAT ARE YOU LOOKING FOR?
Where can you find me.
This site contains affiliate links, at no additional cost to you. As an Amazon Associate I earn from qualifying purchases.
CLIMATE NEUTRAL & FAST SHIPPING
——————
How to Make a Push Pin Map? The 6 things you must know before getting started.
Do you love traveling? Or maybe you just like to know where all your friends and family are located. Either way, a push pin map is a perfect way to keep track of all your worldly adventures! In this blog post, we will teach you how to make your very own push pin map. It’s easy and fun, and best of all, it’s a great way to show off your travels!
What do you need in order to make a DIY push pin travel map?
To make a push pin map, you will need:
- a piece of paper or canvas
- a frame (optional)
- your own personal touch
- a place where to hang your map
Canvas or paper for a push pin map
There are a few different ways that you can make your push pin map. You can use a piece of paper or canvas , and you can either frame it or leave it as is. A standard size such as 24×35 or 30×40 is great for hanging in your favorite spot.

Canvas for push pin maps
A canvas is a great option if you want your map to be a little more sturdy and have a bit of a different look than a paper map. You can find pre-made canvas push pin maps, or you can make your own by purchasing a blank canvas in either cotton or polyester but they are often blended fabrics. Usually, the best canvas blend has more cotton than polyester.
Cotton Canvas is the traditional option for a push pin map
This natural fabric allows the ink to be absorbed deeper for a more rustic look and better durability. If you’re going the traditional route and using cotton canvas, make sure that you select a heavyweight option (at least 18 oz.). This will ensure that your map doesn’t warp or curl when you add all of your pins. You can find cotton canvases in both natural and white options.

Polyester Canvas is the standard for most printed items.
It is a good option if you’re looking for a little bit of a different look or want to avoid warping or curling. Polyester canvases are available in both matte and glossy finishes, and they come in a variety of colors.
If you want a more unique look, you can also have a custom cotton blended canvas made. This means that you get to choose the type of cotton and the blend of polyester. You can also select your map’s weight, color, and finish. This is a great option if you want something really special.
Paper for push pin maps
If you choose to use paper, it’s important to select the right type.
Traditional paper is made from wood pulps.
This type of paper is great for maps because it’s lightweight and relatively inexpensive. However, it can be easily damaged if it gets wet, so you’ll want to be careful with your pins.
If you’re looking for a more durable option, you can choose to use coated paper. Coated papers are made with a plastic coating that makes them more damage resistant and durable. Coating is used to emphasize the paper’s qualities, such as weight or gloss. If you’re looking for a paper that is environmentally friendly, then you should try recycled paper. This type of paper is made from post-consumer waste and it’s also biodegradable.
You may also seek FSC® certified paper , which is paper that has been produced in a sustainable manner. Although certified FSC papers frequently include recycled material, it is not necessary to do so in order to receive the certification. The key criteria for certification are being harvested and manufactured responsibly.

The Forest Stewardship Council is a non-profit organization that was founded to promote environmentally and socially responsible logging. The FSC system assures that wood and paper have been harvested in a socially and ecologically responsible manner. The Chain of Custody certification from the FSC allows for the tracking of material throughout its supply chain, from certified initial source through manufacturing process to the end user.
Synthetic paper is made from propylene
This type of paper offers a smooth surface, tear-resistant and waterproof. Your map will last for a long time. Indoor and outdoor signage, posters, and maps may all be printed on synthetic paper. Synthetic paper is well-suited for these uses due to its waterproofness, tear resistance, and UV resistance against sunlight.

Board for push pin maps

A cork board is a must for a push pin map because the pins will stay in place and it won’t damage what’s behind your travel map. You can find cork boards in a variety of colors and sizes or you can make your own.
It is better to choose a high-density natural cork, which does not easily deform and retains push pins firmly while also removing the push needle without falling apart. There will be no unsightly pinholes in the surface.

A foam core can also be used for a push pin map. This option is a little more expensive than cork boards, but it has a lot of benefits. The foam core is lightweight and doesn’t warp or curl. It’s also resistant to moisture and will not show any holes from the pins.

A Gatorboard is a high quality board made of dense polystyrene foam. It is similar to foam core, but it’s a little more expensive and heavier. Gatorboard is also resistant to moisture and will not show any holes from the pins.
Push Pins for travel maps
Frame for push pin travel maps

Alternatively, you can choose a metal frame. Metal frames come in a variety of colors and styles and they’re usually very affordable.
Finally, if you want your map to really stand out, then consider getting a custom frame made specifically for your travel map. This will add an extra layer of personalization.
Personalizing your push pin map

Assembling your materials
Once you gather all your supplies, you will need to ensure that your map is flat. For this, just lay out your map and allow it to flatten. You can use some weight or some other object to assist with this process. It will take some time before it is flatten, so it is better to do this a day in advance.
You’ll then need to attach the map to the cork/foam board using a double-sided tape. Apply the tape along both sides of the board and place your map on it.
The perfect place to display your push pin map on a wall
A push pin map is about sharing and cherishing your travel memories. Your travel push pin map should be placed on a wall where you can see it everyday and be reminded of your amazing adventures. Your living room, your bedroom or even your office wall could welcome your travel map with open arms!
Now that you know how to make a push pin map, it’s time to start planning your next vacation !
Feeling Inspired?

- Sustainability
- Map Features
- Map Gallery
- Affiliate Program
- Europe Maps
- Customer Help
- Shipping & Delivery
© Pin Adventure Map 2023
- Terms & Conditions
- Privacy Policy
DIY Push Pin Travel Map
UPDATE: All new featured RV tours will be posted on my other website, Wanderful RV Interiors . Existing tours will slowly be moved to the new website, and anything already moved will automatically redirect.
Disclaimer: This post may contain affiliate links, meaning, if you click through and make a purchase we (or those featured in this post) may earn a commission at no additional cost to you. View our full-disclosure here .
If there’s one thing every RV needs, it’s a map.
I remember visiting my aunt and uncle as a kid and they had a huge map set up in their basement where they documented all of their travels with push pins. I thought it was the coolest thing ever and knew one day I’d have one of my own.
Whether you love to travel, plan to travel, or simply dream of doing it someday, this DIY push pin travel map is the perfect way to document your adventures, or maybe just brush up on your geography.

While we had plans to add a map to our RV, the big question was… where?
I originally thought about adding a pull-down map towards the front of the RV, behind the driver and passenger seats. I figured this way we could pull it down to hide the driver’s area while we were parked, and there would be enough space for us both to stand in front of it and decide where our next stop would be.
We also considered creating a roller shade from a large map for our hallway to cover the two windows.
In the end, we decided we really wanted a map that we could add pushpins to in order to document our travels. Since we wanted a larger scale map we figured the best spot to hang it would be in our bedroom. We had already removed a large mirror from the back wall so all we had to do was determine the size we wanted and find our map.
I couldn’t find too many before photos of our RV bedroom from when we first bought it, but here’s one:

Ummm.. can you say 70’s style hotel room? Haha.
I then spent waaaaaaay more time looking at maps than I had anticipated. We wanted something that had a vintage vibe, but at the same time had updated information.
After hours looking at various US maps, I kept coming back to this map . I loved the antique style and that it was more of a horizontal design vs. square. I knew it would look perfect above the cedar chair railing we had added to our bedroom.
Although I’ve mounted poster-size prints to plywood and foam board with spray adhesive in the past, I loved that this map also had the option of re-positionable peel and stick.
That’s when I reached out to World Maps Online , who provided us with the map for this post. The customer support was awesome and they gave me all sorts of tips for mounting the map onto different types of materials.
Here’s how they described the peel and stick map material:
“The adhesive is a little more aggressive than a typical sticky note and will stay up for years.”
We originally considered adding the map to corkboard or even foam board, but ultimately decided that plywood would be the best option for creating this push pin map inside our RV. This was mainly because finding corkboard in the size we needed made it a bit pricey, and I read that foam board can be flammable and wasn’t sure how I felt about that in the RV.

- US or World – we used this one in 67 x 36 with re-positionable peel and stick
- 1/4 inch plywood – you can get this cut down to size at the hardware store
- Two 1 x 2 cedar boards (stained with tung oil), but you could also use fir strips, wooden dowels, etc.
- Measuring Tape
- Credit Card or something else to smooth the map out onto the plywood – I used my Silhouette scraper.
- Two eye hooks
- Drill + Screws
- Hanging Hardware (we actually screwed the map directly into the wall of our RV for extra support)
- Nail – this is for decorative purposes only
If you don’t use the peel and stick map you can attach it to the plywood using spray adhesive like I did in this post .
The first thing we did was measure the size of the plywood we needed as well as the cedar boards which would be a decorative “frame” for the top and bottom of the map. This will depend on the map size you use and if you want to add framing.
Note: I recommend measuring your map before buying the plywood or whatever backing you are going to use and not just going off the measurements you see online. Our map was just slightly smaller than the measurements online so we actually had our plywood cut to 66.5″ wide and 39″ tall. We had it cut a few inches taller than the actual map size so that we could add our 1 x 2 cedar boards to the top and bottom of the plywood, which was cut to 68.5″ long.

If you’re going to “frame” your DIY push pin travel map with any wood then you’ll want to stain it now. This way you can give it the amount of time required to fully dry before you attach it to your plywood. We used tung oil because we are obsessed with it, but it takes a lot longer to cure than most stains. We waited a couple of days before attaching it but it actually leaked down a little bit onto our map. Luckily the map is a vintage style so it’s a little harder to notice but we should have waited longer before attaching them. Woops.
Next, you’ll want to measure out where the wooden frame will go onto the plywood and mark lines so that you have a guide on where to place your map. You could have your frame placed on top of your map or have it line up next to it. We decided to have our cedar wood line upright on top of the map.
Now you get to attach the map to your plywood, yay! If you’re using a really large map I recommend having someone help you with this.
Let me say that the first thing I noticed about the map was the quality and that it had a really nice texture, sort of like canvas.
We lined the map up to the lines we drew onto the plywood and then removed the backing from one corner. We then placed the sticky corner into position and slowly started removing the rest of the map backing. Eric helped me slowly move the map down into place. I smoothed the map out as much as possible using my Silhouette scraper (you could also use a credit card) to avoid wrinkles, starting from one corner and working my way out. We worked slowly and gently but because the map was re-positionable we were able to lift it up and start again when we felt it was more off than we wanted.
Side note: I used a black sharpie to “paint” the thin side of the plywood but looking back it would have been better to paint an inch or two around the border of the plywood, and the side white (if anyone will be able to see the side). I say this because our map had a white border and after we placed it down we were off by just a smidge, so you can see a tiny part of the pinkish plywood we used. It’s barely noticeable but had we painted that area of the plywood white, you wouldn’t notice it at all. It’s not something you have to do, but it would basically help if you’re map isn’t perfectly lined up to the edge.

You can see our map fully attached to the plywood in the photo below. You’ll notice we left a couple of inches at the top and bottom of the plywood for our cedar 1 x 2’s.

We attached the map to the wall of our RV with our nail gun and then added a couple of screws.

We could have waited and attached the cedar 1 x 2’s first but wanted to give the stain a bit more time to dry and were just excited to see this guy up on the wall.
You’ll probably just want to add some heavy-duty hanging hardware to the back of your map/plywood and hang it from that. However, we decided to go this route to make it extra secure in our RV. Of course, you want to be extra careful when you nail or screw things into the walls of your motorhome, but there was previously a heavy mirror here so we knew it would be fine and could handle the weight.

Before we attached the 1 x, 2 cedar boards, to the top and bottom we screwed an eye screw to the sides of the top board. We then strung some twine through the eye hooks so that it will look like the map is hanging from the twine. This is purely decorative.
We used cedar because it’s super lightweight and since it’s a softwood it was pretty easy to screw in the eye hooks. However, if you’re having trouble you can poke a hole with a thumbtack first which will make it easier for the eye hook to go in.

We then attached the cedar 1 x 2 boards with our nailgun. Easy peasy. Now it looks like the map is hung from a nail but it’s really just an added rustic touch.

Here’s what the DIY push pin travel map looks like hung up in the bedroom of our RV. Sooooo much better than it was when we first bought it, and now we have an awesome map to document our adventures.

You can see from the photo below that our alignment of the map was just slightly off, so you can see some of the pinkish plywood on the left side. I feel like it’s less noticeable in person but will probably paint the edge or add white washi tape or something someday. Maybe…
That’s why I suggested painting the border of your plywood to match the border of the map you use. Sure we could have removed the map and re-positioned it, but we figured it wasn’t too bad. Overall, I’m pretty excited at the transformation of our RV bedroom, and this map makes a huge impact on the space.
And the plywood makes it easy to add map pins, yay!
What do you think? I absolutely LOVE our map and highly recommend checking out World Maps Online if you’re looking for map decor for your home or RV.
I can’t wait to fill this baby up with pins as we journey across the US in our RV! Are there any small mountain towns you think we should add to our must-see list? We would love to hear about them in the comments below!
Update: Here’s a photo of our DIY push pin travel map soon after we hit the road.

And here’s a photo from Christmas, when we strung battery-operated fairy lights around the map to highlight the places we’ve traveled. We liked it so much that we decided to keep the lights up year-round.

Thank you so much to World Maps Online for providing us with the beautiful antique-style map for this post. As always, all opinions are 100% our own and we only recommend products we use and love.

12 Comments
This is such a neat idea. Thanks for sharing it at The Creative Circle!
Side note: Are you from NC, by chance? I am from an hour west of Raleigh.
Thanks Angela! We’re not from NC, but we did get married near Asheville and definitely have a soft spot for it. In fact, a few mountain towns we are considering moving to are there, particularly around Boone. 🙂
LOVE LOVE LOVE your map project! I’ve been following you both, but hadn’t commented because we’ve been busy on our own RV reno, (this is the 4th one we have tackled), we now consider ourselves PROS LOL, but on each RV there is an issue that rears it’s ugly head, and you think to yourself, “I never saw that one coming!!!” We are currently renovating a 38′ ft Safari Diesel Pusher that had been smoked in for 22 yrs…YES IT WAS SUPER GROSS! We did a costly RV mistake on this one, we removed the BEAUTIFUL (JK) Toucan etched shower enclosure, then found out you can’t just order a corner shower stall. Nope, gotta have it custom made, $1,800!!! So live and learn, or actually, tear out and learn is our current motto!
Was wondering if you’re planning on coming to Washington State anytime soon? This is the most gorgeous state, and has so many things to see, we still haven’t hit them all yet, and I was born here! I also wanted you both to know we have 3 acres and would be your boondocking hosts if you’re ever up this way and wanted that option. We both feel like the people we have met RVing have turned out to be better than, most people we have known for years, not sure why that is, it just has been a fact!
I have posted our last reno on irv2.net, and hope to post this one as soon as we are done. Take care and hope you keep the wonderful blog posts coming!
Wow, that’s awesome that you’re on your 4th RV reno, and I’ll definitely have to check irv2.net for the photos!
We came so close to removing our shower when we were dealing with the water damage in the bathroom but since we didn’t have to, we figured it would be best to keep it in place, and now I’m sooooo happy we did. Man, what a bummer but definitely good to know.
We have never been to Washington but it’s one of the states I’m most excited about, and it’s definitely high on our list. We may just have to take you up on that offer… 🙂
Could you tell me how you went about taking the old mirror off the wall and did it leave any damage to the existing wall? I have been wanting to remove mine (exactly the same) for two years. Thanks! I love your map!
Hi Bettyanne,
The mirror in our RV was just glued onto the wall with some sort of adhesive. We actually just used a putty knife to get leverage behind it and then were able to loosen all the edges and remove it, but yes it did tear one or two areas of the wallpaper just slightly, although that’s now covered by the map.
However,, I read somewhere about someone using heavy duty fishing line to essentially get underneath the mirror on both sides and pull it through to the other side to loosen up the adhesive, so you may want to try that. Whatever you do I definitely recommend having someone help you. You could always contact the manufacturer too and see if they have any recommendations on removing it.
Hope that helps 🙂 Katie
I love this map and the idea of putting in your RV is brilliant! I pinned it so I can get one too when we move into our new house. Now I just have to figure out which wall to put it on!
Thanks Pamela! How exciting that you’re moving into a new house, I’d love to see what you end up doing if you add a map anywhere 🙂
The map is a great touch since you are going to live and travel in your RV, you did a really good job designing, it and giving your instructions here for us to follow.
Thank you Sandy! It was a super easy project, and gave us almost instant gratification. I love those types of projects 🙂
Just found your blog via Pinterest as I was looking up ideas for our little camper. I am blown away by the bit of remodel I saw!! Wow!! Can’t wait to come poke around the site again soon. You asked about mountain towns to visit – you need to check out North Idaho! I am in the Coeur d’Alene area, it is amazing here!
Thanks Sarena and we will absolutely have to check out the Coeur d’Alene area! Idaho is actually one of the states I’m most excited about!
Comments are closed.

DIY Push Pin Travel Map
By: Author Vineta Jackson
Posted on August 10, 2020
Home » DIY Projects

Transform a drab bulletin board into a DIY push pin travel map to keep track of all your adventures! Dress it up with fabric and fancy trim to display in your home office!

We didn't travel far from home when I was growing up. It wasn't until college that I was bitten by the travel bug, hard. Now I want to go to all. the. places ! Even our son loves to go on adventures, and would rather stay in a hotel than in his own bed.
We've been keeping track of our travels on a big world map mounted on a bulletin board with colored flags to pinpoint each location. But all the neutral colors were looking a bit bland, and the corners were starting to curl from the missing push pins at the bottom.

While we won't be doing any traveling anytime soon thanks to the pandemic, we've been planning where we want to go when this whole thing is over. We're dreaming big, and no destination is off the table! Australia and New Zealand, we're coming to you soon! 🙂
In the meantime, it's time to give this blah map a new look!
Materials Needed for DIY Push Pin Travel Map
- We have this National Geographic map which clearly marks cities with a dot for easy pinning.
- If you're more of a domestic traveler, here are some nice maps of the United States .
- This one is similar to mine. You want the cork board to be slightly larger than your map.
- I used this travel-themed one . You can find lots of similar options here or here .
- I use various colored flags to indicate where different members of our family have traveled. Red for my husband and I together, and blue for our whole family. You could use another color to indicate where you would like to go in the future.
- Spray adhesive
- Rotary cutter
- Painter's tape
- I used the antique gold color, and 5 yards was the perfect amount for my project.
How to make a push pin travel map
Paint the frame.
After removing the pins and map, I was left with a boring brown cork board with an even more boring frame. I wanted a bit more contrast, so I taped off the inside edge of the frame on the cork with painter's tape. Then give the wood a light sanding, just to scuff up the surface and make it easier for the paint to adhere.

Apply two coats of paint to the frame. Much better!

Add fabric backing
Fabric is a great way to change up a boring bulletin board. It doesn't show pin holes like decorative paper does, and you can change it up whenever you want!
I had a yard and a half of this city themed fabric left over from my sewing days. It has a burlap texture, so it wasn't going to work for the throw pillows I had envisioned. But it was perfect for this project!
Place the fabric on top of the bulletin board. Trim off the excess, leaving just enough overlap to cover the frame.

Now flip the fabric over and spray the back generously with the spray adhesive . This particular adhesive is repositionable, making it easy to move the fabric around and get the words lined up exactly as I wanted. Once it's in place, press the fabric down and crease the edges and corners around the inside of the frame.

Use a rotary cutter right up against the edge of the frame to trim away the excess fabric. Be careful not to press down too hard or you'll cut straight through the cork!

Adding the fabric totally transformed the look of the bulletin board! You can leave it just like this, but I was worried the adhesive would eventually lose its hold and the fabric would fall off.

Add nailhead trim (optional)
This upholstery nailhead trim was the perfect addition to take my project up a notch. It was super easy to attach, too. It comes on a roll, with additional nail heads that are used just like thumbtacks on a bulletin board!

To secure the trim to the board, simply insert a nailhead pin into the hole in the trim. On furniture, you would use a hammer to do this, but it goes in easily with just your finger here.

At the corners, I snipped off the excess with cutting pliers . The dimensions of my bulletin board matched up perfectly with the holes of the nailhead trim. I just overlapped the holes at the corners and covered them with a pin.

Attach the paper map to the board
The edges of my paper map were starting to curl, so I trimmed away the white border. It also made the map coordinate better with the fabric behind it. I had extra nailhead pins, so I used them to secure the map to the board at the corners.

Add colored flags to mark your travels
The flag pins were inserted back into their original locations. The red pins are for places my husband and I visited before our son was born, and the blue ones are for family trips.

What a transformation! It's hard to believe this is the same drab bulletin board. The fabric backing and metal border really elevate it from a plain and boring cork board to a beautiful DIY push pin travel map!

Want your own push pin travel map, but don't want to DIY it? Here's a similar framed map with cork backing I found on Amazon here . You can choose your own frame color, and it even provides you with the pins!
Check out these other easy DIY projects!

DIY Air Plant Holder

DIY Blanket Ladder

DIY Drop Cloth Area Rug

Thursday 28th of July 2016
Love this! My daughter and her husband are currently traveling the world. This would be a great way for us to keep up with where she is and where they have been. Thanks so much for sharing! Pinning
Wednesday 27th of July 2016
These travel board would make a lovely wedding gift for a couple who loves to travel!
New York Roofing
Monday 25th of July 2016
This DIY project is awesome to try. And, it will motivate us to plan more trips. Your travel board is looking fantastic.
This is awesome!
Sam@Raggedy Bits
Tuesday 19th of July 2016
This turned out fab!! I love the fabric that you used!
The Handyman's Daughter
Thanks Sam! I was so excited to finally have a good use for it!

DIY Push Pin Travel Map
Sharing is caring!
Are you an avid traveler? My husband and I love to travel and here’s a budget-friendly way to track your travel with this cute DIY travel map.

When my husband and I started dating, I rarely traveled more than a short road trip away. Since then, we have traveled to many states and even overseas. I started using an app to track our travels but really wanted something to hang on the way to remind us of all our memories. I try not to overdo the trinkets and souvenirs from every place we visit, so this push pin travel map does just the trick! Check out my ideas below on how to make this budget-friendly map and be able to keep all your trips in order through color coding!
RELATED: DIY Craft Pegboard
In one quick glimpse you can see every place in the entire world you have been and with just a little thought, imagine where you may go next. The excitement and memories that all flood back into your mind is priceless. It’s also a conversation starter if you have guest is over. There are tons of places to buy ones already made, but the ones I loved are made on canvas and they are pretty expensive, especially if you want a decent size. (The one I wanted was $300 for a 24×36. Yikes! )There are other budget-friendly options like the scratch off ones but I didn’t feel that it is hang on the wall worthy. I also wanted the United States to have outlines of the states. Most of the world maps did not. So we moved to the best option any crafty person could think off and that is to make it yourself with a little DIY project! So, let’s get started!

WHAT YOU NEED:
- liquid nail
- caulk (optional)
- vinyl / Cricut (optional)
- French cleat picture hanger
- drill or screwdriver

How to Make a Push Pin Travel Map
I started with the same premise as the DIY craft board I made. The same sort of style would tie into the room nicely. Most of these things I got off of Amazon. To make it even more inexpensive for myself, I asked for these items for Christmas. 🙂 Since most of them are inexpensive (less than $30), my family didn’t mind getting them for me which worked out perfectly.
RELATED: DIY Travel Savings Jar
The frame just adds a sort of polished and elegant look to your travel map. Basically, you are making your own picture frame for all your travel memories. The frame is very easy to put together. Before you go to a hardware store like Home Depot. Measure the size of your cork board and map. I did have to trim just a little bit off the map for it to fit completely on the cork board. Don’t just measure once, measure twice! Then off to Home Depot or a similar store to purchase the molding. There are many different options for molding so if you see a different one you like better, by all means, use it! This one was cheap yet pretty so we grabbed a plank and heading to their saw section. I love that Home Depot has places to cut down the molding to what you need before you even leave the store. This saves a ton of money on tools you don’t need to buy, like a saw. Measure twice again, mark with a pencil and cut with the saw.

RELATED: The Ultimate Bucket List and How to Create Your Own!
After you cut all 4 pieces to the correct size, now you must cut the angles so they fit together like a frame. Home Depot once again wins! they have a miter box that guides your saw to cut at a 45-degree angle perfectly. Just line it up correctly and cut! Now I have to admit, this is a bit of an arm workout compared to a powered saw, but it’s free and done before I leave the store. You can also bring your map and corkboard with you to the store as I did so you can see that it all fits perfectly before paying and leaving.
RELATED: DIY Wall Calendar and To Do List – for ultimate organization!
Don’t forget to grab the liquid nail and a small thing of paint before leaving. I got my paint from Hobby Lobby. Now that you are home, it’s time to assemble it all together. Using liquid nail, spread a thin line on the border of the map. Smooth it down and allow it to dry before gluing the molding on top. My cork board does not have a big frame, which is how I wanted it, so it does cover a little bit of the map. After you add a nice line of liquid nail and fit the frame together. Use a quick grip to hold it together in place. If you have any gaps in your molding or frame, add a bit of caulk and smooth it down. Allow it to dry overnight. Even though the molding I chose was white, I added a coat of paint just get everything super white. Lastly, add the french cleat picture hanger to your board and where you would like it on the wall and hang it up!
This will cost you roughly between $50-$75 to make if you make it about the size of mine. My cork board and map was 24×36. If you ask for some of the things on your Christmas list like I did, you can do the travel map for less than $30!

RELATED: 10 Unique Things to Do in New Orleans
Making a legend is totally optional, but as the years press on, it’s hard to remember what trip we took when. Color coding our trips by year with these push pins really help to remember all the highlights of every year we traveled. It works best using a Cricut and applying the vinyl. If you don’t have one, I’m sure you could ask a friend to make you one with their Silhouette or Cricut. I also added the years on top the pin box to keep track that way as well.

These push pins are my favorite! I got 600 in 10 different colors which give me tons of places I can go each year. They are short and have a small pinhead with is perfect for these kinds of cork boards and travel maps. It makes it easy to see and they are fun colors as opposed to just the primary colors like the other push pins. The push pins come separated by color (Hallelujah!) and a small nifty box for easy storage.

Now the fun part of adding all your travels! This is when you realize how long it’s been since your last adventure and that it’s time to start planning another one!

Need more travel ideas? Go Here
Traveling to New Orleans? Go here
Starting a bucket list? Go Here
Feeling crafty? Go here
Want to spice up date night? Go here
Looking for delicious recipes? Go here
Share with friends!

You also might be interested in

AirBnB: Tips for a Successful Trip
This post may contain affiliate links, please read my full[...]

50 States Before 50

DIY Craft Peg Board
Leave your reply..

I love this so much. I have so many plans as far as traveling. I am going to do this once I start!

Thanks Blake! Traveling is definitely addicting! Just go on that first trip and you’ll have a board covered with travels in no time! 🙂

Oh my I could not love this any more! I saw your post on Facebook and didn’t realize you made the entire thing! This is just awesome. I love how colorful the map is! And what a great idea to make a legend with future colors so you can plan ahead too. Love, love love this.
Thanks Nikki! I appreciate all your kind words. Does this mean you will be making one to track all your adventures? 🙂

What a clever idea! I love this! I think it would be fun to have in our girl’s room, too.
That’s a great idea Kim! I can only imagine how full my board would be if I started young. 🙂
Notify me of follow-up comments by email.
Notify me of new posts by email.

Hey There! I’m Becky, and I’m so glad you stopped by! I’m here to help you find adventure in the everyday life whether its spicing up date nights , cooking a new recipe , exploring our city , or traveling the world . I’m here to show you how to make that happen. So, won’t you journey along with me?
Let’s Be Friends!

Get a FREE ebook!
Signup for our emails so you can get more recipes and this FREE ebook cookbook for delicious weeknight meals in 30 mins or less!
Don't worry, I won't email often, I hate spammy emails too!
Ebook is on its way!
Please check your email! I can't wait to send you all the deliciousness!
Popular Posts
Check Out Our Progress!

2017 · AdventuresofB2.com. Theme by HB-Themes.
Type and press Enter to search
How to Make a DIY Push Pin Travel Map
Taking photos in every place you visit is a good way of keeping track of and showcasing your travels, but you would achieve better results by making a push pin travel map. Such a map makes it easy for you to note the places you have traveled to and the places that you need to visit .
Some people opt to buy pre-assembled push pin travel map- which I guess is pretty much okay, but doing that would take away from you the joy and fun of customizing your own map from scratch. Also, a DIY push pin travel map will save you a lot of money.
And if you are thinking about giving the map out as a gift , a map that you made on your own would give you more satisfaction than the one you would buy from the shop.
A good push pin travel map should highlight the cities and destinations that you've been to. It should give you and your visitors a quick glimpse of your travel adventures. At the same time, a world map canvas gives your living room a little decor boost.

Please read on to learn how to make your own push pin travel map. Here are 9 steps of making a push pin travel map.
Step I: Preps
Acquire the following items:
- A 60cm by 90cm map.
- A foam board the size of your map or slightly bigger. You will use it to hold your pins in place.
- A paint of a color that blends best with your map and frame.
- A frame big enough to hold your map. Ensure that it has pre-installed hanging hardware.
- A foam paint roller and a couple of 1-inch foam paint brushes.
- Sharp scissors or a precision knife for any probable cutting needs.
- Spray adhesive that you'll use to bond the map to the foam board.
- Weighty items such as books.
- Smoothing tool to remove any air bubbles that may form after bonding the map to the board. The tool shouldn't be sharp otherwise it might damage the map.
- Color-coordinated pins to mark different locations on the map.
- A ruler and a tape
Step II: Cutting the board
- Use your ruler to measure 60 cm by 90 cm on your foam board and then mark each dimension using the tape. The edges of your measured outline should be perfect right angles.
- Join the marked edges with straight lines to form a rectangle.
- Cut the board along the lines drawn. Use your sharp precision knife or scissors to do this.
Step III: Glue the board
- Use the spray adhesive to glue the boar. Spray adhesive is preferred for this step because it dries up evenly, leaving little or no lumps. To get a perfect bond, apply as much adhesive as possible, though you should be careful not to go overboard.
Step IV: Place the map
- Carefully place your map on the board ensuring that the edges are well in place and that the map is well stretched out.
- Using your smoothing tool, smooth out any visible air bubbles. Run the tool over the map as many times as necessary until the bond is perfect and the glue is evenly distributed.
- Place the map facing the ceiling and place your heavy books on top of it. Leave the setup like that for a couple of hours so that the map can bond well on the board.
Step V: Prep the frame
- Paint your frame and leave it for 30 minutes to dry. If it won't have dried up by then, give it all the extra time it needs. While at it, remember to use the right colors that blend well with your map and color walls.
- Use your 1-inch brushes to get into the crevices of the frame.
- Add another coat of paint and then leave it to dry. That gives it a more complete, finished look.
Step VI: Frame the map
- Your map must be well dried up by now. Place it carefully in the frame ensuring that the edges remain intact. Remember to keep the map facing up.
Step VII: Pin your map
- Start by downloading a good pinning legend from a reputable website and then printing it out.
- Glue the legend to one corner of your map.
- Mark your travel destinations using the push pins. The advantage of having multi-colored pins is that you can mark past travels, upcoming travels, and dream destinations using different colors.
- When placing your pin, try to only mark the major cities and country capitals only to avoid overcrowding the map.
Step VIII: Hang the map
- Hang the map on the wall directly opposite the entrance door. That makes it the focal point of your living room so that every visitor walking through the door can see it.
Step IX: Decorating the map
- If you have any collectibles from your past travels, this is a perfect chance for you to showcase them. place them strategically and neatly on either side of the DIY world map canvas.
Make Your Own Virtual Push Pin Travel Map
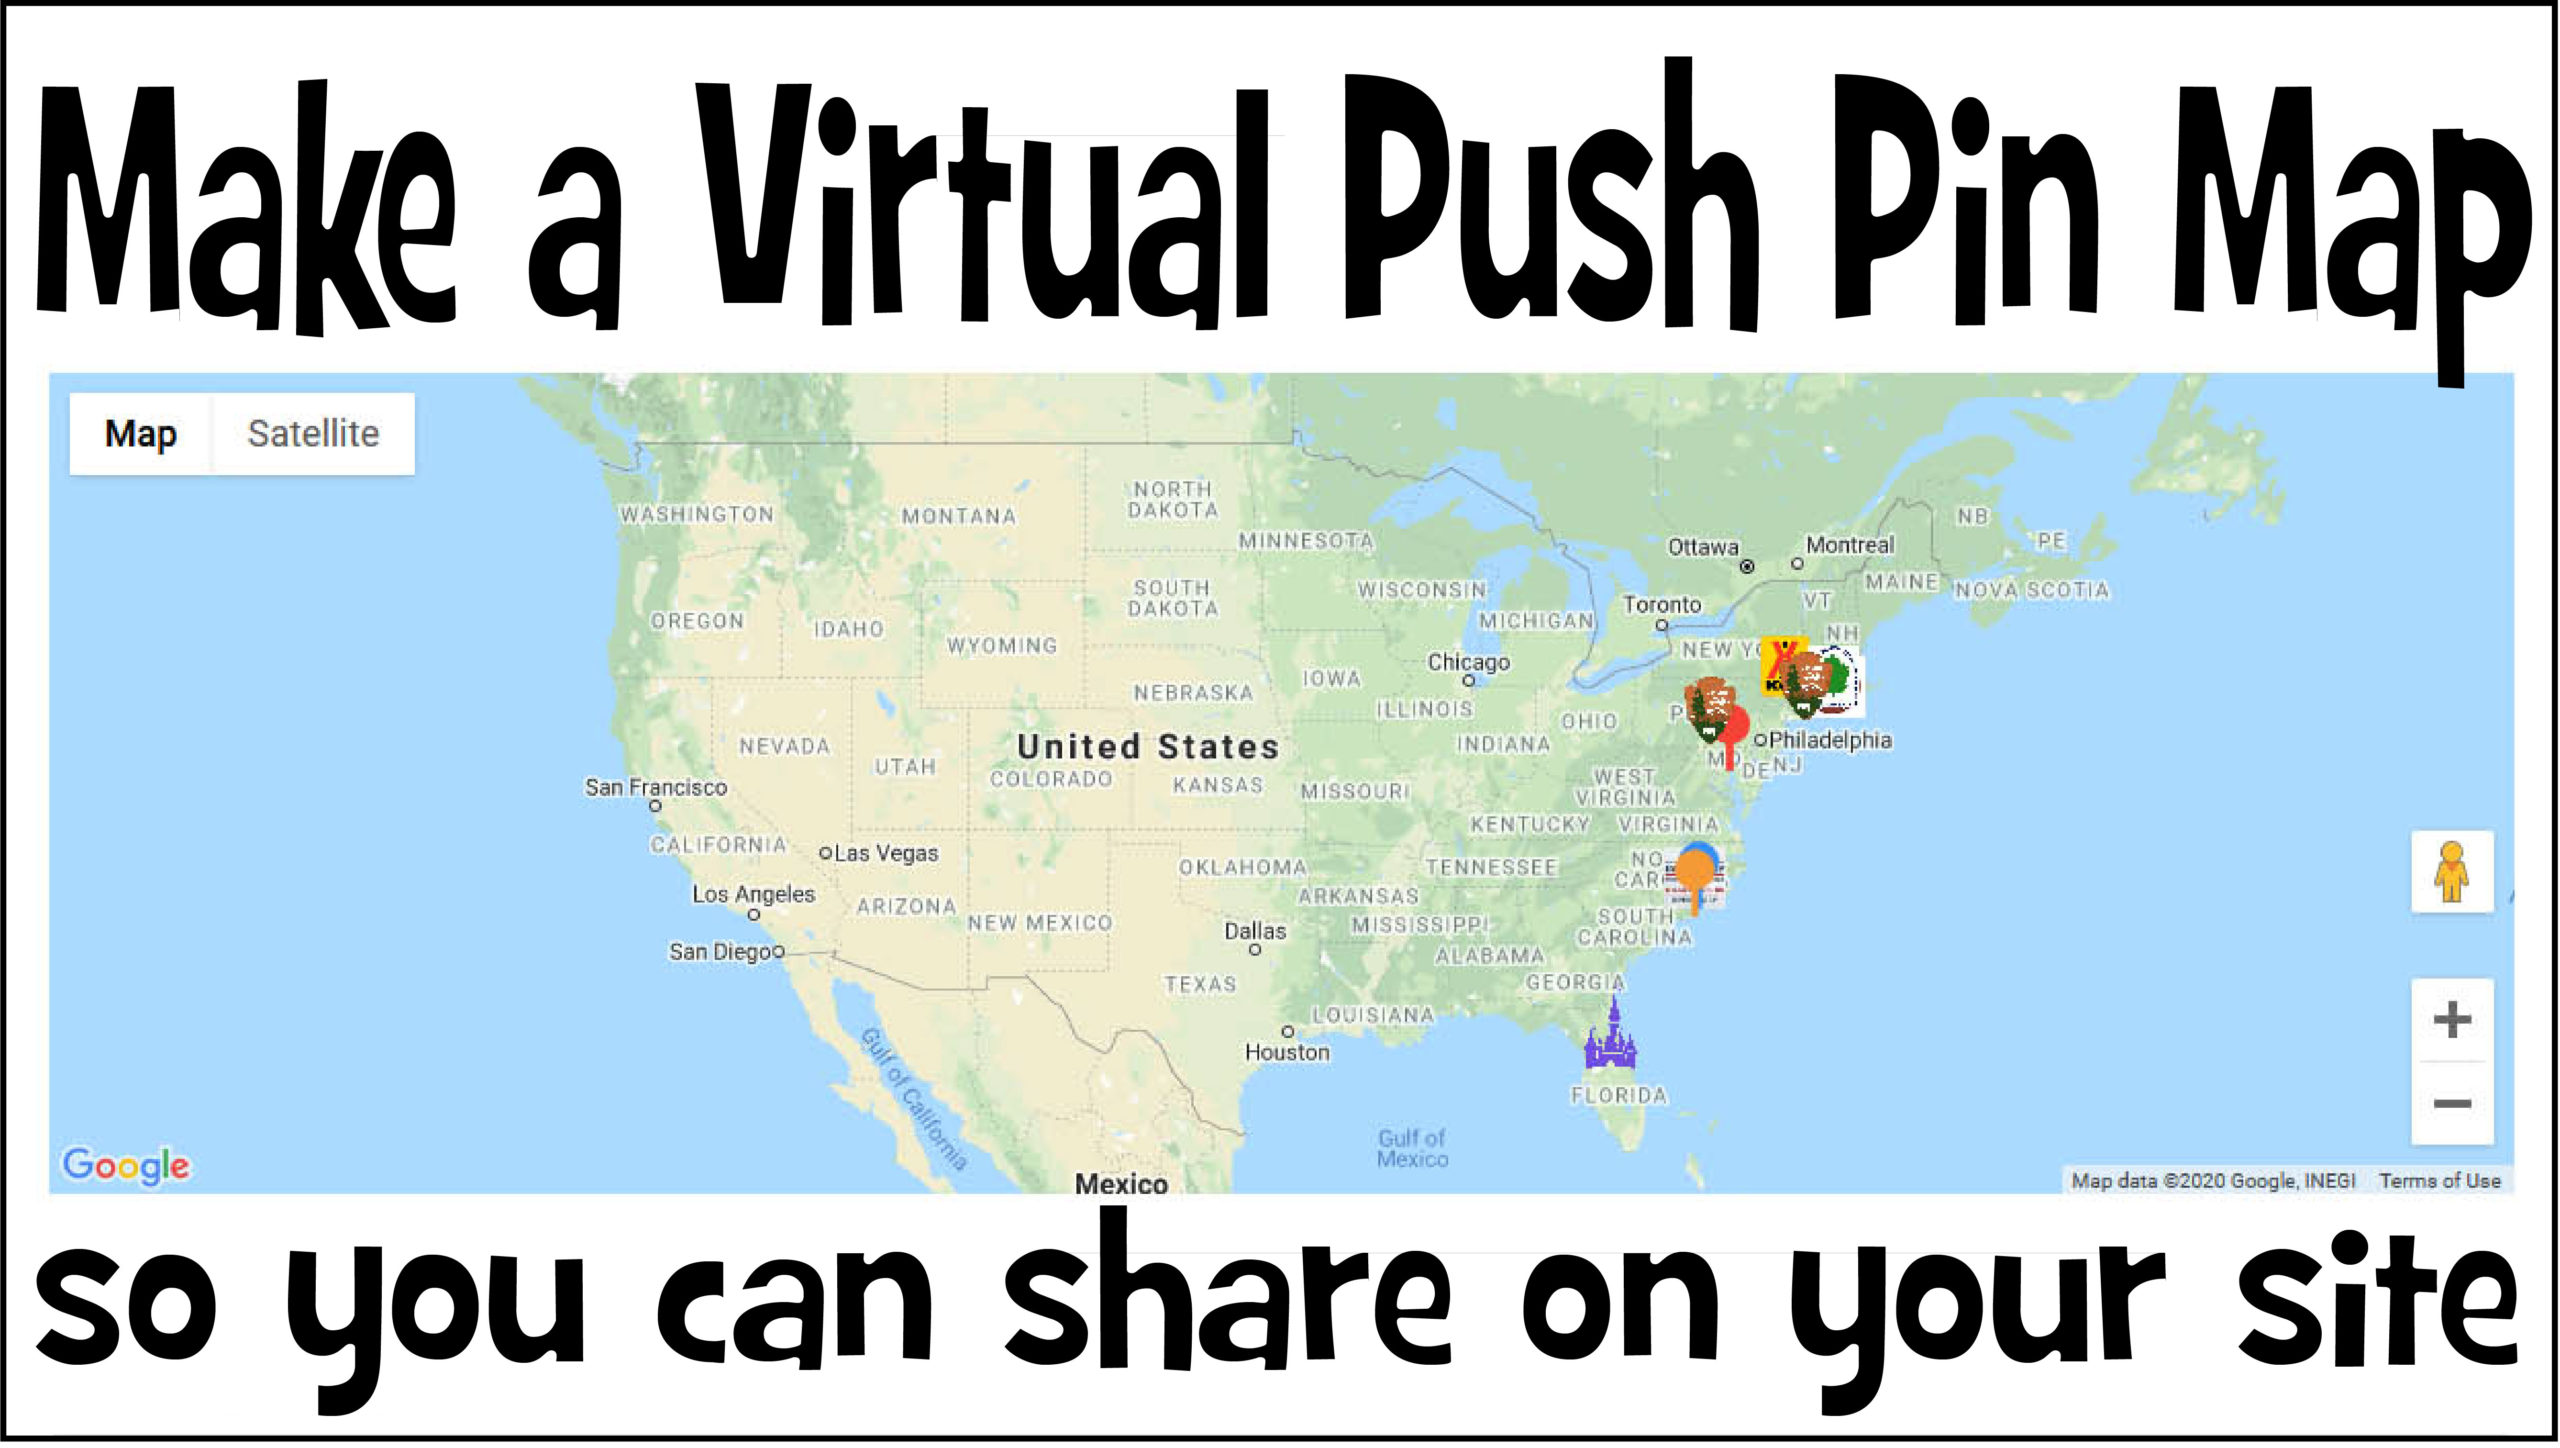
Hi Everyone. So I recently came across a really great website for making your very virtual push pin travel map. What’s a push pin travel map you may ask? Well, back in the old days people would take a physical map of a state or the whole country and then at every stop place a pin to mark where they have been. A virtual version is just that, done on the computer, so you can post it online to your website or make it shareable for friends and family to see and take part in your travels.
I searched for a while and came across SnazzyMaps.com while searching for a mapping tool to work with our WordPress website. They have a plugin available for WordPress and you can custom create your push pin travel map on their website using a whole host of features. They even have different styles of maps that can match up well with your website themes. Once done you just copy your code and place it on your website for all to see. Oh, and it’s FREE! A lot of other websites of this type were charging monthly subscription fees and one time fees. I wasn’t going to pay $15 a month to host a map.
So if you want to see how I created our Push Pin Travel Map scroll on down.
Alright, let’s get started. First thing you will have to do is create an account with Snazzy Maps.

With that out of the way you are now all set to begin creating your Virtual Travel Push Pin Map or any type of map for that matter.
Build a Map
Clicking on BUILD A MAP on the Snazzy Maps header brings you to the first step of making your map.

Here you can choose your “Style” of Map. There are a lot of them, so don’t feel overwhelmed.

You can then customize the size of the map, the center point and the zoom level. The Center Point is where the map centers when it loads. If you want it to be on your home town, you can set it to that. Zoom level will change how far in or out on the map it will be when it loads.

Once you have that set you can move on to adding your first map marker. Oh, and don’t worry, you can always go back and make adjustments to your settings.

Name your marker in the box. You can name it anything you want. I chose for this example, to name mine the Statue of Liberty Monument.
Next is the Location field. There are two options. If you know the Lat and Long enter those. If not, click on Search for a Location and you can type in your place of interest. As you can see below I typed in “statue” and the second result was the Statue of Liberty National Monument. I selected that and then moved on to choose my marker type.

Snazzy Maps gives you three different options for your map icon. The first one is the Default Google Map Icon. The second is a Styled Marker, which has a lot of choices to choose from. And finally, the third, which I circled is the Custom Marker Icon option. I chose this for most of our icons. I feel it adds a great touch to our map.

When you click on Custom Marker you will get an upload box. Navigate to your folder for a stored icon and select your icon. It will automatically load into the preview and be put on the map as you can see below. You can modify the height and width of the icon and it’s anchor points. Once you are all done click on apply changes and Snazzy Maps will save your map Icon.

As you can see below, our new marker is now listed in the Markers field. Now you can customize your marker and how your site visitors can interact with it.
You can click on the Box Icon in green on your specific marker and this will enable you to add or edit your marker pop up box. This is great if you want to talk about this specific location or link to any reviews or blogs you may have posted about this site.
Another great feature is immediately to the left. It is a compass dial and if you click on this icon your map will load with this marker point as your map center. This is great if you want your map to load for your most recent travel destination marker for your blog visitors.

When you come to the Pop Up option for your map marker make sure you enable it. Click on the slide button at the top and onec you do that the customizable fields will populate below.
You can then customize your Pop Up. There are different themes to choose from. You can change the background color of the Pop Up and it’s font color and then below is the editing box where you can type in your information about your map marker. There are a lot of options so play around with them and find a setting that works for you.

Scrolling down farther you can then adjust the position of the Pop Up when your site visitor clicks on the map marker. You can have it open to the top, left, bottom or right of your map marker. Below that is more Advanced Settings which allow you to customize your map and how your information is shared. Once you are done customizing your map marker click on Apply Changes and your map marker is all set. You can then move on to adding an additional marker or saving your map and getting it ready to publish on your website.

To save your map simply click on the Disc Icon between your settings field and map field.

You’re almost done! It’s now time to name your Map. Once you come up for a name for your map the final step is enter in a Google Maps API Key. Most websites come with an API key that you can find in your dashboard. If not, click in the blue box to be brought to Google’s Developer page to register for an API key. You won’t be able to publish your map without it. Once you enter your API key just click save and your map is now ready to be published.

Click on the View Code Icon below the Disc Icon. At the bottom will be your Snazzy Maps html code. Just click on Copy Code to Clipboard and navigate to where you want to put it on your website and just paste it in. That’s It! you’ve now made your very own Virtual Travel Push Pin Map. Great Job!

As you can see it’s not that hard to make a really great looking virtual push pin map. And even once you are finished, you can always go back and add more map markers. Once you are done just save the map and it will auto populate the new markers on your map. No need to recopy the code and paste it in your site again. I love the fact that you can customize the map Icons to add some flare to your map that truly makes it your own. Additionally the pop up windows are great for providing details and information to your site visitors.
To see our Push Pin Map Click here .
We also have a map just for our National Parks that we visited.
I have to say that this mapping site is definitely top notch and the fact that it is free is the best part. If you have any questions please leave a comment down below and I’ll get right back to you. Happy travels and mapping!

Subscribe to Our Newsletter
Let’s keep in touch.
Stay up to date on all of our happenings and new releases. Join our mailing list.
We don’t spam! Read our privacy policy for more info.
Check your inbox or spam folder to confirm your subscription.
You might also like

My Covid-19 Story and my Immune Support
Going to ct to do something crazy, jeep overland cargo rack – third brake light install, halloween giveaway, ac recharge in the winnebago, more similar posts.
QUARANTINE Day 4 | My Vitamins / Supplements
RV Bed Platform DIY | KING Size Mattress UPGRADE
Pedal Commander Install & Review
More CRAPPY RV Construction and 1st Coat – Painting the RV Part 5
How to REMOVE RV DECALS – WHIZZY WHEEL
RV Transmission Fluid and Gasket Replacement
How to mount and frame a push pin map with spray adhesive
Diy: use spray adhesive to mount and frame a push pin world map.
We provide all of our DIY push pin maps with instructions on how to DIY frame your map. There are many options to do this and we have experience with 2 options. Double sided adhesive and spray adhesive. Our favorite method is using spray adhesive, however it does require 2 people to easily adhere your map without any bubbles or mishaps.
Watch our video how to below and scroll down for written instructions.
Don’t want to use spray adhesive? We also like using the double sided tape adhesive method. You can see our blog post, how to and video here.
How to frame a push pin map with spray adhesive
• You will need a 24×36 inch map, please visit us to create your custom map • You will need a 24 x 36 inch frame —> PRO TIP! Get 10% off this frame and it includes your foam core! No need to track that down. — INSIDER SECRET: when you get to the step choosing your cover, on your keyboard hit the keys COMMAND + H. Your screen will minimize (briefly causing panic 😊). Click to bring it back open and you’ll see that you can select “NO COVER”. This is what you want for pinning and you’ll save money AND not have to toss out the acrylic cover, which is wasteful. Win-win! • Not using the frame source above? Then, You will need 24×36 inch foam core 3/16 inch thick • You will need adhesive of your choice. We love Gorilla Heavy Duty Spray Adhesive .
This is the best art mounting option if two people are available for extra hands. Please be sure to spray entire foam core liberally with adhesive
One person holds map up in the air, while the second person aligns two of the corners of the map to the foam core. (Watch our video to see how)
The person holding up the map can then slowly lay down the map on to the foam core, while the other person smooths map down with hands to ensure it is adhered evenly. (Watch our video to see how)
• Place your map that is now adhered to foam core in a frame of your choice (without glass) May we recommend our favorite handmade frames? BONUS: they come with the foam core! PRO TIP! Get 10% off this frame AND it includes your foam core! INSIDER SECRET: when you get to the step choosing your cover, on your keyboard hit the keys COMMAND + H. Your screen will minimize (briefly causing panic 😊). Click to bring it back open and you’ll see that you can select “NO COVER”. This is what you want for pinning and you’ll save money AND not have to toss out the acrylic cover, which is wasteful. Win-win!
hang, pin and enjoy!
The Amazon links are affiliate links. As an Amazon Associate I earn from qualifying purchases.
All of our travel maps come with a print out of this Do It Yourself Guide to mount and frame your push pin travel map. You can download and print if you need another copy!
Shop push pin travel maps now:
Cotton anniversary gift – personalized push pin world map – multiple color options, diy watercolor cotton texture push pin usa map 24×36 inches, diy world watercolor, cotton texture push pin map – 24×36 inches, emerald green push pin world travel map with 5 custom banner options, europe push pin travel map diy watercolor – cotton canvas 24×36 inches, farm house decor push pin world map 24×36″, gray push pin map world map with banner options and 100 map pins, grey world map personalized, love map coloring book world travel journal map – couple’s edition, pastel wall art – push pin world maps with city detail – 24 x 36 inch travel map, personalized emerald green travel world map 24 x 36 inch, push pin world map – first anniversary gift – multiple color options – 24″ x 36″ – personalized.
Automated page speed optimizations for fast site performance

Custom wall art, maps and trendy artwork
Making a diy travel push pin map with one of blursbyai’s maps
With VIDEO! Questions? Email me: blursbyai.shop @ gmail.com Hello everyone! Today I want to leave a couple links and ideas about how to make a simple and inexpensive diy travel push pin map with one of my maps.
I have maps printed on paper here:
Society6 , posters in Redbubble , Photowall, UKposters …
and maps printed on canvas here:
Society6 , Redbubble , UKposters …
You can make a push pin map with either of them.
Here’s a video showcasing 10 easy ways to make a push pin map for marking travels (English audio/English subs by Sara):
Spanish audio/English subs (The one that speaks in this one is me):
Let’s write down all the options, shall we?

#1: A print on paper + thin EVA foam + a frame
#2: a map print on paper + foamboard + a frame.
Here’s a post from a few years ago where I made a rustic-looking world map push pin map with a frame, a map paper print, and foamboard.
#3: A map print on paper + thick layer of corkboard + a frame
#4: a map print on paper + a frame that’s backed with cardboard (an ikea one in this case) + an extra cardboard, #5: a map canvas print + thin eva foam, #6: a map canvas print + thick eva foam, #7: a map canvas print + thin corkboard, #8: a map canvas print + rigid corkboard tiles, #9: a map print on paper + a commercial framed corkboard, #10: a map printed on rolled canvas (unstretched) + a frame + foamboard, bonus #1: a print on paper + a frame that’s backed with foamboard..
This is an option if you are looking for a size that’s 41×27″ or smaller. You need a map printed on paper and a frame that is backed with foamboard like these from Frameusa.
Push pins for your map.
I’ve gathered some recommended shops for purchasing push pins here.
As always, I’m right here if you have any questions:
Share this:, 10 comments.
- Pingback: Best seller “Abey” watercolor world map, now available in smaller sizes – blursbyai
- Pingback: Map of USA with states ~ Colors – blursbyai
- Pingback: New design: gold effect world map, with cities, in striped background – blursbyai
- Pingback: Colors for highly detailed maps – blursbyai
- Pingback: New design: highly detailed gold and teal world map – blursbyai
- Pingback: New design: floral, white and gold world map – blursbyai
- Pingback: Happy holidays 2018! – blursbyai
- Pingback: Personalized printable maps that you can edit yourself RIGHT NOW!
- Pingback: Sale alert: 50% off wrapping paper at society6 and a hack for making push pin boards
- Pingback: Sale alert: Flash deals at society6 – 50% off and 20% off. Details inside. Ends October 30th.
Comments are closed.
Discover more from
Subscribe now to keep reading and get access to the full archive.
Continue reading
- GOOD AMERICAN SALE
Home > Tips > Happy Friday
This Reader Made Her Own DIY Push Pin Travel Map
Hip2Save may earn a small commission at no extra cost to you via trusted partners and affiliate links in this post. Prices and availability are accurate as of time posted. Read our full disclosure policy here .
Share this:
- Click to share on Facebook (Opens in new window)
- Click to share on X (Opens in new window)
- Click to share on Pinterest (Opens in new window)
- Click to share on H2S Email (Opens in new window)
- Click to share on SMS (Opens in new window)

Plan on doing more traveling?
Traveling is a blast especially when you get to do it with your loved ones and make wonderful memories. If you’ve been traveling more lately or plan on doing so in the future, one cool way to commemorate your adventures is with a fun push-pin travel map that you can create yourself!
Hip2Save reader, Sara, did just that with a little inspiration from Lina and she did it without spending much money at all! Check out her DIY crafting story…

I made my own version of one of the crafts featured here with all Dollar Tree materials. The map is a sticker set ( similar map sticker set here ). I used three sheets of adhesive cork (I could’ve only used two if I had planned better), one piece of foam board, and one piece of poster board.
I already had the frame from a photo collage that I no longer use but if I needed one I would’ve gone to Goodwill or another thrift store to find an ugly print with a good frame (all of those 90’s country blue geese prints are screaming for a new life!).
I can’t wait to add push pins of all of the places our family has visited!

Thank you, Sara, for sharing your awesome DIY push pin travel map! What a wonderful way to keep track of all the locations your family has visited throughout the years! This would be a super fun family crafting project and would look great displayed almost anywhere in your home. If you like to travel locally, you could even make a state map and pin all the road trips you’ve gone on. Happy travels!👋
Check out where to grab some of the supplies…
- Crafter’s Square Adhesive Cork Sheets
- US States Map Travel Tracker Sticker Set
HAPPY FRIDAY!
Do you have a funny, “Hip”, or unique tip to share?! Fill out our Happy Friday form . Every Friday, we post one submission by a Hip2Save reader ( view past submissions ) that gives us a glimpse into their frugal lifestyle or simply makes us smile. If yours is published on Hip2Save, we’ll email you a $10 Amazon eGift card!
About the writer:
Jessica holds a Business Degree and 10 years of writing experience from various deal sites including Hip2Save. Connect with Jessica on LinkedIn
Don't Miss These!

Wall Outlet Extender Only $7.99 on Amazon | Includes 8 Plugs & 3 USB Ports

Blackstone 17″ Portable Griddle Only $79.98 Shipped on HomeDepot.com
$80 Off HP Smart All-in-One Printer + Free Shipping (Includes 2 Years Worth of Ink)

Ceiling Fan & Light from $35 Shipped – Screws into Light Socket (8,000 Sold Today!)
I hope you make it to South Carolina, Sara! You won’t be disappointed!!! 🥰
Thanks so much for featuring my submission and for the Amazon gift card! It was such a nice surprise!!!
Thank you for sending it over! Such a great idea!
This is such a cool idea! Thanks for sharing with us! I am not crafty but could probably try this one out! 😉
Leave a Reply Cancel reply
Your email address will not be published. Required fields are marked *
Respond to this post
Notify me via e-mail if anyone answers my comment.
Sign up for a Hip2Save account (it's free) to access all of the awesome features!
Remember Me
Don't have an account? Register
Forgot Password
Become a hip2save insider.
Don't Miss Out! Join our large community of insiders - it's totally free! Once you join, you'll be able to save & share your favorite deals, rate posts and recipes and add items to your HipList and Cookbook! What are ya waiting for?!
Already have an account? Login
Thank you for rating!
Would you also like to leave us a comment?
IMAGES
COMMENTS
Many Frame Options And Map Styles To Choose From. Keep Track Of Your Travels In Style! Customizable Maps To Display Your Adventures And Pins For Where You've Been.
Free shipping on qualified orders. Free, easy returns on millions of items. Find deals and low prices on map travel push pins at Amazon.com
World Travel Map. Working on a large, flat surface, carefully unroll map on cork board, map side facing up. Line up all edges and place some heavy books on one end to keep the whole thing from curling/moving. Carefully lift opposite end of map and spray adhesive on center of cork board, gently smoothing the map from the center out so that there ...
Learn how to make your own personalized push pin world travel map to show your past and future family adventures. Follow the step-by-step instructions and see the supplies needed to create a big and durable map wall.
Learn how to make a push pin travel map with pins at home for under $50 using a window cling and a bulletin board. See how we upgraded to a professional map from Conquest Maps after four years of pinning.
Creating Your DIY Push Pin Travel Map. The process for this DIY travel map is quick and easy - you'll be able to hang your map and display your push pins in under and hour! Step 1: mount cork. Completely disassemble the frame; set the wood aside and put the glass or plastic front away. You won't be using it.
First, you'll want to make sure that the pins are strong enough to hold up your map. Second, you'll need to consider the thickness of your map. You don't want the pins to go all the way through the map and into whatever is behind it. Finally, you'll want to choose pins that are visually appealing.
Learn how to create a vintage-style push pin travel map in your RV or home with this step-by-step tutorial. Find out how to choose, mount and frame a map, and where to get push pins and twine.
Map Pins (Office Max) - $3.00. Total Cost: $50.00 (or less, if not using Mod Podge or you already have supplies on hand) 1) Spray the back side of the poster map and the front side of the insulation board with an even layer of the adhesive spray. 2) Working quickly, carefully place the poster over top the insulation board (the sticky side).
Materials Needed for DIY Push Pin Travel Map. World map. We have this National Geographic map which clearly marks cities with a dot for easy pinning. If you're more of a domestic traveler, here are some nice maps of the United States. Large cork bulletin board. This one is similar to mine. You want the cork board to be slightly larger than your ...
How to Make a DIY Pushpin Travel Map. Cut your corkboard to the size of your map. In a well-ventilated area, apply a thin layer of spray glue to the back of the map. Carefully place the map sticky-side-down onto the corkboard. Smooth out the paper of the map onto the cork so that there are no bubbles under the surface.
Using liquid nail, spread a thin line on the border of the map. Smooth it down and allow it to dry before gluing the molding on top. My cork board does not have a big frame, which is how I wanted it, so it does cover a little bit of the map. After you add a nice line of liquid nail and fit the frame together.
Step IV: Place the map. Carefully place your map on the board ensuring that the edges are well in place and that the map is well stretched out. Using your smoothing tool, smooth out any visible air bubbles. Run the tool over the map as many times as necessary until the bond is perfect and the glue is evenly distributed.
Frame your Map. Open the frame, and remove the glass or acrylic front. Then place the layers in the frame in this order: Map (print side down and positioned correctly for hanging) Cork pieces. Frame backing. Then secure the layers in place with the frame's fasteners.
The ultimate guide to push pin travel maps for custom and made to order maps. One of our best selling products is a 24×36 inch push pin travel map. What makes our maps special is that each one was hand designed by Jessica Wilkeson and crafted with pinning travels in mind. The design of each map is unique and the exclusive printed text box with ...
How to make a simple and elegant Push-Pin Corkboard map for only $14 using supplies at Walmart. * 2'x3' Quartet Corkboard ($9 in-store @ Walmart) - https://a...
1. Use scissors to cut around the map in the shape you'd like to use. 2. Place the map down on the cork foam board. Trace around the map's edge about 1/2 an inch out, using a pen. 3. Use a sharp Xacto knife and carefully cut just inside the outline, so you don't see any pen marks.
Click on the View Code Icon below the Disc Icon. At the bottom will be your Snazzy Maps html code. Just click on Copy Code to Clipboard and navigate to where you want to put it on your website and just paste it in. That's It! you've now made your very own Virtual Travel Push Pin Map. Great Job!
DIY: Use spray adhesive to mount and frame a push pin world map. We provide all of our DIY push pin maps with instructions on how to DIY frame your map. There are many options to do this and we have experience with 2 options. and spray adhesive. Our favorite method is using spray adhesive, however it does require 2 people to easily adhere your ...
Here's a post from a few years ago where I made a rustic-looking world map push pin map with a frame, a map paper print, and foamboard. #3: A map print on paper + thick layer of corkboard + a frame #4: A map print on paper + a frame that's backed with cardboard (An IKEA one in this case) + an extra cardboard #5: A map canvas print + thin ...
#traveldecor #decor #diy #travelmap #pushpinmap #corkboardmap #homedecorMATERIALS FOR TRAVEL MAP DIY:VÄGGISNoticeboard, white $5.99https://www.ikea.com/us/en...
This DIY push pin wall map was inspired because our family loves traveling but I couldn't think of a way to showcase our travels other than photos. I saw th...
Thank you, Sara, for sharing your awesome DIY push pin travel map! What a wonderful way to keep track of all the locations your family has visited throughout the years! This would be a super fun family crafting project and would look great displayed almost anywhere in your home. If you like to travel locally, you could even make a state map and ...
The travel map with pins is just such a fun piece of art to display and also a great conversation starter. You know you're dying to make your own personalized push pin travel map! Buy your. DIY Push Pin Travel Map Printables. for only $8.97!
A quick video on how I did my DIY #Project81PH push pin travel map using the resources I have on hand. This project only cost me less than Php200 because I u...