Want to highlight a helpful answer? Upvote!
Did someone help you, or did an answer or User Tip resolve your issue? Upvote by selecting the upvote arrow. Your feedback helps others! Learn more about when to upvote >
Looks like no one’s replied in a while. To start the conversation again, simply ask a new question.
Can safari be used as a kiosk?
I'm trying to lock down an iMac 2014 with a password so that my customers can not leave the web browser app e.g safari, and only the websites that i allow may be accsessed. Can safari do this or will i need another app, it would be nice to display a custom welcome splash screen which would be shown until someone moves the mouse or clicks start. Also to have it go back to that screen after a few minutes of inactivity. I also can run windows 10 in VMware fusion if this helps as a last resort. Need some advice thanks
iMac, macOS High Sierra (10.13.2), 2014 i mac
Posted on Jan 17, 2018 6:51 AM
Loading page content
Page content loaded

Jan 17, 2018 8:14 AM in response to Reel fishing 2
See some articles macOS Sierra: Set up your Mac to be secure
macOS Sierra: Display a message in the login window
Click on the inside links for the first article to get more information .
And also , if you click on apple logo on top left corner of the screen , scroll down click on lock screen it will lock immediately .
See some screen shots in security and privacy .
Jan 17, 2018 7:17 AM in response to Reel fishing 2
See if this helps.
Parental Controls
Parental Controls System Preferences

How to setup Kiosk mode for your iPad, using only Safari and allowing only specific websites
Have you even wondered how do establishments lock down their iPad’s so it only uses their application or website? Well with iPad there is a kiosk mode where you can lock-down the device to just use a single app and basically disable all physical buttons. It is not hard as you think you just need one tool called the Apple Configurator 2 .
Once you installed it you are good to go, regardless you have one or many iPads it’s really easy.
Now open the application, it’s the purple iPad icon. You can connect your iPads via USB at this stage as well.

Once the application opens, you will see all of your iPads connected to your Mac.

Select all iPads that you want to configure. Then go to Actions -> Advanced -> then Start Single App Mode . What this does is that it restricts the iPad to only run one app of your choice.

Window will appear, this is where you will choose the single app you want your iPads to run. But before we do that lets click Options .

From here you can disable all iPad features like physical buttons, voice, audio, rotation etc. For this instance we just checked Touch as it is used for browsing through our site. Click Apply .

Look and select Safari

Now your iPads are in Single App mode. Now lets place a restriction on what sites Safari can open and for this we need to create a blueprint so we can store it and easily push the policy on the iPad using profiles.
Go to File -> New Blueprint

Name your Blueprint

Choose iPads only, since we are using only iPads

Go to File -> New Profile to create a new Profile to be attached to this blueprint.

Now go to Content Filter then click Configure

Choose Built-in: Specific Websites Only

Add the URLS that are allowed, click on the + icon

Type the URL , if you want to put it in bookmarks add a name otherwise leave it.

Go to File -> Save .

Give it a name, then click Save .

Now attach that newly created profile to the blueprint. Click on the green + icon , then choose Profiles.

Select the one you saved earlier. Then click Add

Now the profile is attached on the blueprint

All you need to do is apply it. Choose the iPads where you want to apply them. Select Actions -> Apply -> Then your Blueprint . Thats it! Congratulations your iPad is in kiosk mode now.

To revert it Single app mode, it’s the same step as putting them into Single App Mode. Select all iPads that you want to configure. Then go to Actions -> Advanced -> then Stop Single App Mode .
Share this:
- Click to share on LinkedIn (Opens in new window)
- Click to share on Twitter (Opens in new window)
- Click to share on Facebook (Opens in new window)
- Click to share on Tumblr (Opens in new window)
- Click to share on Reddit (Opens in new window)
- Click to share on Pinterest (Opens in new window)
- Click to share on Pocket (Opens in new window)
- Click to share on Telegram (Opens in new window)
- Click to share on WhatsApp (Opens in new window)
- Click to print (Opens in new window)
- Click to email a link to a friend (Opens in new window)
Recommended
Leave a reply cancel reply.
This site uses Akismet to reduce spam. Learn how your comment data is processed .

Web Kiosks Made Easy
Easily turn any Mac into a standalone Kiosk featuring a full-screen web browser.
Kiosk provides you with powerful features that are easy to use.
Immersive Browsing
Instantly turn any Mac into a full screen web browser.
Content Control
Easily restrict sites by configuring a whitelist or blacklist.
Prevent users from switching applications or exiting the kiosk.
Local File Support
Load content from local files rather than remote sites.
Presentation Mode
Use Kiosk to create non-interactive, automatically updating information displays.
Customizable
Customize keyboard shortcuts, choose a monitor to use for display, hide all browser controls, and more.
Tabbed Browsing
Want to let users open multiple sites? Just check the box.
Cost Effective
Meet your needs without breaking the bank.
Available on the Mac App Store
Free upgrade for existing customers!

Need help or have questions about the product before you purchase?

Kiosk Software for Mac
eCrisper makes it easy to turn a Mac into a secure public access Internet kiosk.
It is used by schools, museums, hotels, churches, and libraries to reliably and elegantly give access to web content.
Free lifetime support and upgrades.
See list of features below

Customizable Layout
eCrisper divides the screen into 5 optional and resizable areas
- Each area can display rich web content
- The top area can also display a title and two logos
- The left and right sides can each display up to 20 buttons linked to URLs
- The bottom area can display a timer, a quit button, a language list, and a login box
Secure Kiosk Mode
eCrisper locks down the operating system into kiosk mode
- Prevents user access to the desktop, applications, and folders
- Deactivates undesired key combinations
- Prohibits the downloading of files from the Internet
- Automatically restarts in the event of a crash
User Data Deleted
When a session is ended by the user or because of inactivity, eCrisper closes all browser windows, deletes cookies, cache, and browser history, and returns to the home page.
Limited Sessions Duration
You can offer free unlimited access, free but limited to a maximum number of minutes, or use accounts from your own central user database (prepaid cards).
Inactivity Timeout
A session is ended automatically if no activity is detected for a specified duration. The user receives a warning and can prevent the timeout.
Website Restrictions
You can restrict access to specified URLs, for example your organization’s websites.
Multilingual
You can easily add languages or modify existing ones. This gives you complete control over the text displayed to the users. Users can switch between languages.
Simple and reliable
eCrisper was implemented specifically for Mac using Apple’s latest software technologies and with an obsessive attention to details. It is fast, reliable, and easy to use.
The world’s most advanced operating system
The rock-solid UNIX foundation of Mac OS X provides unparalleled stability and performance. This is key to successful kiosks.
The world’s most advanced web browser engine
Web browsing is powered by WebKit, the world’s most advanced browser engine, the same engine used by Safari and Google Chrome.
Download a free trial and experience eCrisper first hand
Newsletters
- Our sponsors
- Watch Store
- Hot topics:
- Apple legal battles
- Apple deals
- Editor’s picks
- Buying guides
How to lock your iPad into a single app
By Charlie Sorrel • 1:00 pm, December 10, 2018
- Top stories

The iPad’s main trick is that it disappears when you launch an app. Fire up a piano app, and your iPad becomes a piano. Launch YouTube and it turns into a TV for pacifying children. This is part of the magic of the iPad, but it’s not quite perfect. Kids can easily leave YouTube and start reading your sexts instead. And a musician might accidentally trigger a gesture while playing on those virtual piano keys, finding themselves back at the home screen in the middle of a performance.
What you need is kiosk mode, aka Guided Access. This locks the iPad into a single app, and disables the hardware buttons. And it’s equally good for keeping you in one app, or keeping people out of all the others.
Guided Access aka Kiosk Mode
The official name is Guided Access , but the alternate name — kiosk mode — is a better guide to what it actually does. Once enabled, Guided Access lets you triple-tap the top button on an iPad Pro (or the home button on older iPads), to lock the current app onto the screen.
This is handy on a kiosk, where you may leave an iPad running a presentation, unattended. Trade shows, store showrooms, museums, school projects — all of these are situations where locking an iPad into a single app are essential.
To this end, there is an option for a passcode in the Guided Access Settings.

Find this in Settings > General > Accessibility > Guided Access . This is where you enable Guided Access, as well as configure the main settings. In here you can set a passcode, a time limit, and enable the triple-tap shortcut to activate the feature.
Using Guided Access

When you’re ready to lock an app, just launch that app, triple-tap the top bottom or home button, and choose Guided Access from the popover that appears. The first time you run it, you’ll see something like the screen above.
You can just hit Start , and you’re off (you’ll be prompted for a passcode the first time you do). In future, Guided access will just start when you activate it. To access the settings, you will have to triple click the top button again, tap the Guided Access popover again, and enter your passcode.
There are several options. The defaults lock you into a single app, as well as disabling the Dock, Control Center, Notification Center, and more. You can also enable or disable the keyboard, and even turn off touch altogether (good for slideshows).
Even neater, you can draw around interface elements to lock them. That can be used to disable features for other people, but is great for the performing musician, because you could disable the buttons that change settings, for example.
How to exit Guided Access
Leaving Guided Access is easy. Just triple-tap the same button as before, and then uncheck Guided Access in the popover. You’ll need to enter your passcode, and you’ll be back at the configuration screen. Then, just tap End to end the session.
Guided access is one of those accessibility features that ends up being useful for anyone. Try it next time you’re forced to let a child use your iPad. You may still have to swab the iPad down with disinfectant wipes afterwards, but at least they won’t have been able to read all your email.
Daily round-ups or a weekly refresher, straight from Cult of Mac to your inbox.

Cult of Mac Today
Our daily roundup of Apple news, reviews and how-tos. Plus the best Apple tweets, fun polls and inspiring Steve Jobs bons mots. Our readers say: "Love what you do" -- Christi Cardenas. "Absolutely love the content!" -- Harshita Arora. "Genuinely one of the highlights of my inbox" -- Lee Barnett.

The Weekender
The week's best Apple news, reviews and how-tos from Cult of Mac, every Saturday morning. Our readers say: "Thank you guys for always posting cool stuff" -- Vaughn Nevins. "Very informative" -- Kenly Xavier.
Popular This Week
How to take solar eclipse photos with iphone, these are the best games on apple arcade, bodycam, dashcam, security camera: this tiny gadget can do it all [deals], big logitech sale: up to half off keyboards, mice, webcams and more [deals], some of the best 2024 macs are still ahead of us, apple opens the iphone app store to retro game emulators, oled ipad pro and new ipad air on track for early may launch, save on nut mini, an affordable airtag alternative [deals], 42-inch smart tv may be user’s best display ever [setups], classic imac g4 looks on as mac pro drives monster display [setups].
Wednesday — September 12, 2023
Kiosk Mode on iPads with PWAs and Guided Access Mode
A great way to get an "almost-native" locked down app experience on iPads, perfect for using at live events where devices need to be unattended.

I regularly help experiential marketing agencies create apps for their events . These include branded games, quizzes, & interfaces that are used on-site via iPads. Because of tight turnarounds, the best way to deliver these apps and experience is via the browser as web apps.
Clients often want these experiences locked-down at the event. In other words they don't want users being able to access the underlying iPadOS. Instead, they want to restrict access to the single application developed for the event.
This is known as “kiosk mode” and has traditionally been a bit of a faff on iPads, particularly when using web applications via the browser.
Thankfully there are two recent features/technologies introduced that now make this possible:
- Safari’s adoption of “PWA”s
- iPadOS's “Guided Access Mode”
Using these two technologies together make for the perfect kiosk mode experience, without having to develop a native app. This makes the process much quicker and cheaper to develop and roll-out.
About PWAs Click to copy direct link to clipboard

PWA stands for “Progressive web app”. This is a browser technology that lets you run a website like a native app.
It allows you to add an icon to your Home Screen that can be clicked to launch your web app (almost) full-screen. This means the browser address bar and controls are all hidden, giving you a much slicker experience that resembles running a native App Store app.
Adding PWA support to website
Before you can install a PWA to your iPad Home Screen (see below), the web app you installing needs to be configured to support the feature. I'm not covering this process here as it's out of the scope of blog post and depends on your codebase.
About Guided Access Mode Click to copy direct link to clipboard
This is an accessibility feature in iPadOS that lets you lock the iPad down to a single application. This is essential “child mode”, but it's also perfect for live events or other situations where you don't want people getting access to the underlying iPad environment.
Usually we could only lock the entire browser down using this mode. This is useful, but it's not perfect, as a user could potentially back-out of our web application and start browsing the web.
The trick here is that we're using this feature in tandem with a PWA. This means we can lock down the screen to our PWA application, not just the browser. This means the user can only interact with our web application.
Installing a PWA Click to copy direct link to clipboard
Installing a PWA web application is easy. Open the website as normal and click the “share” icon in the top right toolbar. Scroll down and look for the “Add to Home Screen Button”:

Click this and you're done - there'll now be a new icon on your homescreen:

When you click the icon, the website should now open in full-screen mode.

Notice that there is no longer any address bar. Instead there is a thin menu bar, giving a more "full screen" and native feeling to the app.
The problem here is that we can still easily exist the app. This will be fixed in the next section.
Having issues?
Note that if you can't see this option, it's likely that the web application isn't properly configured. You'll need to look into the app codebase to figure out why this is.
Setting Up Guided Access Mode Click to copy direct link to clipboard
This mode is also easy to configure, but it's not particularly intuitive. On your iPad, go to the settings and scroll down to the “Accessibility” section:

Scroll down the “Guided Access” option and click into it:

- Make sure the “Guided Access” toggle is turned on
- Set up a passcode via the “Passcode Settings” option. This will let you lock down the iPad to a particular passcode. You'll need this passcode to exit Guided Access Mode
- Ensure “Accessibility Shortcut” option is turned on
- Click the “Display Auto-Lock” section and turn it to “Never”
Finally, go back out of this section and then into the “Accessibility Shortcut” section. Here, make sure that the “Guided Access” option is ticked and that you've dragged it all the way to top of the screen.

Now you're ready to actually put your iPad in Guided Access mode. Open the PWA you installed in the previous step.
Click the physical lock button on the top-right of the iPad three times.

This will cause the app to zoom out and the Guided Access Mode configuration screen will come up. Here you can configure how restricted you want the experience to be. When ready hit “start”. The iPad will now be fully locked down to your app.

To exit this mode, hit the top-right lock button three times again. You'll be prompted for your passcode to exit Guided Access Mode.
Conclusion Click to copy direct link to clipboard
Bringing the power of web-based PWA applications together with Guided Access Mode on iPadOS gives you an event-ready kiosk mode without any of the need for a full native application.
It only takes a little bit of configuration but will allow you to leave iPads unattended with confidence at your next event.
Managing Mac Kiosks
18 dec managing mac kiosks.
We have implemented multiple forms of kiosk throughout the years at the Marriott Library or other locations on campus that we support. Initially, we implemented web kiosks that provided anonymous users at the Marriott Library quick access to limited library & campus resources like the catalog system, databases, etc. These web kiosks needed to be secure, resilient and easy to use for the public but at the same time prevent anonymous access to resources we do not allow. This expanded to “exhibit” kiosks that would include media content like audio, video and other types of content focused around a specific library exhibits.
And finally, we have implemented “Digital Displays” which use technologies such as LCD, LED and projection to display digital images, video, web pages, or text. They can be found in public spaces of the Marriott Library to provide wayfinding, exhibitions and marketing & communication information including text, animated or video messages for advertising, information, entertainment and merchandising to campus students, staff and faculty.
This post will cover a history of the methodologies & technologies we have implemented and modifications we have developed to address IT development & resource impact and ease access to outside groups like web development & content providers.
Starting around 2004, we implemented public web kiosks using Mac OS X. On a standard Mac OS X system, users have greater overall access to the operating system features. They can run the Finder, use the Dock, launch most applications, and save files in their home folder. On our public web kiosks, however, are significantly more “restrictive”, limiting users’ access to just a few applications. The available applications are confined to a small subset like a web browser, utilities, and helper applications. The kiosks themselves have been set up to be extremely easy to use, capable of operating relatively unattended, require minimal maintenance, and are easy to update. Their key operating feature is the ability to restrict users from making changes to the system or hard disk.

This is a list of the key modifications we made to set up our kiosks originally:
- Guest User – a new user that does NOT have administrative rights to the machine and that has a REAL password
- Limit Write Access – limit what a guest user can change on the hard disk by changing file permissions and ownership
- Enable Firmware Security – prevents users from making changes to the OS by bypassing default startup disk.
- Customized Apple Menu – using third party applications such as Fruit Menu, the Apple Menu can be customized to remove shutdown/logout options and prevent users from shutting down or logging out of the Mac
- Administrative Utility – to allow administrative users to perform some admin procedures like restarting, shutting down, logging out, launching the Finder, but restrict these processes from the general kiosk user, we created an application which requires a password to access to these functions
- Replace the Finder – Many kiosks only allow users to use one application, such as a web browser. To do this, you will need to replace the Finder with the desired application by either changing the loginwindow preferences or swapping the Finder with another application
- Disable the Dock – disabling the Dock.app by renaming it, or changing the permissions prevents users from launching the it. It also creates more usable screen space on your kiosk machines
- Maintenance – to clean up these changes, use a script that runs at login, logout, a defined schedule, or when the machine is idle.
The public kiosks refreshed based on maintenance schedule and activation of screensaver and would restore the kiosk users home folder to a default including browser settings, bookmarks, default home page, etc. We restricted web content using open source software called “ Privoxy “. Privoxy is a non-caching web proxy with advanced filtering capabilities for enhancing privacy, modifying web page data and HTTP headers, controlling access, and removing ads and other obnoxious Internet junk. Privoxy has a flexible configuration and can be customized to suit individual needs and tastes.
Whitelist We use Privoxy to give access to specific sites using a defined whitelist and block all other websites.

Then we provide the user with feedback regarding blocked web sites. If they user needs to access restricted web sites, we direct users to a non-kiosk system, one requiring an authenticated login to access those sites.
Proxy Configuration & Bypass We set the kiosks to use they proxy by programmatically modifying the System Preferences -> Network -> Proxies Settings to set and specify the proxy settings and can exclude sites from the proxy that don’t work properly with a proxy or specifically with Privoxy.
We have an old perl script that we use to manage the proxy configuration which uses the networksetup command line utility with these commands:
- networksetup -setwebproxy networkservice domain portnumber authenticated username password
- networksetup -setsecurewebproxy networkservice domain portnumber authenticated username password
- networksetup -setproxybypassdomains networkservice domain1 [domain2] […]
For example here is the proxy perl script:
While this method was effective for many years, other backend code and configuration maintenance made supporting new operating system versions and Safari browser updates more and more difficult. And with increasing demands, projects & priorities on our IT group it was decided to move to a commercial application called, xStand.
xStand allowed us to restrict access to some web sites, the operating system, system settings, the downloading of files and applications with little additional development and free up our time from continually updating our previously internally developed public web kiosk scripts & configuration. It had a few minor issues and annoyances, but overall worked well for our needs.
Unfortunately, after many years of solid service, the company supporting xStand closed its doors and sold the software to another developer and then their license servers were decommissioned that prevented the software from running properly and displayed the following message:
We tried working with the “new” company, Noblic Inc. , but found their customer support and server licensing less than desired. We began implementing an internal solution, one designed to require much less maintenance and effort integrating new operating system versions and browser updates.
For example, this FAQ was posted to the NobKiosk, but as of now has been removed. Note “If you have a license of xStand, you can continue using it for free until end of 2018” wasn’t held up in our experience.
As the posting of this article xStand is still available via the Mac App Store , but is no longer supported or in development by the original developers, adnX SARL.
Brave New World
Our kiosk implementation leverages WordPress to provide our content creators, primarily the libraries marketing and communications group, with tools they are already familiar with. As you will see, this approach offers a high degree of control and customization.
With the WordPress site, we implemented the plugin called LayerSlider that allows easily editing pages, animations & effects used on our digital displays and other WordPress sites.
- LayerSlider – Digital Display Settings Example
- LayerSlider – Editing Digital Display Slides Example
- LayerSlider – Digital Display Animation Options Example
Hide Mouse Cursor We also implemented the following Cascading Style Sheets (CSS) to hide the mouse cursor:
Another option on Mac systems is using Cursorcerer Preference Pane which allows you to which allows you to hide the cursor at any time by use of a global hotkey or based on idle time and bring it back as soon as you move the mouse. For our digital displays setup we thought it would be better to go the CSS route vs installing additional software to give us this functionality. But, for other scenarios like a media server, Cursorcerer might meet your needs if you can’t depend on CSS.
Manage Display Settings To manage the display preferences on our Mac systems, we developed the python script/library named Display Manager and made it available to others on our GitHub repository. It allows users to programmatically manage Mac system display settings like resolution, refresh rate, rotation, brightness, screen mirroring, and HDMI underscan. It’s primarily intended for Mac Admins who need to control displays in specific, predictable ways. Display Manager works in a 2-part package: a library that actually controls Mac displays ( display_manager_lib.py ), and a script that allows access via the command line, and executes commands in a non-interfering way ( display_manager.py ).
On our digital display implementation, we set the resolution, rotate the display 90 degrees and set the HDMI underscan to properly fill the display.
For example, we use Jamf Pro and scope our digital display to a policy that runs a shell script with parameter values.
Using the following script:
And run it ongoing at every login and via custom trigger to allow easy ad-hoc execution to set display settings.
If your environment isn’t using Jamf Pro, you could easily use a similar methodology with tools like Outset or custom launch item to run based on your environment needs.
We decided to use Google Chrome for our browser kiosk implementation using Chromimum command line switches .
Using the this command format:
We used the following switches:
- –kiosk Enable kiosk mode with Google Chrome in full screen. /path/to/Google Chrome.app/Contents/Google Chrome –kiosk
- –kiosk [WEB_ADDRESS] Enable kiosk mode with Google Chrome in full screen with specific web site. /path/to/Google Chrome.app/Contents/Google Chrome –kiosk https://lib.utah.edu
- –app=[WEB ADDRESS] Specifies that Google Chrome should be launched in “application” mode without address bar. /path/to/Google Chrome.app/Contents/Google Chrome –kiosk –app=https://lib.utah.edu
- –force-first-run Displays the First Run experience when the browser is started, regardless of whether or not it’s actually the First Run (this overrides kNoFirstRun).
Process Overview Here is an overview of how the various pieces of our kiosk system work together:
Script Here is the python script we are using with our kiosk implementation. It launches Google Chrome based on command line switched based via configuration property list, then uses AppleScript to verify its the frontmost application, verifies if screen saver is running using pgrep , uses ioreg to verify is display is asleep, removes Google Chrome profile to cleanup previous user session, and based on conditions will restart Google Chrome if necessary like if it has crashed, quit by user or if screen saver activated or display asleep, etc.
With the following LaunchAgent:
This LaunchAgent sends standard output to /tmp/chrome_kiosk.log , standard error to /tmp/chrome_kiosk.log , will keep alive if the script fails and is limited to Aqua session.
Apple Technical Note named “ Daemons and Agents ” that explains most of the session types available for launchd.
- Aqua – GUI agent which has access to all the GUI services
- LoginWindow – Pre-login agent which runs in the login window context
- Background – Runs in the parent context of the user
- StandardIO – Runs only in non-GUI login session (i.e SSH sessions)
A useful GUI application that allows you to create, manage, debug & learning system and user services & options on Mac systems is named, LaunchControl .
The property list that is used to define individual kiosk configurations either can be customized using the defaults command or a configuration profile:
Which we store on our kiosks at the following location:
/Library/Management/edu.utah.mlib.kiosk.settings.plist
In the future we we might migrate from Privoxy to EZProxy after it has been thoroughly tested and staged. We are currently using EZproxy to provide access from outside our library’s network to restricted-access websites that authenticate users by IP address and if it will give us similar functionality as Privoxy with our kiosk implementation would lessen the amount of proxy services we are supporting.
If there is interest by the community in our kiosk methodology and code, we will clean it up and make it more community friendly and post to our public GitHub repository. Let us know by using our contact us page or post a comment to this blog post.
Richard Glaser
Received some feedback on this post about if we investigated OpenKiosk, based on Firefox by the Mozilla development group. We didn’t investigate this option, but would be interested in others sharing their experience.
Here is more information about OpenKiosk…
OpenKiosk is a cross platform kiosk web browser based on Mozilla Firefox that can be easily installed and used to secure a computer for use as a public terminal. This is a complete solution for any kiosk installation. This software is released under the MPL “as is” with no warranty or support.
OpenKiosk is currently deployed in schools, universities, libraries, hospitals, airports, hotels, governments, and businesses across the globe.
http://openkiosk.mozdevgroup.com
Pingback: Marriott Library - Apple ITS | Google Chrome for Kiosks Posted to GitHub
[…] For more detailed information about our Mac kiosk implementation, see our blog post. […]
Leave a Reply Cancel reply
Device Harmony
Device Management
Endpoint Detection & Response
Integrations
iOS & iPadOS
Resources Hub
Customer Stories
MacAdmins Community
Security Details
Technology Partners
Become a Partner
Register a Deal
Partner Portal
About Kandji
News & Press

How to Set Up and Manage an iPad Kiosk

- Components of an iPad Kiosk
Managing an iPad Kiosk
Configuring ipad kiosk settings, finding your ipad kiosk app, guided access vs. single app mode, updating software on an ipad kiosk.
The primary function of Apple devices in an organization is, of course, to provide computing and communications for individual users. But that’s not the only purpose they can serve.
One of the most common alternatives: Configuring an iPad as a kiosk—a single-purpose device, usually set in a fixed location. Instead of running multiple apps at the user’s discretion, iPad kiosks run just one.
People sometimes refer to this setup as "iPad kiosk mode," but that's not really accurate: There's no "kiosk mode" switch in the iPad's Settings app, nor does the phrase appear in Apple's support documentation. But we'll explain all that in a bit.
Typically such kiosks used by multiple users: Think sales information in retail, ordering stations in restaurants, check-in tools in hotels, and other similar use-cases.
Dedicated kiosk devices can cost tens of thousands of dollars, which is why it often makes great sense to configure an iPad as one instead. But setting up and managing iPad kiosks is a specialized project for the IT team. Here’s the outline of how you'd go about it.
The Components of an iPad Kiosk
Before you get started with your iPad kiosk, you need to assemble the necessary hardware and software.
The iPad Itself
Start by selecting an iPad with your desired form factor. For example, a 12.9-inch iPad Pro gives you the most screen real estate and will be easier for users to read but takes up more physical space. If you’re space-constrained, an iPad mini may make more sense. Assess your situation and plan accordingly.
The Location
After you select your device, think about where you want it physically installed. The location should be accessible for users regardless of their height. Don’t position your kiosk in direct sunlight: Not only will it make it harder for users to read the screen, but it can cause the device to overheat, especially if it doesn’t have adequate ventilation. You can find environmental requirements for every iPad on Apple’s website. (Here, for example, are the requirements for iPad Pro .) Position your kiosk near a power outlet unless you plan to move it somewhere else to charge it daily, or use an enclosure with room for a battery system.
The Enclosure
Speaking of enclosures: You want one. A suitable enclosure can protect your iPad from theft while still making it easily accessible to everyone who needs to use it. Some enclosures offer built-in power connections or multi-day batteries; some even come with built-in barcode scanners or printers.
A simple web search for iPad kiosk will turn up a wide variety of different enclosures. Most importantly, the enclosure you choose must fit your iPad model. Next, you will want to consider how the iPad will be mounted and secured. If you already have an existing table, opt for a tabletop enclosure. Otherwise, get a freestanding one that sits directly on the floor.
The Network Connection
The network is the lifeline for your device, allowing your kiosk app of choice to send and receive data and for management tasks such as software updates or restarting and shutting down the iPad remotely.
If you plan to connect your iPad by Wi-Fi, ensure the network is secure and reliable. Metal enclosures can have a negative impact on the Wi-Fi signal, so take that into consideration when shopping for one. With the proper enclosure, cables, and/or adapters, you could also connect your iPad to an ethernet network and power it using Power over Ethernet (PoE).
Cellular is another option to connect your iPad to the network—particularly if your kiosk will be mobile (think a food-ordering station on a food truck). The same rules apply to cellular as they do for Wi-Fi: Make sure your network connection is reliable and fast. Check with your network and security teams to make sure that your cellular connection meets their requirements.
If you have more than one kiosk or if it is in a remote location, you’ll want to manage it with a device management solution such as Kandji. Device management allows you to keep your iPad devices up-to-date, to restart and shut them down remotely, and more.
For that to work, and assuming you plan to use Single App or Autonomous Single App Mode (which we’ll explain in a moment), you must enable supervision on your iPad devices. The best way to do this is by using Apple Business Manager and your device management solution. Apple Business Manager will also enable you to use Automated Device Enrollment (ADE) to automatically enroll new iPad devices into your device management solution—which makes setting up or replacing kiosk devices way easier.
When you configure your device management solution for ADE, skip any unnecessary setup screens such as the Welcome and Update Complete screens—this will make deployments more efficient and help with software updates later. If your app uses location services, don’t skip that screen.
You could use Apple Configurator to supervise your iPad devices and even lock them to your app. However, this method doesn’t scale well, especially if your kiosks are geographically dispersed.
Before you can set your kiosk loose in the wild, you’ll have to make a few decisions and configure some baseline settings. Some of them you can set with your device management solution; others require manual intervention.
As we mentioned earlier, for the purposes of this article, we’re defining a kiosk as a device with a single purpose—meaning it’s locked into a single app. Configuration of such a device is simpler because users only see the app locked to the screen. You don’t need to worry about things like setting wallpaper or the perfect home screen layout. But there are still a few settings you will want to configure.
Screen Lock
If you want your kiosk screen to remain on all the time, set the screen Auto-Lock to Never ( Settings > Display & Brightness ). Keeping the screen lit all the time may shorten its life over time, but will provide a better experience for your users. If you don’t want to disable Auto-Lock completely, you may want to increase the timeout to the maximum, so the screen doesn’t turn off too quickly. If you let your kiosk screen turn off when not in use, users will just have to tap the screen to wake it up.
Most multi-user kiosks do not have a passcode. Again this is different from a standard shared device such as a handheld point-of-sale device, where you may want a passcode as an extra layer of protection. In the kiosk use case, your users won’t know the passcode. Not enforcing a passcode also helps with software updates (more on that later).
Restrictions
You may want to review your device management solution's possible device restrictions to see if you need to apply any. Most of the time, you don’t need to worry about additional restrictions because users can’t access settings when you lock your iPad devices to a single app. When you lock the app to the screen, you will also have the option to set some settings and restrictions, such as the screen lock mentioned above.
You’ll be running just one app—that users can see, at least—on your iPad kiosk. There are dedicated kiosk apps, but you can use any app that runs on an iPad. Search Apple’s App Store to find the one that fits your needs, whether it’s a point-of-sale app, one for guest registration, or even a web browser such as Safari.
Web pages hosted in a browser don’t provide an ideal user experience. If you decide to go that route, be sure you optimize your web page for touch screen use. Small hyperlink text and drop-down menus don’t work well in this environment. If you are using a browser, you will also need to restrict what web pages are accessible, so you don’t have bad actors loading less than desirable content.
If you find an app in the App Store that almost fits the bill but requires a few tweaks, contact the developer to see if they are interested in creating a Custom App that does what you want. You can also develop your own app from scratch and distribute it to your own Apple Business Manager portal as a Custom App. To create your app, you will need an Apple Developer Program membership .
Once you settle on your perfect kiosk app, install it on your iPad devices using your device management solution. If you don’t have one, you’ll have to install the app manually on each device.
The final step to turning your iPad into a full-fledged kiosk is to lock in that app, so it’s the only thing that users ever see. There are multiple ways to do this, each with its own pros and cons.
One way that we are not covering here: Automatic Assessment Configuration . It is designed to lock an app into place but doesn’t fit the bill here. As the name applies, it is used in education settings specifically for assessment apps. But here are your other choices:
Guided Access
Guided Access is an accessibility feature built into iOS and iPadOS. It might be a good solution if you have just a small number of kiosks to manage. (FYI, it’s also super handy for little kids at home.) Guided Access requires you to manually lock your iPad into an app on the device itself.
If you have a lot of kiosks, or if they are in different geographic locations, this is not a good solution, because it requires you to touch each device.
You start by enabling Guided Access ( Settings > Accessibility > Guided Access ). While you’re there, set a passcode, so users can’t exit Guided Access mode without the credential. Enable the Accessibility Shortcut to give yourself an easy way to exit Guided Access. Disable Display Auto-Lock if you don’t want the screen to go dark.
After you’ve set your Guided Access settings, open the app you want to lock in place and triple-press the side button (or the Home button, depending on the iPad model). You will see an option to enable or disable certain features— such as the volume or sleep buttons—while in Guided Access. Tap Start , and the app will be placed into Guided Access mode and locked to the screen. To exit Guided Access, triple-press the same button and enter your passcode to end the session.
Single App Mode
Single App Mode allows you to lock all your devices to a single app using your device management solution. Send the payload containing the app you want your managed devices to lock in place from your device management solution. There is no need to touch each device, which makes this method scalable.
You can also set additional settings—restricting the use of physical buttons and more—using your device management solution (which makes this scalable to multiple kiosks). To support users who require assistive technologies, you can choose which of those technologies will be presented to users when they triple-click the Home button. For example, your kiosk solution will be more friendly to someone with little or no eyesight by allowing them to use VoiceOver .
There’s one major caveat to Single App Mode: If your device loses connectivity to the network—which means your device management solution can’t contact it—you won’t be able to take it out of Single App Mode. There are two ways to fix that situation:
One, you can connect the iPad to a functioning wired Ethernet network, where your device management solution can contact it. Alternatively, you can perform a hard reset. If you restrict the use of the physical device buttons, this means you will need to let the battery drain, which takes substantial time considering how long iPad batteries last these days.
Autonomous Single App Mode
Autonomous Single App Mode blends the best of both worlds. It allows you to deploy a list of apps that can be locked to your device's screen using your device management solution. When you open one of your listed apps on the device, it will lock to the screen.
Your kiosk app must support Autonomous Single App Mode, not only to be locked in place but also so you can exit it. That’s why Autonomous Single App Mode is especially good if you’re deploying a Custom App —you can have the developer build in an administrative menu or exit button. That way you can exit the app right on the device when you need to change settings or perform maintenance, with no network connection required.
You’ll want to hide this functionality or protect it with a passcode so your users cannot exit and tamper with your settings. Send your developer Apple’s documentation on how to make your custom app lock and release from Autonomous Single App Mode.
As with Single App Mode, remember to use your device management solution to configure accessibility settings to accommodate your users’ various needs. There is also an excellent WWDC video on how to make your app accessible.
On a personal device, it’s best practice to make operating system and app updates automatic. However, on a kiosk—especially one that’s business critical or generates revenue—you’ll want to disable automatic update functionality to avoid disrupting business.
To do that, go to Settings > General > Software Update and disable it. If you are using an App Store app or a Custom App not installed by your device management solution, disable automatic downloads of app updates ( Settings > App Store > App Updates ).
Don’t take this recommendation as a free pass to avoid updates altogether—they are essential for protecting your device from vulnerabilities. Just be thoughtful about when you do them. Plan to do them after hours; your device management may support such scheduled updates.
Updates take time, so you don’t want to do them during business hours. They are best done overnight or at the end of the day when the device has the entire evening to run the updates. If your internet bandwidth is constrained, this will take additional time.
When you are ready to update your OS and app, take time to think it through. To update the OS, you will need to exit out of the locked app and then run the update. For Guided Access, that means ending the Guided Access session on the device. You may be able to do the same with Autonomous Single App Mode if your app has exit functionality, as mentioned above. Otherwise, use your device management solution to disable Autonomous Single App Mode or Single App Mode.
Once you’ve run the OS updates, as usual, launch Guided Access or send the device management payloads for Single App Mode or Autonomous Single App Mode to lock your app back into place.
If you have a passcode on the device, you have an extra challenge: You can’t deploy OS updates using your device management solution without intervention on the device; you will have to enter the passcode on the device manually before proceeding. You could clear the passcode with your device management solution, but after the update, you will have to manually add a passcode again; it cannot be done remotely.
App updates are similar. It’s easiest to do them at the same time as OS updates. Some apps can be updated while they are open—they will update, temporarily quit, and reopen. Unfortunately updating open apps doesn’t work consistently. To reliably update your app, use your device management solution to unlock the app from the screen; update the app; and lock the app back into place. When you take your app out of Single App Mode, there is a risk that users will tamper with the iPad, and the iPad may go to sleep. To prevent this, use device management and Single App Mode to lock another app to the screen while your app updates.
In summary, using iPad devices as kiosks can save you lots of time and money. They are also an elegant, portable, and user-friendly solution. It may take some time and effort to plan their deployment, but you will realize the benefits immediately.
Whether the iPad devices you're managing are being used as kiosks or as everyday computing devices, Kandji can help you keep them all up to date and in your desired state. The Kandji team is constantly working on solutions to streamline your workflow and secure all of your Apple devices. With powerful and time-saving features such as zero-touch deployment , one-click compliance templates, and plenty more, Kandji has everything you need to bring your Apple fleet into the modern workplace.

See Kandji in Action
Experience Apple device management and security that actually gives you back your time.
Get Started Contact Us
Start Free Trial Contact Us
Standalone Intune and Safari on iOS in Kiosk mode
I had a scenario at a customer where I needed to set and iOS device in Kiosk Mode with the only allowed app, the Safari browser. Currently in Microsoft Intune Standalone when you select Kiosk Mode you have to select either a Managed App or a Store App when you select the Kiosk Mode option.
Let’s start with the background. To be able to set an iOS device in Kiosk Mode you need to configure it to “supervised mode” which have to be done with the Apple Configurator on an computer running OS X. When the device is in supervised mode enroll it in Intune as you normally would with any device, then we can configure Kiosk mode using Intune.
Create an iOS Configuration Policy with the following settings.

4. As soon as the policy is applied Safari will be launched on the iPad and you cannot close it or do anything else than browse the web using Safari.
If you want it out of Kiosk mode you can do any of these things:
- Choose to Retire it using the Intune console, it will be removed from Intune if you choose this option.
- Delete the deployment of the policy that has set it in Kiosk mode
- Delete it from the group where the policy is applied.
2 thoughts on “ Standalone Intune and Safari on iOS in Kiosk mode ”
A very helpful blog. to know more about “Single App Kiosk Mode: – http://blog.mobilock.in/2016/12/08/turning-android-devices-single-app-kiosk-mode/
How do you deploy the default home page or bookmarks in safari on managed IOS devices?
Leave a Reply Cancel reply
Your email address will not be published. Required fields are marked *
By using this form you agree with the storage and handling of your data by this website. *
This site uses Akismet to reduce spam. Learn how your comment data is processed .
Privacy Overview
- Alternative
- Write for Us
This mode restricts users from accessing other apps, notifications, or system settings when activated.
Essentially, the iPad becomes a dedicated device for that particular app or function, ensuring a focused and controlled user experience.
Are you a fan of an Apple product and want to purchase Apple Macbook , Watch , or tablet ? then must check our articles regarding all kinds of Apple alternative options.
Why Use iPad Kiosk Mode?
- Enhanced User Experience: You eliminate potential distractions by locking the iPad to a specific app. Whether a digital menu at a restaurant or an interactive display at a museum, users get a streamlined experience without unrelated notifications or prompts.
- Security: iPad kiosk mode ensures that users can’t tamper with the device settings or access unauthorized apps. It is especially crucial in public settings where you want to protect sensitive information or prevent misuse.
- Versatility: From trade shows and conferences to retail stores and educational institutions, the applications of iPad kiosk mode are vast. You can use it for registrations, surveys, digital catalogs, and interactive displays.
- Cost-Efficient: Instead of investing in specialized hardware for specific tasks, you can repurpose an iPad with kiosk mode. This saves money and offers the reliability and performance of Apple’s ecosystem.
- Easy Setup: Activating the iPad kiosk mode is straightforward. With just a few taps in the settings, you can transform your iPad into a dedicated kiosk with no technical expertise required.
- Data Collection: For businesses conducting surveys or gathering feedback, the iPad kiosk mode ensures consistent data collection without the risk of users navigating away or altering the process.
Components of an iPad Kiosk

- iPad Device : The primary component will display the content or run the application.
- Kiosk Stand : A physical stand or enclosure that holds the iPad securely, often with anti-theft features.
- Power Source : Ensures the iPad remains charged, mainly if it will be used for extended periods.
- Single App : The specific application or content you want to display.
How to Set Up iPad Kiosk Mode?
Two primary methods exist to set up an iPad in kiosk mode: Single App Mode and Guided Access.
Single App Mode

This feature locks the iPad to a single application, preventing users from accessing other apps, notifications, or system functionalities.
It’s perfect for presentations, point-of-sale systems, or educational apps where you want to keep the user’s attention undivided.
- Navigate to Settings: Start by unlocking your iPad and opening the app.
- Dive into Accessibility Options: Within Settings, scroll down and select Accessibility . This section houses various features to enhance the user experience, including our sought-after iPad kiosk mode.
- Activate Guided Access: You’ll find Guided Access under the Learning section. Tap on it and toggle the switch to ON . This feature is the foundation of the Single App Mode.
- Set a Passcode: For security, you’ll need to set a passcode, ensuring only authorized users can exit the Single App Mode. Pick a memorable yet secure passcode.
- Launch Your Desired App: Exit the Settings and open the app you wish to lock in Single App Mode.
- Activate Single App Mode: This action opens the Guided Access interface. Circle any screen areas to disable, adjust settings as needed, and tap Start in the top right.
- Enjoy a Distraction-Free Experience: Your iPad is now locked to the app you’ve chosen, providing users with a focused and streamlined experience.
- Exiting Single App Mode: To go to Single App Mode, triple-click the home (or top) button, enter your passcode, and tap End in the top left.
Guided Access

It’s the perfect tool for presentations, exams, or any scenario requiring undivided attention.
- Head to Settings: Kickstart the process by opening the Settings app on your iPad.
- Tap into Accessibility: Within Settings, go to Accessibility . This section houses various features, including our focus: iPad kiosk mode.
- Activate Guided Access: Scroll to find Guided Access under the Learning category. Toggle the switch to ON to activate this feature.
- Secure with a Passcode: You’ll need to set a passcode to ensure only authorized users can exit Guided Access. Choose a passcode that’s both memorable and secure.
- Launch Your Chosen App: Exit Settings and open the app you wish to lock using Guided Access.
- Engage Guided Access Mode: With your app open, triple-click the iPad’s home (or top) button to access the Guided Access interface. Adjust settings as needed, then tap Start to lock the app.
- Experience-Focused Interaction: Your iPad is now in a dedicated mode for the chosen app, ensuring users engage without distractions.
- To Deactivate Guided Access: To exit, triple-click the home button (or top button), enter the passcode, and tap “End” to return to the standard iPad mode.
How to Manage an iPad Kiosk?
Leveraging the iPad kiosk mode can transform the device into a single-purpose powerhouse.
However, managing it effectively is crucial to ensure optimal performance and user experience.
Here’s a guide to help you master the management of an iPad kiosk.
1. Regularly Update the Software
To ensure smooth operation and security, regularly check for iOS updates. Keeping the software up-to-date ensures that your iPad kiosk mode runs seamlessly and benefits from the latest features and security patches.
2. Monitor Battery Health
While iPads boast impressive battery life, keeping an eye on battery health is essential. Consider a permanent charging solution to prevent unexpected downtimes if the kiosk is continuously used.
3. Secure the Device Physically
A robust enclosure gives your kiosk a professional look and protects the iPad from theft or tampering. Ensure the enclosure has openings for charging and other essential functions.
4. Regularly Review App Performance
The app running in the iPad kiosk mode should be monitored for any glitches or performance issues. Regularly update the app and address any user feedback to enhance the experience.
5. Limit Notifications
To maintain a distraction-free environment, turn off unnecessary notifications. It ensures that users remain focused on the kiosk content without interruptions.
6. Backup Data
Suppose your kiosk regularly collects user data or feedback to back up this information. It ensures you don’t lose valuable insights due to any unforeseen issues.
Guided Access Vs Single App Mode
Let’s delve into the distinctions between these two modes to help you make an informed choice.
Guided Access: The User-Friendly Lockdown
- Purpose : Guided Access is designed for temporary sessions where the iPad needs to be restricted to a single app. It’s perfect for presentations, educational settings, or even handing your device to a child without worrying about them accessing other apps.
- Setup : Activating Guided Access is straightforward. Within the iPad’s settings, you navigate to Accessibility and toggle on Guided Access. Once set, a triple-click of the home button (or top button on newer models) activates this mode for the currently used app.
- Flexibility : One of the standout features of Guided Access is the ability to turn off specific touch areas on the screen, ensuring users don’t interact with certain buttons or features.
- Exit : Exiting Guided Access requires the same triple-click action, followed by a passcode input, making it user-friendly and easily reversible.
Single App Mode: The Dedicated Solution
- Purpose : Single App Mode is the go-to for businesses and institutions requiring a more permanent iPad kiosk mode solution. It’s ideal for point-of-sale systems, information kiosks, or any scenario where the iPad needs to run a singular app for extended periods.
- Setup : This mode requires a more involved setup, typically through Apple’s management tools like Apple Configurator or Mobile Device Management (MDM) solutions.
- Security : Single App Mode offers a higher level of security. Once activated, the device is locked to that specific app until an administrator decides otherwise.
- Exit : Exiting Single App Mode isn’t as straightforward as Guided Access. It requires the administrator to deactivate the mode through the management tool initially used for setup.
Setting up an iPad in kiosk mode can enhance user experience and provide specific services or information without distractions.
Whether you choose Single App Mode or Guided Access, it’s essential to understand their features and limitations to select the best option for your needs.
LEAVE A REPLY Cancel reply
Save my name, email, and website in this browser for the next time I comment.
Recent Posts

Citi App Not Working? Fix the App Now

Why is MyMazda App Not Working? Solutions for Android/iPhone

Chipotle App Payment Not Working? What to Do

Why is My Repost App Not Working? Reasons & Solutions

Why is My Pentair App Not Working? Troubleshooting Guide
- Disclaimers
- Cookie Policy
- Privacy Policy
How to enable kiosk mode on Apple (iPhone/iOS) devices?
What is apple kiosk/ios kiosk.
Apple Kiosk Mode or iOS Kiosk Mode is a restrictive mode available in iPhones to lock down devices to a single app or a specific set of apps. It's also commonly know as iOS app lock.
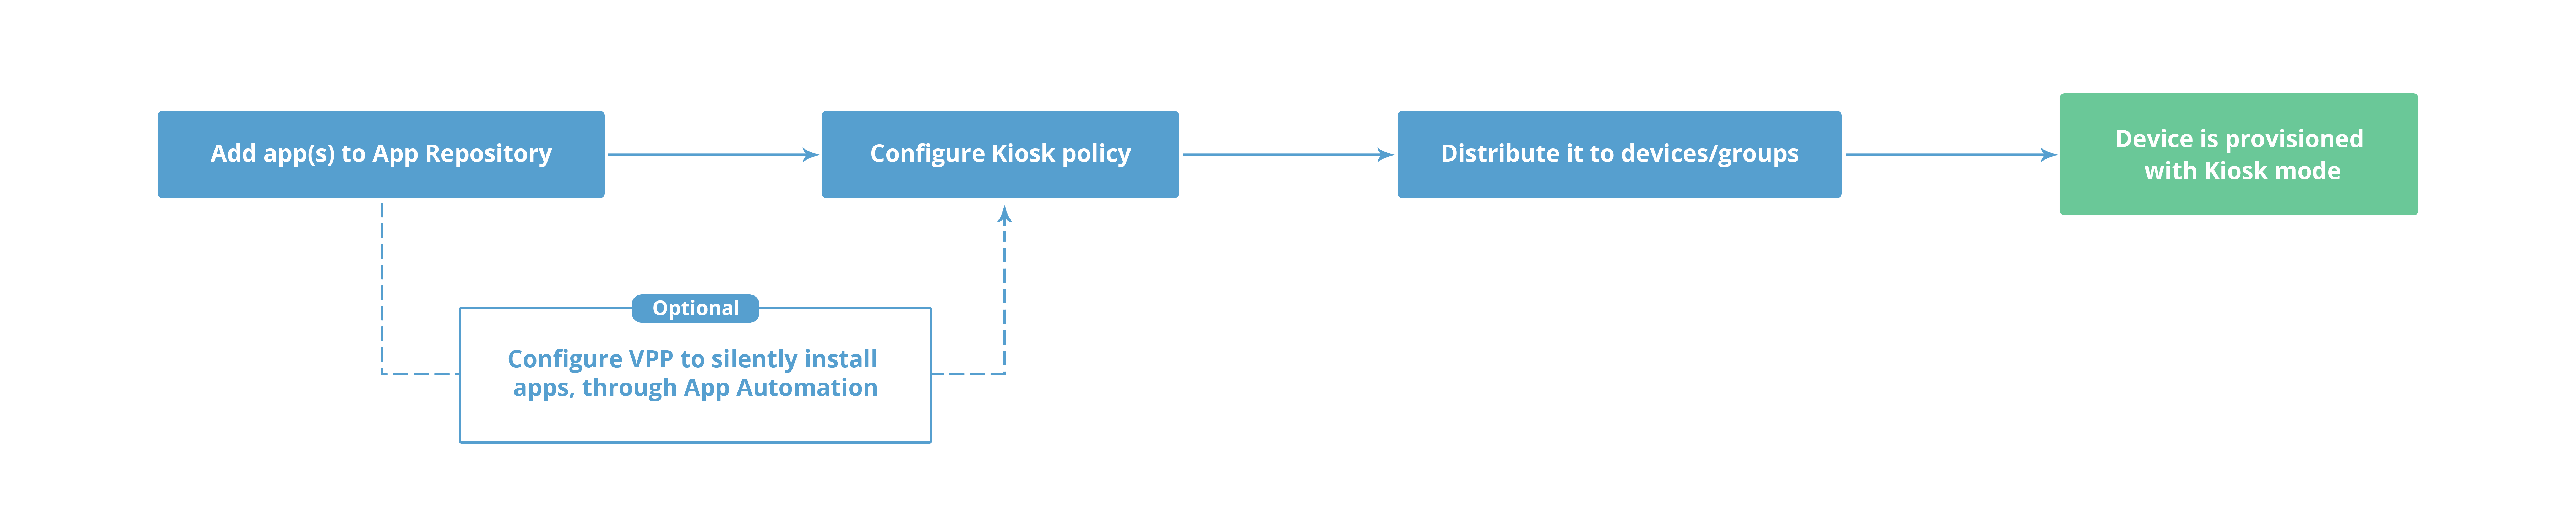
With iOS devices and single-purpose devices finding an exponential level of usage in organizations, ensuring devices are locked to specific apps and/or settings becomes a cumbersome task for system administrators. With Kiosk for iOS devices and iPad Kiosk Mode , this can be easily and efficiently solved as it lets you lock the devices to specific and/or settings as well as ensure the user cannot move away from the app or modify the settings. Additionally, users cannot access any other features present on the Apple device in Kiosk mode. The other advantage is that, you can also provision Web Shortcuts under Kiosk as well. You can enable kiosk for Apple TV and iOS devices. Kiosk can be understood better from the following flow diagram:
Pre-requisites
- The devices must be Supervised .
- For single-app Kiosk , iPhones and iPads must be running iOS 6 or later versions .
- For multi-app Kiosk , iPhones and iPads must be running iOS 9.3 or later versions .
- For Autonomous Single App Mode , iPhones and iPads must be running iOS 7.0 or later versions
- To facilitate automatic app installation and update, the apps provisioned in Kiosks must be purchased/approved through ABM .
Single App Mode (SAM)
Single App Mode lets you restrict a Supervised device to a single app and ensure only that app to stay in the foreground allowing the users to perform only specific tasks on the designated device. In addition, you can pre-configure device functionalities such as Touch, volume buttons, etc., to prevent users from modifying the configured settings on the device.
- Kiosk with web shortcut(s) - Set up a Kiosk device with access restricted to only a specified web shortcut while blocking access to the web entirely. You can force auto-refresh web shortcuts after specific time intervals. Auto-refresh clears the session and cookies ensuring the data entered by one user is not accessible to other users.
- Digital Signage - Create interactive customer experience by setting up a digital signage, designated for displaying engaging content at POS/POI terminals.
- POS Terminal - Lock devices to any point-of-service application to fit the business needs for hospitality, retail, health care and more.
- If an app is present in single app kiosk mode, permissions will be given by the user only once while launching the app, post which all permission prompts will be disabled.
- To power off a device in single app kiosk mode, try force restarting the device as shown here .
Multi App Mode
Multi App Mode restricts the corporate devices to two or more apps and web shortcuts approved by the organization, ensuring optimum use of the device for business, minimizing distractions and enhancing data security by preventing users from downloading any unapproved applications. Additionally, Multi App Mode is bundled with the perks of customizing the device Home screen and switching to Single App Mode for a particular duration using Autonomous Apps .
Autonomous Apps
Autonomous app lets you temporarily lock the device into a specific app which can enter and exit the Kiosk mode by themselves, preventing users from accessing other apps for a particular duration or until the task is completed. Enabling Autonomous app limits access, for eg: It allows us to give permission to a member from the IT department of a school which uses iPads to conduct quizzes and in case of any trouble, the member from the IT department can exit the kiosk mode in the device, rectify the problem and can relock automatically when the quiz app is laughed again. Note: Only apps that support Autonomous Single App Mode functionality as explained in Apple Developer document can be enabled using MDM Kiosk. To distribute specific profiles and apps to a group of devices, assign all the devices present in an MDM server in ABM to a group in MDM and distribute the required profiles and apps to that group.
Home Screen Layout Customization
Home screen Layout customization lets you tailor the Home screen to your preferences by organizing app or web shortcut icons on the Home screen and providing convenient access to apps/ web shortcuts users need the most. You can also add frequently used apps to the Dock for easier access when user swipes across any of the Home screen, and add pages or folders to the Home screen. Since Home screen customization prevents users from rearranging icons or uninstalling apps pinned to the Home screen, you can define a standardized layout on corporate devices, creating a consistent user experience while accessing the apps.
Watch this quick video to learn how to customize your device's Home Screen in a few minutes:
Note: Only web shortcuts added in the Kiosk profile can be customized to desired position. Web shortcuts added from other profiles will be listed after the ones configured in Kiosk profile.
Automate App Installation
MDM lets you automate installation of apps provisioned in Kiosk (both Store and enterprise apps) to ensure seamless Kiosk profile association. Enterprise apps provisioned in Kiosk will be silently installed on the devices once the profile is distributed to the devices. In case of Store apps, to automate Kiosk app installation, ABM needs to be configured to ensure apps install without requiring Apple ID and only apps purchased through ABM can be installed silently on the devices. You can learn more about silent installation of apps using ABM here .
It is recommended that you ensure the app has adequate licenses, before associating the Kiosk profile to groups/devices. You can know license details of any app by, navigating to App Repository and clicking on the app.
Automate App Updates
In addition to silent installation of apps provisioned in Kiosk, MDM also allows you to update these apps silently without any user intervention. For enterprise apps, the app gets updated in the background without affecting the app usage. The apps will be updated silently only if ABM is configured to ensure apps install without requiring Apple ID . While updating ABM-purchased apps, devices secured with a passcode are automatically locked over-the-air and in case of devices with no passcode, if ME MDM app is installed on the device, the app will be provisioned as the Kiosk app during the update or the device will be temporarily inoperable if ME MDM is not installed on the device . If the apps provisioned under Kiosk are not purchased via ABM, you need to remove the Kiosk profile, update the apps and then re-associate the Kiosk profile.
It is recommended that you update the apps during scheduled device maintenance to avoid operational breakages.
Provisioning app(s)/ web shortcut(s) under Kiosk
- You can provision apps added to the App Repository or already present in any one of the managed devices. This can include pre-installed apps, Store apps and enterprise apps.
- You can add new web shortcuts or provision web shortcuts already configured in other profiles.
- If a web shortcut is edited, it will also be modified in the Kiosk profile and updated in the Kiosk devices.
- In Multi App Mode, web shortcuts and bookmarks created by the users on the device will be displayed in addition to the ones provisioned in Kiosk profile.
Policy Description
- Distribute only one Kiosk profile to the managed devices to avoid profile conflicts.
- Go to Inventory and then to Apps tab.
- There, click on the Add New App button and add the apps that you are going to test on the iPads/other devices. We believe you will test a finite number of apps - so you can add all the app's bundle IDs here.
- Add these newly added apps to the kiosk profile that you have distributed to the device. Publish the updated profile and redistribute. We recommend testing the update on a few devices, before distributing the new profile to all.
In multi-app mode, Kiosk will be configured only for the apps present on the device. In case you have not automated app installation, you need to manually distribute app(s) that are/is not present on the device and install the app(s) silently or manually from the App Catalog. On successful installation of the app(s), the Kiosk Profile will automatically get re-associated to the device.
Note: In multi-app mode Kiosk, Settings and Phone are enabled by default.
Store apps can be manually updated by the user if App Store is provisioned as an app in Kiosk. Otherwise the app update needs to be distributed via MDM as explained here . In case of enterprise apps, you need to update the latest version of the source file (.ipa) on the App Repository and then update the app on the devices.
Once a device is put into Single App Mode, no permission prompt will be generated . This means that the app cannot access camera, contacts, or location services. These settings should be manually enabled on the device before putting the device into Single App Kiosk.
If you want to provision Web Shortcuts to open in a browser , you can do so only by setting up multi-app Kiosk with the browser app (ex: Safari) as one of the Kiosk apps . Once the web shortcut is opened in a browser, the shortcut icon configured in MDM gets replaced with the icon associated with the particular URL.
If an Apple device provisioned in iOS Kiosk mode has no network connectivity, the remote commands executed from the MDM Console like Scan or disassociating Kiosk profile will not be executed until the device comes into contact with the server. If the device has completely lost contact with the server, MDM Profile need to be removed to recover the device from Kiosk as explained here .
This action can be performed in the Inventory in MDM Console. Click on Inventory, go to Devices, click on Actions and select Restart Device.
How-To Geek
How to permanently disable incognito mode in your browser.
Deactivate private browsing mode.
Quick Links
Turning off vs. disabling incognito mode, how to disable incognito mode in chrome for windows, how to disable incognito mode in chrome for macos, how to disable private browsing in safari on iphone and macos, how to disable inprivate mode in edge for windows, can you disable private browsing in firefox, key takeaways.
- You can turn off private browsing in Chrome on Windows and macOS by running a command in Command Prompt and Terminal.
- In Microsoft Edge, you can turn off private browsing through Registry Editor. Unfortunately, there's no native way to turn it off in Firefox.
- You'll need to adjust content restriction settings to turn off private browsing mode in Safari on macOS and iOS.
If you share your phone or computer with children or minors and want to monitor their browsing activity, consider turning off the private browsing mode. Let's explore how you can turn it off in Google Chrome for Windows and macOS, Microsoft Edge for Windows, and Safari for iPhone and macOS.
If you've opened private browsing mode and only want to leave it, turning it off is simple in all major browsers on desktop and mobile devices . Just exit the browser completely, and you'll be out of incognito mode the next time you open it.
However, if you want to completely disable incognito mode to prevent others from using it on a device, you'll need to turn it off permanently, and that has a few more steps involved.
To turn off private browsing mode in Chrome on a Windows device, type CMD into the Windows Search bar, right-click the "Command Prompt" app, and select "Run as Administrator." Ensure you run the Command Prompt utility with administrative privileges to avoid encountering errors while turning off private browsing mode.
Once you've opened Command Prompt as an administrator, copy and paste the following command into the window, and then press the Enter key:
After executing this command, exit the Command Prompt window. You should now see that Incognito mode has been disabled (grayed out) in Chrome.
If you decide to re-enable private browsing later, use the above command again in Command Prompt, but replace the "1" with "0," like so:
To turn off private browsing in Chrome on a macOS device, first launch Terminal . Press Command+Space to open the Spotlight search window. Then, type Terminal and double-click "Terminal" in the search results to open it.
In the Terminal window, enter the following command:
Press Enter after typing the command.
After executing the command, close the Terminal window. You'll find that private browsing mode has been turned off in Chrome.
Safari doesn't offer a direct option to turn off private browsing mode. However, by adjusting content restrictions for web content, you can disable Safari's private browsing mode on both iPhone and macOS.
Disable Private Browsing on an iPhone
To adjust these permissions on an iPhone, open your device's settings and tap "Screen Time." If Screen Time isn't enabled, tap "Turn on Screen Time," then tap "Continue" on the following page to activate it.
Next, set up a passcode for Screen Time to prevent your child from making unauthorized changes. To do this, tap on "Use Screen Time Passcode," set a passcode, and confirm it on the next page. This will protect Screen Time with the passcode.
Now, navigate to "Content and Privacy Restrictions." Enable the toggle next to "Content and Privacy Restrictions" and tap on "Content Restrictions." You may need to enter the passcode to access the content restrictions settings.
In this menu, tap "Web Content" and select "Limit Adult Websites" from the available options. Once done, exit this menu, and you'll notice that the private browsing option is no longer available in Safari.
Disable Private Browsing on a Mac
To turn off private browsing mode on a macOS device, open System Preferences from the Dock, navigate to "Screen Time" in the left sidebar, and, under Restrictions, open "Content and Privacy" settings.
Enable the toggle next to Content and Privacy. Then, open the "Content Restrictions" settings and select "Limit Adult Websites" from the Access to Web Content menu. Once selected, click "Done" in the bottom-right corner.
Upon returning to Safari, you'll notice that the "New Private Window" option has now been grayed out, indicating that the private browsing mode has been successfully disabled.
If you use Microsoft Edge as your default browser on a Windows device, you can turn off private browsing mode via Registry Editor.
To open Registry Editor, press Win+R, type regedit , and press Enter. Then, click "Yes" in the User Account Control (UAC) window.
In the Registry Editor, navigate to HKEY_CURRENT_USER > Software > Policies > Microsoft > Edge.
If some of these keys don't exist already, you can create them by right-clicking and selecting New > Key. Then, rename the key accordingly.
Select "Edge," right-click in the right pane, select New > DWORD (32-bit) Value, and name it InPrivateModeAvailability . Double-click the value, set the Value Data to "1," and click "OK."
Now, close the Registry Editor and restart your Windows PC.
Misconfiguring Registry Editor can lead to severe consequences. Make sure to follow the above steps carefully when tweaking the keys. For added safety, you can make a backup of the Registry. .
Unlike other browsers, there's no browser or operating system-level solution to turn off private browsing in Mozilla Firefox. The only available method involves using an extension that turns off private browsing. However, due to the associated risks with third-party extensions, we strongly advise against using them.
If you use Firefox as the default browser, remove it from your computer, set Chrome or Edge as your default browser, and turn off private browsing for them. If you have a Windows laptop, you can use Microsoft's Family Safety app to restrict access to any browser other than Edge. Also, you can implement content filters within Edge to disable access to inappropriate content.
You can now prevent your child or other users from browsing privately.
While the above methods will turn off private browsing in browsers, keep an eye on your child whenever they browse the web. They may find ways to work around these restrictions.
Apple will relax repair policy to allow used genuine parts with select iPhones
Here’s an early Earth Day victory for the planet we all inhabit. Apple is relaxing the rules for its repair policies to allow used genuine parts for the first time. The change will apply to select iPhones and go into effect this fall.
Apple’s SVP of Hardware Engineering and maybe-future-CEO-who-knows John Ternus emphasized the environmental impact of the policy change:
“At Apple, we’re always looking for new ways to deliver the best possible experience for our customers while reducing the impact we have on the planet, and a key part of that means designing products that last,” said John Ternus, Apple’s senior vice president of Hardware Engineering. “For the last two years, teams across Apple have been innovating on product design and manufacturing to support repairs with used Apple parts that won’t compromise users’ safety, security, or privacy. With this latest expansion to our repair program, we’re excited to be adding even more choice and convenience for our customers, while helping to extend the life of our products and their parts.”
Apple explains that the repair policy change extends to biometric sensors as well:
Apple teams have been hard at work over the last two years to enable the reuse of parts such as biometric sensors used for Face ID or Touch ID, and beginning this fall, calibration for genuine Apple parts, new or used, will happen on device after the part is installed. In addition, future iPhone releases will have support for used biometric sensors.
Also making news, Apple is changing its requirement for a device serial number when ordering parts:
And in order to simplify the repair process, customers and service providers will no longer need to provide a device’s serial number when ordering parts from the Self Service Repair Store for repairs not involving replacement of the logic board.
Finally, there’s an Activation Lock element to the change to ensure stolen phones aren’t sold off for parts:
Apple will also extend its popular Activation Lock feature to iPhone parts in order to deter stolen iPhones from being disassembled for parts. Requested by customers and law enforcement officials, the feature was designed to limit iPhone theft by blocking a lost or stolen iPhone from being reactivated. If a device under repair detects that a supported part was obtained from another device with Activation Lock or Lost Mode enabled, calibration capabilities for that part will be restricted.
You can read the full announcement on Apple’s website here . We’ll update you as the changed announced today go live later this year.
FTC: We use income earning auto affiliate links. More.
Check out 9to5Mac on YouTube for more Apple news:

Zac covers Apple news, hosts the 9to5Mac Happy Hour podcast, and created SpaceExplored.com.
Apple mengumumkan fitur privasi dan keamanan baru
Fitur Privasi Memberikan Pengguna Kontrol yang Lebih Besar atas Data Mereka

Fitur-Fitur yang Dirancang untuk Membantu Melindungi Keselamatan Pengguna

Perlindungan Keamanan yang Andal untuk Melindungi Data Pengguna

Fitur-Fitur Lainnya yang Dirancang Berlandaskan Privasi dan Keamanan
- Periksa memudahkan pengguna untuk memberi tahu teman atau anggota keluarga bahwa mereka telah sampai di tempat tujuan dengan selamat. Setelah diaktifkan oleh pengguna, Periksa secara otomatis mendeteksi ketika pengguna sudah sampai di tempat tujuan, dan akan memberitahukan kepada kontak yang dipilih melalui Pesan. Jika sesuatu yang tidak diharapkan terjadi saat pengguna sedang dalam perjalanan, Periksa akan mengenali bahwa pengguna tidak mendekati arah tujuan yang telah ditentukan dan memeriksanya. Jika tidak ada respons, fitur ini akan membagikan informasi yang berguna, seperti lokasi persis pengguna, level baterai, status sinyal seluler, dan waktu aktif menggunakan iPhone terakhir mereka kepada kontak yang dipilih pengguna. Selain memudahkan pengguna untuk mendapatkan bantuan jika diperlukan, Periksa juga dirancang untuk menjaga privasi dan keamanan, sehingga pengguna tetap memegang kendali dengan menentukan kepada siapa mereka akan membagikan informasi, termasuk tujuan dan durasi waktu yang mereka tentukan. Pengguna dapat mengakhiri sesi Periksa kapan saja. Informasi yang dikirim pada Periksa dienkripsi secara menyeluruh, sehingga hanya dapat dibaca oleh anggota keluarga atau teman yang dipilih pengguna, bukan Apple atau pihak lainnya.
- Dengan NameDrop , pengalaman baru di AirDrop , pengguna dapat mendekatkan iPhone-nya dengan iPhone lainnya untuk membagikan informasi kontak kepada penerima yang diinginkan. Pengguna juga dapat memilih detail kontak tertentu yang mereka bagikan dan, yang paling penting, informasi yang tidak ingin mereka bagikan. Pengguna juga dapat membagikan konten seperti foto atau tautan dengan cara ini. Pengguna Apple Watch juga dapat menggunakan NameDrop dengan mengetuk tombol Bagikan di Kartu Saya pada aplikasi Kontak, atau dengan mengetuk komplikasi wajah jam Kartu Saya, lalu mendekatkan Apple Watch secara berhadapan dengan Apple Watch lainnya. Sama seperti semua pengalaman AirDrop, fitur-fitur baru ini juga mengamankan konten yang dibagikan dengan koneksi terenkripsi.
- Pesan Suara Langsung memudahkan pengguna mengetahui kapan harus menjawab panggilan telepon. Ketika seseorang menelepon dan mulai meninggalkan pesan, pengguna akan melihat transkripsi langsung selagi penelepon berbicara. Jika pengguna ingin berbicara dengan penelepon, ia dapat mengangkat panggilan tersebut kapan saja. Ketika Heningkan Penelepon Tak Dikenal diaktifkan, panggilan dari nomor tak dikenal akan langsung masuk ke Pesan Suara Langsung tanpa berdering sebelumnya. Panggilan yang teridentifikasi sebagai spam oleh operator tidak akan muncul sebagai Pesan Suara Langsung, dan akan langsung ditolak. Dengan begitu, spam, penipuan, atau panggilan yang mungkin mengganggu privasi dapat diabaikan tanpa melewatkan panggilan penting. Berkat keandalan Neural Engine, Pesan Suara Langsung terjadi sepenuhnya di perangkat, dan informasi ini tidak dibagikan kepada Apple.
Teks artikel ini
05 Juni 2023
PRESS RELEASE
CUPERTINO, CALIFORNIA Apple hari ini mengumumkan inovasi terbarunya dalam privasi dan keamanan, termasuk pembaruan besar pada Penelusuran Pribadi Safari, Kemanan Komunikasi, dan Mode Lockdown, serta peningkatan pada privasi aplikasi. Selain itu, Apple memperkenalkan fitur-fitur baru yang dirancang dengan berlandaskan privasi dan keamanan, termasuk Periksa, NameDrop, dan Pesan Suara Langsung. Upaya-upaya baru ini merupakan perwujudan dari keyakinan teguh Apple bahwa privasi adalah hak asasi manusia dan bahwa privasi yang baik berdiri di atas fondasi keamanan yang kuat.
“Privasi dirancang ke dalam setiap produk dan fitur Apple yang baru sedari awal,” kata Craig Federighi, Senior Vice President of Software Engineering Apple. “Kami selalu berupaya agar pengguna tetap memegang kendali atas data mereka dengan terus menyediakan fitur privasi yang terdepan di industri dan keamanan data terbaik di dunia. Pendekatan ini terlihat jelas pada sejumlah fitur di platform kami, seperti pembaruan besar pada Penelusuran Pribadi Safari, serta perluasan Mode Lockdown.”
Pembaruan Besar pada Penelusuran Pribadi Safari Safari telah menghadirkan penelusuran pribadi bertahun-tahun sebelum browser lain. Tahun ini, pembaruan signifikan semakin melindungi pengguna dari pelacak ketika menelusuri web, dan juga dari orang-orang yang memiliki akses ke perangkatnya. Bahkan, perlindungan pelacakan dan sidik jari tingkat lanjut juga membantu mencegah situs web menggunakan teknologi terbaru untuk melacak atau mengidentifikasi perangkat pengguna. Penelusuran Pribadi kini terkunci apabila tidak digunakan, sehingga pengguna tetap dapat membiarkan tab terbuka ketika beranjak dari perangkatnya.
Peningkatan pada Izin Privasi Foto Pemilih Foto baru yang tersemat dapat membantu pengguna membagikan foto tertentu kepada aplikasi dan tetap merahasiakan foto-foto lainnya di perpustakaan. Ketika aplikasi meminta akses ke seluruh foto dalam perpustakaan pengguna, pengguna akan melihat informasi selengkapnya tentang apa yang akan mereka bagikan, beserta pengingat tentang pilihan mereka yang muncul sesekali.
Perlindungan Pelacakan Tautan dalam Pesan, Mail, dan Penelusuran Pribadi Safari Beberapa situs web menambahkan informasi tambahan pada URL-nya untuk melacak pengguna di situs web lain. Kini informasi ini akan dihapus dari tautan yang dibagikan pengguna dalam Pesan dan Mail, dan tautan akan tetap berfungsi sebagaimana mestinya. Informasi ini juga akan dihapus dari tautan di Penelusuran Pribadi Safari.
Peningkatan Privasi Aplikasi Berbagai alat baru memberikan informasi lebih lanjut kepada para pengembang mengenai praktik data dari Perlengkapan Pengembangan Perangkat Lunak (SDK) pihak ketiga yang mereka gunakan dalam aplikasi mereka, sehingga mereka dapat memberikan Label Nutrisi Privasi yang lebih akurat. Perubahan ini juga meningkatkan integritas rantai pasok perangkat lunak dengan mendukung tanda tangan bagi SDK pihak ketiga untuk menambahkan lapisan perlindungan lain terhadap penyalahgunaan.
Keamanan Komunikasi Keamanan Komunikasi, yang dirancang untuk memperingatkan anak-anak ketika menerima atau mengirim foto dalam Pesan yang mengandung ketelanjangan, kini juga mencakup konten video selain gambar diam. API baru memungkinkan pengembang untuk mengintegrasikan Keamanan Komunikasi ke dalam aplikasi mereka. Selain itu, fitur ini kini akan membantu menjaga anak-anak tetap aman ketika mereka mengirim dan menerima AirDrop, pesan video FaceTime, dan ketika menggunakan aplikasi Telepon untuk menerima Poster Kontak dan pemilih Foto untuk memilih konten yang akan dikirimkan. Semua pemrosesan gambar dan video untuk Keselamatan Komunikasi berlangsung di perangkat, yang artinya Apple maupun pihak ketiga mana pun tidak dapat mengakses konten tersebut. Peringatan ini akan diaktifkan untuk akun anak dalam paket Keluarga Berbagi mereka, dan dapat dinonaktifkan oleh orang tua.
Peringatan Konten Sensitif Peringatan Konten Sensitif membantu pengguna dewasa agar terhindar dari gambar dan video telanjang yang tidak diinginkan ketika menerimanya dalam Pesan, AirDrop, pesan video FaceTime, dan aplikasi Telepon ketika menerima Poster Kontak, yang menggunakan teknologi perlindungan privasi yang sama yang merupakan inti dari Keamanan Komunikasi. Fitur ini opsional dan dapat diaktifkan pengguna di pengaturan Privasi & Keamanan. Sama seperti pada Keamanan Komunikasi, semua pemrosesan gambar dan video untuk Peringatan Konten Sensitif berlangsung di perangkat, yang artinya Apple maupun pihak ketiga mana pun tidak dapat mengakses konten tersebut.
Pembaruan Kata Sandi dan Kunci Sandi Untuk berbagi kata sandi dan kunci sandi dengan lebih mudah dan lebih aman, pengguna dapat membuat grup untuk berbagi beberapa kata sandi, dan semua orang dalam grup dapat menambahkan dan mengedit kata sandi agar selalu sesuai dengan yang terbaru. Karena dibagikan melalui Rantai Kunci iCloud, kata sandi selalu dienkripsi secara menyeluruh. Selain itu, kode verifikasi sekali pakai kali yang diterima di Mail kini akan terisi secara otomatis di Safari, sehingga proses masuk yang aman bisa dilakukan tanpa meninggalkan browser.
Mode Lockdown Mode Lockdown diperluas untuk memberikan perlindungan lebih besar kepada mereka yang mungkin menjadi sasaran spyware bayaran karena identitas atau pekerjaannya. Perlindungan baru mencakup standar konektivitas nirkabel yang lebih aman, penanganan media, standar berbagi media, sandboxing, dan pengoptimalan keamanan jaringan. Mengaktifkan Mode Lockdown akan semakin memperkuat pertahanan perangkat dan secara ketat membatasi fungsi-fungsi tertentu, dengan gesit mengurangi area serangan bagi mereka yang membutuhkan perlindungan tambahan. Selain itu, Mode Lockdown akan didukung di watchOS.
Fitur-fitur ini akan hadir dalam pembaruan perangkat lunak gratis tahun ini.
Press Contacts
Saluran Bantuan Media Apple
Gambar dalam artikel ini
Kontak Pers
IMAGES
VIDEO
COMMENTS
Run Safari In Kiosk Mode And Restrict It To One Domain. Hi. I have a requirement to display only one website in full-screen mode on iPad in kiosk mode. ... Apple may provide or recommend responses as a possible solution based on the information provided; every potential issue may involve several factors not detailed in the conversations ...
There's a plugin called Saft which enables kiosk mode in Safari. (Saft has been discontinued as of late 2012; it doesn't work beyond Safari 5.0.5.) If the computer is being used in public, create a new guest user in the system preferences and use this one for the fair. ... Chrome has a Kiosk mode for Mac OS. Sort of. You can pass it command ...
And also , if you click on apple logo on top left corner of the screen , scroll down click on lock screen it will lock immediately . See some screen shots in security and privacy . See if this helps. Parental Controls. Parental Controls System Preferences. Can safari be used as a kiosk?
Guided Access provides multiple tools to customize a kiosk experience on iPad. To set up kiosk mode for iPad, use the following steps: Open the Settings app. Tap Accessibility > Guided Access. Flip the switch to turn on Guided Access. Enable Passcode Settings and select Guided Access Passcode or Touch ID.
This can only be done on a Mac, as Apple Configurator only runs on Macs. With your iPad in Supervised Mode and connected to your Mac via a USB cable, open the Apple Configurator application and select the connected device. Click the "Actions" menu, point to "Advanced," and select "Start Single App Mode."
Mojave, Safari Kiosk Mode (real full-screen) So I had an Applescript that would open Safari, hit a URL, and transition to true full-screen (edge to edge content) using. do JavaScript "document.documentElement.webkitRequestFullscreen();" in document 1. In Mojave, that now states,
Name your Blueprint. Choose iPads only, since we are using only iPads. Go to File-> New Profile to create a new Profile to be attached to this blueprint.. Now go to Content Filter then click Configure. Choose Built-in: Specific Websites Only. Add the URLS that are allowed, click on the + icon. Type the URL, if you want to put it in bookmarks add a name otherwise leave it.
Easily turn any Mac into a standalone Kiosk featuring a full-screen web browser. Features. Kiosk provides you with powerful features that are easy to use. ... Presentation Mode. Use Kiosk to create non-interactive, automatically updating information displays. Customizable. Customize keyboard shortcuts, choose a monitor to use for display, hide ...
Kiosk Software for Mac. eCrisper makes it easy to turn a Mac into a secure public access Internet kiosk. It is used by schools, museums, hotels, churches, and libraries to reliably and elegantly give access to web content. Free lifetime support and upgrades. See list of features below.
To access the settings, you will have to triple click the top button again, tap the Guided Access popover again, and enter your passcode. There are several options. The defaults lock you into a ...
On your iPad, go to the settings and scroll down to the "Accessibility" section: Scroll down the "Guided Access" option and click into it: From here: Set up a passcode via the "Passcode Settings" option. This will let you lock down the iPad to a particular passcode. You'll need this passcode to exit Guided Access Mode.
At least on Windows version of Safari (5.1.7), To make it go full-screen you have to press F11. You will still see a tool-bar, but it should automatically hide after a few seconds, and then you will be in complete full-screen mode. Note: If you press F11 before all the content of your page are loaded, you might have some layout problems, so I ...
This blog post outlines how the Marriott Library manages Mac kiosks covering the original methods used in 2004 and changes and improvements including time consuming in-house development with Apple Safari and home folder cleanup, migration to commercial product named xStand, and then switching back to less intensive in-house development requiring updating and reverse engineering.
The best way to do this is by using Apple Business Manager and your device management solution. Apple Business Manager will also enable you to use Automated Device Enrollment (ADE) to automatically enroll new iPad devices into your device management solution—which makes setting up or replacing kiosk devices way easier.
Create a new "iOS Configuration Policy". 2. Enable the "Select a managed app that will be allowed to run when the device is in Kiosk mode:" if you browse you have to select either an application in the App Store or a managed app that you have deployed (.ipa). Instead of browsing simply type "com.apple.mobilesafari", then Safari is ...
The home for gaming on Mac machines! Here you will find resources, information, and a great community of gamers. Members Online. Can I use linux on a m1 pro macbook for gaming? ... Android Multi-App Kiosk mode auto start application upvote ...
Pick a memorable yet secure passcode. Launch Your Desired App: Exit the Settings and open the app you wish to lock in Single App Mode. Activate Single App Mode: This action opens the Guided Access interface. Circle any screen areas to disable, adjust settings as needed, and tap Start in the top right.
//Enter kiosk mode func KisokMode(){ let presOptions: NSApplication.PresentationOptions = [ .hideDock, // Dock is entirely unavailable. Spotlight menu is disabled. .autoHideMenuBar, // Menu Bar appears when moused to. .disableAppleMenu, // All Apple menu items are disabled.
Make sure the app you want to use in kiosk mode is installed on your iPad. On your Mac, download the Apple Configurator 2 app from the App Store. Connect the iPad to your Mac. Open Apple Configurator 2. Select the device and on the menu bar go to Actions>Advanced>Start Single App mode. Select the Supervise mode (this can be undone but you will ...
Apple kiosk mode helps enable access only to a single app or pre-defined apps on iPhone/iOS devices. Enable iPhone/iOS kiosk mode to limit access to apps and device functionalities with Mobile Device Manager Plus. ... Safari) as one of the Kiosk apps. Once the web shortcut is opened in a browser, the shortcut icon configured in MDM gets ...
Apple's WebKit team says that it has successfully improved Safari's Speedometer 3.0 score by ~60% between the release of Safari 17.0 in September and Safari 17.4's release in March. These ...
Safari browsing assistant rumored for iOS 18. In a post on social media today, code sleuth Nicolás Álvarez shared two new features in the works at Apple: According to Álvarez, both of these ...
Press Command+Space to open the Spotlight search window. Then, type Terminal and double-click "Terminal" in the search results to open it. In the Terminal window, enter the following command: Press Enter after typing the command. After executing the command, close the Terminal window. You'll find that private browsing mode has been turned off ...
Apple is alerting users to a new instance of an identified mercenary spyware attack on the iPhone. Possible victims have been sent an email from Apple describing how the attack could "remotely ...
Whether Apple has any major new AI features planned for Safari as part of iOS 18 this year remains to be seen. Follow Chance : Threads , Twitter , Instagram , and Mastodon .
Apple is relaxing the rules for its repair policies to allow used genuine parts for the first time. The change will apply to select iPhones and go into effect this fall. Apple's SVP of Hardware ...
CUPERTINO, CALIFORNIA Apple hari ini mengumumkan inovasi terbarunya dalam privasi dan keamanan, termasuk pembaruan besar pada Penelusuran Pribadi Safari, Kemanan Komunikasi, dan Mode Lockdown, serta peningkatan pada privasi aplikasi. Selain itu, Apple memperkenalkan fitur-fitur baru yang dirancang dengan berlandaskan privasi dan keamanan, termasuk Periksa, NameDrop, dan Pesan Suara Langsung.